
Owner`s manual


47
4. Local Console
This chapter explains how to operate the NetCommander IP via the local console. The local console allows you to access connected
computer/servers, configure the KVM’s network settings, and to configure some more basic settings specific to local access.
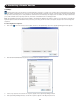
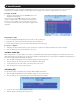
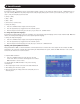
To display the OSD:
1. From the local keyboard, press the left Shift key twice. The
OSD Main window appears.
Lines with sun icons in the PM column show active computers/
servers. A computer that is connected, but is powered-off, does
not have a sun icon. When a server is busy (when an account is
accessing it in an Exclusive Session), the entire line appears in red
characters.
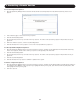
Navigating the OSD:
• To move the highlight bar throughout the list, press the [h] and [i] arrow keys.
• To jump from one column to the next (when relevant), press the [Tab] key.
• To exit the OSD or return to a previous window within the OSD, press the [Esc] key.
To select a computer:
1. Navigate to the desired port using the [h] and [i] arrow keys, or type the two-digit port number of the desired computer.
2. Press the [Enter] key. The selected computer is accessed.
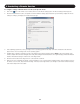
4.1 Move Label (F1)
When a Target Server is accessed via the local console, a Confirmation Label appears briefly, displaying the port number and name of the
Target Server being accessed. After a few seconds, the Confirmation Label disappears. You can position the Confirmation Label anywhere on
the screen using the OSD’s MOVE LABEL (F1) function.
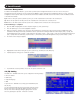
1. Open the OSD and highlight the desired computer using the [h] and [i] arrow keys.
2. Press the [F1] key. The selected port’s video and Confirmation Label appear.
3. Use the arrow keys to move the label to a desired position on the screen.
4. Press the [Esc] key to save the position and exit.
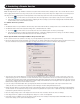
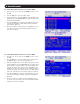
4.2 Tuning (F5)
You can tune the image of any Target Server using the OSD’s TUNING (F5) function.
1. Open the OSD and highlight the desired computer using the [h] and [i] arrow keys.
2. Press the [F5] key. The selected port’s video and the Image Tuning Label appears.
3. Use the [h] and [i] arrow keys to adjust the image.
4. When the image is satisfactory, press the [Esc] key.