
User Guide

27
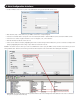
2. Web Configuration Interface
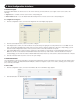
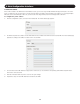
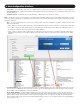
2. In the Account Blocking section:
•IntheBlock after field, enter in the number of unsuccessful login attempts that will be allowed in a given time period. This time period
is set in the attempts within (hr:min) field. Enter into this field the time in hours and minutes.
•IntheBlock account field, you can select the length of time that an account will be blocked for if it exceeds the number of
unsuccessful login attempts.
•Checkthefor period (hr:min) checkbox to block the account for a specified period of time. This time period is set in the hours and
minutes fields to the right of the for period (hr:min) checkbox.
•Checktheforever checkbox to block the account indefinitely.
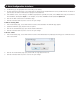
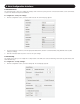
3. In the Password Policy section:
• Select the High security password policy checkbox to enable the high security password policy, or leave it unchecked to enable the
standard security policy to apply. Both security policies prohibit the use of the username being included in the password, and have a
maximumcharacterlimitof10.Thestandardsecuritypolicyrequiresonlythatthepasswordcontainatleastsixcharacters.Thehigh
securitypolicyrequiresthatthepasswordcontainatleasteightcharacters,andthatitcontainonenumber,oneupper-caseletter,
andoneofthefollowingspecialcharacters;!, @, #, $, %, ^, *, (), _, -, +, =, [], ’, :, ;, ?, /, or {}
• Check the Enable OSD passwordcheckboxtorequirethatausernameandpasswordbeenteredforlocaluseraccesstotheOSD.By
default,apasswordisnotrequiredtoaccesstheKVMviathelocalconsole.AccountscreatedintheWebCongurationInterfaceare
used for both local and remote access.
4. There is only one field in the Idle Timeout portion of the Security page;Disconnect after. In this field, select the amount of time that an
account can be idle before it is automatically disconnected from the system. Select No Timeout to disable this feature.
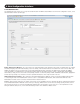
5. The Serial Terminal Policy portion of the Security pageallowsyoutoenableaccesstotheconnectedserialdevicesviayourownSSH
client(e.g.PuTTY,SecureCRT,etc.).Bydefault,thisisdisabled,sothatanaccountmustopentheWebCongurationInterfaceand
double-click on the serial ports in the My Targets screenlisttoaccessthemviatheNetCommanderIP’sinternalSSHclient.Toenable
directSSHconnection,checktheEnable direct SSH connection checkbox and enter in the desired TCP port numbers for serial ports 1
and2(bydefault,thesearesetto4001and4002).YoucanthenaccesstheconnectedserialdevicesusingyourownSSHclientby
providing 1) the IP address of the NetCommander IP, 2) the TCP port number for the desired serial device, and 3) your KVM username
and password.
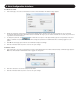
6. After changing any settings in the Security page, click the Save button at the top of the page to save your changes.
7. Upon clicking Save, you will be prompted to reboot the KVM to finish implementation of the new Security settings. Click Yes to proceed.