
Owner`s manual
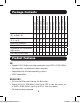


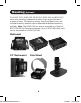


TO DVI SOURCE
RJ45 JACK
Cat5/5e/6
PATCH CABLE
LOCAL UNIT
POWER
JACK
REMOTE UNIT
TO DVI MONITOR
B140-101 — Up to 100 ft. at 1024 x 768 (60 Hz), or up to 50 ft. at 1920 x 1080 (60 Hz)
B140-1P1-WP-1 — Up to 75 ft. at 1024 x 768 (60 Hz), or up to 50 ft. at 1920 x 1080 (60 Hz)
B140-101X and B140-1A1-WP — Up to 200 ft. at 1024 x 768 (60 Hz), or up to 150 ft. at 1920 x 1080 (60 Hz)
9
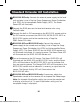
Standard Extender Kit Installation
(B140-101, B140-1P1-WP-1, B140-101X, B140-1A1-WP)
Notes:
1. The diagram below shows a B140-101X installation. Installation will
be the same for the B140-1A1-WP. Installation will be similar for the
B140-101 and B140-1P1-WP-1, except that they will not require
external power.
2. Test to make sure that the entire installation works properly before
pulling cables through ceilings/walls.
3. To achieve maximum distance and performance, use 24 AWG Solid
Wire Cat5e/6 cable. Using stranded wire cable, or cable with a gauge
(AWG) size higher than 24 AWG, will result in lesser performance
and shorter extension distance. Tripp Lite N202-Series (Cat6) patch
cables are made with 24 AWG Solid Wire cabling.
1
Make sure power to the DVI source is turned off.
2
Connect the built-in DVI connector on the B140-101 or B140-101X
local unit to the DVI source, or connect the B140-1A1-WP or
B140-1P1-WP-1 local unit to the source using a Tripp Lite
P561-SeriesDVIcable.
201110026-93-3094-EN.indd 9 11/3/2011 11:37:08 AM