
Owner`s manual


6
Standard Installation continued
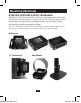
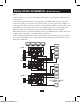
4. Connect the external power supply to the B140-002 or B140-004
local unit and plug it into a Tripp Lite Surge Suppressor, PDU or
Uninterruptible Power Supply (UPS). The green RJ45 LEDs and red
Power LED on the B140-004 will illuminate to indicate power is being
received from the external power supply. The green RJ45 LEDs on the
B140-002 will illuminate to indicate power is being received from the
external power supply.
5. Using Cat5e/6 cable, connect one of the RJ45 output ports on the local
unit to the RJ45 input port on the B140-1P0 or B140-1A0 remote unit; or,
connect it to the 110 punchdown jack on the B140-1P0-WP or
B140-1A0-WP remote wallplate.
6. Repeat step 5 for each additional remote unit you are connecting.
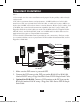
7. B140-1A0 and B140-1A0-WP Only: Connect the external power supply
to the B140-1A0 or B140-1A0-WP, and plug it into a Tripp Lite Surge
Suppressor, PDU or Uninterruptible Power Supply (UPS).
The green RJ45 LED on the B140-1A0 and the green LED on the B140-
1A0-WP will illuminate to indicate that the unit is receiving power.
8. Repeat step 7 for each additional B140-1A0 or B140-1A0-WP in the
installation.
9. Connect the B140-1P0 DVI-D Single-Link connector to the monitor; or,
connect the B140-1P0-WP, B140-1A0 or B140-1A0-WP to the monitor
using a Tripp Lite P561-Series DVI-D Single-Link Cable. The green RJ45
LED on the B140-1P0, and the green LED on the B140-1P0-WP illuminate
to indicate the unit is receiving power from the monitor.
10. Repeat step 9 for each additional monitor you are connecting.
11. Turn on the power to the DVI source. The orange RJ45 LEDs illuminate on
the B140-002, B140-004 and B140-1A0, and the orange LED illuminates
on the B140-1A0-WP to indicate the unit is receiving a signal from the
source. The screen should now be displayed on the connected monitors.
12. If necessary, use the Equalization control on the B140-1A0 or
B140-1A0-WP to adjust the video image. Note: If your monitor does not
display a picture at all, the Equalization control may need to be adjusted.
Try each Equalization setting until a picture is displayed.
201007212 93-2986.indb 6 9/1/2010 3:48:11 PM