Owner's Manual SmartPro NET SmartPro XL ® ® 1111 W. 35th Street Chicago, IL 60609 USA Customer Support: (773) 869-1234 www.tripplite.com 1250–3000 VA Intelligent Network UPS Systems (120V) ESPAÑOL: p. 8 FRANÇAIS: p. 15 Safety: p. 2 Installation: p. 3 - 4 Basic Operation: p. 4 - 6 Storage & Service: p. 7 Specifications: p. 7 Warranty & Insurance: p. 6 Copyright © 1999 Tripp Lite. All rights reserved. SmartPro® is a registered trademark of Tripp Lite.
Important Safety Instructions SAVE THESE INSTRUCTIONS This manual contains important instructions and warnings that should be followed during the installation, operation and storage of all Tripp Lite UPS systems. Failure to follow these warnings will void your warranty. UPS Location Warnings • Install your UPS indoors, away from excess moisture or heat, conductive contaminants, dust or direct sunlight. • For best performance, keep the indoor temperature between 32° F and 104° F (between 0° C and 40° C).
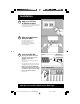
Installation 1 Plug your UPS into an electrical outlet. See “Suggested Circuit” in Specifications section to determine if your model should occupy a 20or 30-amp dedicated circuit. 2 Plug your equipment into your UPS. Your UPS is designed to support only computer equipment. Connecting household appliances, laser printers or surge suppressors is not recommended. 3 Turn your UPS ON. · Set the System Enable Switch (DIP Switch #4, UPS back panel) to the “ENABLE” (UP) position.
DB9 Port Connection –Optional–* 1 Using Tripp Lite cable, connect your primary server’s DB9 port to the single DB9 port labeled “SMART” (which provides complete intelligent RS-232 communications).** 2 If you have additional computers: a. Connect them to the DB9 ports labeled “BASIC” (which provide basic, contact-closure shutdown capabilities). b. Set their corresponding LAN Interface DIP Switches to the ACTIVATE (DOWN) position. See diagram for which switch controls which port.*** 2a.
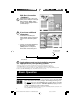
ON/Standby Switch This momentary switch controls power to the UPS receptacles. Engage it momentarily and release it to toggle between the “ON” mode (power ON at the UPS receptacles) and “Standby” mode (power OFF at the UPS receptacles). Mute/Test Switch Use this momentary switch to do two things: Silence the blackout alarm Engage this switch and release it. Note: when the battery is nearly depleted, the alarm resumes (and cannot be silenced) to alert you to immediately shut down connected equipment.
This multi-colored light displays 4 separate UPS load conditions. It will turn from green (low) to yellow (medium) to red (high) as you connect equipment to show you the load level your UPS is supporting. When the light is red your UPS is supporting a load above 85% of its capacity. If the red light begins flashing, your UPS is severely overloaded. Remove overload immediately until light stops flashing.
Storage & Service Storage Turn your UPS OFF: first, engage the ON/Standby Switch and release it to place your UPS in the “Standby” mode; then set the System Enable Switch (Jumper #4, UPS rear panel) to “DISABLE” (Down); finally, disconnect the UPS power cord from the wall outlet. If you plan on storing your UPS for an extended period of time, recharge the UPS batteries once every three months. Follow steps #1 and #3 in the Installation section and allow the UPS to charge from 4 to 6 hours.
1111 W. 35th Street, Chicago, IL 60609 USA 773.869.1234 (USA) • 773.869.1212 (International) www.tripplite.