200607114 93-2586 SMART2200RMXL2U OM.qxd e Y nc NT ION a cha uct! A d RR AT y for pro nty WA ISTRe toda p Litewarra G lin Trip m/ RE r on EE .co te FR lite gis a ipp Re win w.tr to ww 7/21/2006 2:04 PM Page 1 Owner’s Manual SmartPro Rackmount ® Intelligent, Line-Interactive UPS Systems 100/110/120V Sine Wave Input/Output • 2200VA • Extended Run Model: SMART2200RMXL2U Not suitable for mobile applications.
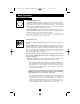
00607114 93-2586 SMART2200RMXL2U OM.qxd 7/21/2006 2:04 PM Page 2 Important Safety Instructions SAVE THESE INSTRUCTIONS This manual contains important instructions that should be followed during the installation, operation and storage of all Tripp Lite UPS Systems. Failure to heed these warnings will void your warranty. UPS Location Warnings • Use caution when lifting UPS. Because of the considerable weight of all Rackmount UPS systems, at least two people should assist in lifting and installing them.
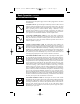
200607114 93-2586 SMART2200RMXL2U OM.qxd 7/21/2006 2:04 PM Page 3 Mounting (Rack) Mount your equipment in either a 4-post or 2-post rack or rack enclosure. The user must determine the fitness of hardware and procedures before mounting. If hardware and procedures are not suitable for your application, contact the manufacturer of your rack or rack enclosure. The procedures described in this manual are for common rack and rack enclosure types and may not be appropriate for all applications.
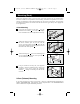
200607114 93-2586 SMART2200RMXL2U OM.qxd 7/21/2006 2:04 PM Page 4 Mounting (Tower) Mount your UPS models in an upright, tower position using included hardware. The user must determine the fitness of hardware and procedures before mounting. 1 Stand your UPS on its side with the LED/Control panel at the top. Attach one rack mounting ear A to each side of the UPS using included screws B . Attach the rack mounting ears to the floor with user-supplied hardware.
200607114 93-2586 SMART2200RMXL2U OM.qxd 7/21/2006 2:04 PM Quick Installation 1 With the UPS disconnected from utility power, use a small tool to set the Voltage DIP Switches to match your input voltage (UPS is preset to the 120V setting). 2 Plug the UPS into an outlet on a dedicated circuit.* 1 NOTE! after you plug the UPS into a live AC outlet, the UPS (in “Standby” mode) will automatically charge its batteries,** but will not supply power to its outlets until it is turned ON (see Step 3 below).
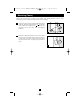
200607114 93-2586 SMART2200RMXL2U OM.qxd 7/21/2006 2:04 PM Page 6 Optional Installation These connections are optional. Your UPS will function properly without these connections. 1 USB and RS-232 Serial Communications Use the included USB cable (see 1a ) and DB9 serial cable (see 1b ) to connect the communication port on your computer to the communication port of your UPS. Install on your computer the Tripp Lite PowerAlert Software appropriate to your computer’s operating system.
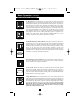
200607114 93-2586 SMART2200RMXL2U OM.qxd 7/21/2006 2:04 PM Page 7 Basic Operation Buttons (Front Panel) “ON/OFF/STANDBY” Button • To turn the UPS ON: with the UPS plugged into a live AC wall outlet*, press and hold the “ON/OFF/STANDBY” button for one second.** Release the button. If utility power is absent, you can “cold-start” the UPS (i.e.: turn it ON and supply power for a limited time from its batteries***) by pressing and holding the “ON/OFF/STANDBY” button for one second.
200607114 93-2586 SMART2200RMXL2U OM.qxd Basic Operation 7/21/2006 2:04 PM Page 8 continued Indicator Lights (Front Panel) All Indicator Light descriptions apply when the UPS is plugged into a wall outlet and turned ON. “POWER” LED: this green LED lights continuously when the UPS is ON and supplying connected equipment with AC power from a utility source.
200607114 93-2586 SMART2200RMXL2U OM.qxd Basic Operation 7/21/2006 2:04 PM Page 9 continued Other UPS Features (Rear Panel) 15 amp/120V NEMA 5-15R AC Receptacles: Your UPS features 15- and 20-amp AC outlets. These output receptacles provide your connected equipment with AC line power during normal operation and battery power during blackouts and brownouts. The UPS protects equipment connected to these receptacles against damaging surges and line noise.
200607114 93-2586 SMART2200RMXL2U OM.qxd Basic Operation 7/21/2006 2:04 PM Page 10 continued Power Sensitivity Adjustment: This dial is normally set fully counter-clockwise, which enables the UPS to provide maximum protection against waveform distortions in its AC input. When such distortion occurs, the UPS will normally switch to providing sine wave power from its battery reserves for as long as the distortion is present.
200607114 93-2586 SMART2200RMXL2U OM.qxd 7/21/2006 2:04 PM Page 11 Storage and Service Storage Before storing your UPS, turn it completely OFF: with the UPS ON and receiving utility power, press and hold the “ON/OFF/STANDBY” button for one second (an alarm will beep once briefly after the interval has passed); then, unplug the UPS from the wall outlet.
200607114 93-2586 SMART2200RMXL2U OM.qxd 7/21/2006 2:04 PM Page 12 Battery Replacement Under normal conditions, the original batteries in your UPS will last many years. See Safety section before replacing batteries. The batteries are designed for hot-swap replacement (i.e. leaving the UPS in ON mode), but some qualified service personnel may wish to put the UPS in the OFF mode and disconnect equipment before proceeding.
1111 W. 35th Street, Chicago, IL 60609 USA 773.869.1234 (USA) • 773.869.1212 (International) www.tripplite.