ty n: r a ite ty an tio ay fo ipp L rran r ar ra od Tr /wa W ist ine t REE com g nl a F te. Rester o win rippli gi to .t re ce ww w an — h c uct d o pr Owner’s Manual USB to VGA/DVI Adapter Model #: U244-001-R USB to VGA Adapter Model #: U244-001-VGA-R USB to HDMI Adapter Model #: U244-001-HDMI-R Table of Contents 1. Introduction 1.1 Features 1.2 Package Contents 1.3 System Requirements 2. Installation 3. Using the Adapter 3.1 Display Properties 3.2 Extending Video to the Add-On Display 3.
1. Introduction 1.1 Features • Adds an additional monitor, LCD or projector through a single USB 2.
1. Introduction Computer requirements when using 1 – 2 display adapters: • 1.2GHz Single Core CPU • 512MB memory Computer requirements when using 3 display adapters: • 1.8GHz Single Core CPU • 1GB memory Computer requirements when using 4 – 6 display adapters: • 1.6GHz Core Duo CPU • 1GB memory Note: Only 1 added monitor can support DVD playback. In order to support DVD playback, your computer must meet the following requirements: • 2.
2. Installation 2. For Windows users, the set-up process will begin automatically. For Mac users, an install screen will appear with a Display Link Software Installer link. Click this link to begin installation. Follow the prompts that appear to complete the process. 3. When this process is complete, you will need to restart your computer to finish the installation. 4. After restarting your computer, connect the included USB cable from an available USB 2.0 port to the display adapter. 5.
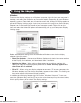
3. Using the Adapter Windows To access the display settings on a Windows computer, right-click on your computer’s desktop, and select the Properties or Personalize option, depending on your Windows operating system. From there you will need to access the Settings or Display option to get to the Display Settings page. A quick way to access this page is to use the display adapter icon in the lower-right corner of your computer screen.
3. Using the Adapter Note: • The display adapter icon only appears in the lower-right corner of Windows computers, and offers a quick way to adjust the display(s) settings. The settings available in this right-click menu may vary depending on your Windows operating system. • Only Mirror mode is supported under Windows Vista Display Driver Model (WDDM) mode.
3. Using the Adapter 2. Select the monitor icon that represents the add-on display you wish to change, or choose the add-on display from the drop-down menu. The primary display is always icon 1. 3. Once you’ve selected the monitor icon for the add-on display, check the checkbox to extend video onto the monitor, or select the extension option from the drop-down list. 4. Drag the monitor icons in the Display Settings page so that they are positioned to replicate the location of the actual displays.
3. Using the Adapter 3.3 Mirroring Video on the Add-On Display To display the same thing on both the primary and add-on display, follow the steps below: Windows 1. Open your computer’s Display Settings page. 2. Select the monitor icon that represents the add-on display you wish to change, or choose the add-on display from the drop-down menu. The primary display is always icon 1. 3.
3. Using the Adapter 2. Select the monitor icon that represents the add-on display you wish to change, or choose the add-on display from the drop-down menu. The primary display is always icon 1. 3. Check the box next to This is my main monitor and click the Apply button to make the add-on display the primary display for the computer. Note: • Some computers require you to first un-select the original primary display before setting a new primary display.
4. Troubleshooting Q: Why is the add-on monitor flickering? A: This is usually caused by a low refresh rate. When in “Mirror Mode,” increase the refresh rate of the main monitor. This will in turn increase the refresh rate of the add-on monitor, which should stop the flickering. When in “Extended Mode,” increase the refresh rate of the add-on monitor.
4. Troubleshooting Q: In “Extended” mode, why does the cursor disappear? A: If you’re in extended mode but have not yet connected the add-on monitor to the U244-001-R, the desktop will still pan to the add-on monitor. It’s possible that your cursor has moved to the extended desktop and is no longer visible on the primary display. When this occurs, try the following: • Connect the add-on monitor to the U244-001-R. You should be able to see the mouse cursor once the computer screen is displayed.
6. Warranty and Warranty Registration 1-Year Limited Warranty Tripp Lite warrants its products to be free from defects in materials and workmanship for a 1-year period from the date of retail purchase by end user. Tripp Lite’s obligation under this warranty is limited to repairing or replacing (at its sole option) any such defective products.To obtain service under this warranty you must obtain a Returned Material Authorization (RMA) number from Tripp Lite or an authorized Tripp Lite service center.