
User Manual


5
Installation
Notes:
• Only one monitor can be connected at a time.
• Only one memory card slot can be used at a time.
• When connected to power through USB-C charging port, 15W is dedicated to
docking station and connected USB peripherals. Remaining power is used to
charge connected USB-C device.
• See Optional Accessories section for suggested cables.
• When the unit is connected to the USB-C port on your computer and to
a network via Cat5e/6 cabling, a network connection will be automatically
established. If no connection is made, you can manually establish one by going
to your computer’s network settings page. For example, on a Mac you would
navigate to the Network section found in System Preferences, click the ‘Assist Me’
button to get to the Network Setup Assistant, then follow the prompts to establish
a connection.
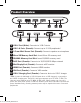
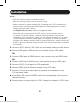
1. Connect USB-C port to USB-C port on your laptop, tablet or other device.
2. Connect VGA port to VGA port on your monitor using a VGA cable.
OR
3. Connect HDMI port to HDMI port on your monitor using an HDMI cable.
OR
4. Connect mDP port to mDP port on your monitor using an mDP cable.
5. Connect USB 3.0 hub ports to USB peripherals.
6. Connect RJ45 port to Ethernet network using UTP cable.
7. Connect 3.5 mm mini stereo port to speaker or microphone using
3.5 mm audio cable.
8. Insert Micro SD and/or SD/MMC card into corresponding slot to access
external memory.
9. Charge device by connecting its USB-C charger to adapter’s USB-C port.
20-03-062-93356F_RevF.indd 520-03-062-93356F_RevF.indd 5 3/6/2020 2:28:48 PM3/6/2020 2:28:48 PM