
Instructions / Assembly


Installation & Assembly Instructions
Please contact our Customer Service Division with any questions at:
30700 D Carter Street ∙ Solon, OH 44139 ∙ (P) 440.248.5480 ∙ support@tritonproducts.com
For a full line of products visit www.tritonproducts.com 2 INDB703
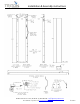
angle bracket with preinstalled fasteners on rail end bracket. Partially install (4) ¼” bolts with cut lock washers.
Install bolts about half way only. (Repeat steps 2 thru 4 for opposite end.)
5. (Refer to Figure 2-1 and 2-3) Installing Top Rail: Top rail will be positioned between corner angle brackets
installed at each end. Insert top rail from the underneath at slight angle and let set on bolts/fasteners of rail end
brackets. Using holes located on the top front edge of corner angle bracket insert hex head bolt with star lock
washers through corner angle and into corner threaded insert in top rail. (Repeat for all four top corners.)
6. Installation internal center supports (Refer to Figures 1-1 parts call out, 2-1 and 2-4). Center support braces will
be placed inside of angle brackets and run the length of the cart. (figure 2-4) Each center support will be installed
with their flat edges without bolts facing up. From the end of each angle bracket install hex head bolt with cut
lock washer center point at each end. (Repeat for opposite end.)
7. (Figure 2-3) Tighten all (4) top end bolts used to attach corner angle brackets to rail end brackets at both ends.
8. (Figure 2-1) Pull handle installation: Locate the right corner angle bracket with the 4 extra holes at the top. Install
pull handle using ¼” tapered head bolts. (Note: handle will be positioned at end of tool cart that swivel casters
will be installed on.)
9. (Figure 1-2) Installation of Casters: Swivel casters will be installed on the end of tool cart with handle: With cart
on its side insert ¼” hex head bolts with cut lock washer through caster mount plate and through holes in bottom
tray, install ¼” flat washer and secure in place using ¼” hex head nut. Tighten securely after all 4 bolts have been
installed. (Repeat for each caster.)
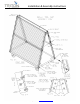
10. Installation of DuraBoard: Each 24”x48” sheet of DuraBoard (polypropylene pegboard) has 16 pre-drilled
oversized mount holes around its perimeter. Each board will be installed lengthwise (left to right.) From the front
of the tool cart, remove hex head bolt and star washer from the top left corner. Align the pre-drilled hole in the
upper left-hand corner of the DuraBoard with bolt hole in angle bracket and fastener installed in top rail. Reinstall
the ¼” hex head bolt with star lock washer (Repeat process for all (4) corner installations for each side). Locate
balance of oversized holes around the perimeter of the DuraBoard that align with pre-installed fasteners in corner
angle brackets and center support and install ¼” hex head bolts with star lock washers. (Keep all bolts loose until
finished installing the DuraBoard.)
11. Once all fasteners have been installed around all DuraBoards, securely tighten all ¼” fasteners throughout
assembled cart.
Secure storage for all items can be achieved using DuraHook™ double locking pegboard hooks.