
Installation Instructions

Installation & Assembly Instructions
Please contact our Customer Service Division with any questions at:
30700 D Carter Street ∙ Solon, OH 44139 ∙ (P) 440.248.5480 ∙ support@tritonproducts.com
For a full line of products visit www.tritonproducts.com 1 INDB705
Read all instructions completely before installing. Should you have any questions about your
installation, please call Customer Service at 440-248-5480
Tools needed for this installation (not supplied with kit): Level, Tape Measure, Drill, Drill Bits and Phillips
Head Screwdriver
1. Review Carton Contents: (2 Boxes Make Up This Kit)
2 Pcs. Pegboard 24" x 48" x 1/4” Thick
75 Pcs. Assortment DuraHook® Locking Pegboard Hooks
4 Pcs. BinClips for hanging Plastic Bins
4 Pcs. Hanging Plastic Bins
85 Pcs. Lock Screws for hooks (short screws packaged separately)
16 Pcs. #12-2" long mounting screws
16 Pcs. #12 plastic wall anchors
16 Pcs. Metal wall mounts/spacers
2. Wall Mounting Instructions: pegboards can be mounted to walls in separate locations, side by side
horizontally or above one another vertically.
A) Determine the location or locations where you want to mount your new storage system.
B) Determine if you want to mount boards (a.) side by side horizontally (b.) above or below one
another, or (c.) in different locations from each other.
C) Using one sheet of the pegboard determine the location and height you wish to mount your
storage system.
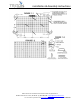
D) (Using diagram 1-1) Hold one sheet of pegboard flat against the wall surface, use level to
make sure board is level and square.
E) (Using diagram 1-1) While still holding pegboard flat against wall level and using a pencil,
make a circular trace inside of all (8) hole locations using diagram 1-1. (If planning to mount
boards in totally separate locations go on to step (H)
F) If you’re planning to mount the second pegboard directly to the side or above or below the
first: Hold the first pegboard flat against the wall while making sure all 8 traced holes are
still aligned with appropriate holes in pegboard. Using a pencil, trace the outer edge of the
board you’re planning to mount the second board against.
G) If mounting side by side or above or below one another: use the second board in your kit,
align outer edge with the pencil mark created in step (F). Do not cover up pencil mark with
board. Mark hole locations as called out in step (E).
DB-2-83 | TPB2-83 (2) 24x48x1/4” Pegboards, 79 Hooks, 4 Bins