
Instructions / Assembly


Installation & Assembly Instructions
Please contact our Customer Service Division with any questions at:
30700 D Carter Street ∙ Solon, OH 44139 ∙ (P) 440.248.5480 ∙ support@tritonproducts.com
For a full line of products visit www.tritonproducts.com 1
Read all instructions completely before installing. Should you have any questions about your
installation, please call Customer Service at 440-248-5480
NOTE: All systems must be secured to structurally sound, flat walls
Step 1. Remove all parts from carton and inventory all components.
Parts Inventory
(2) Panel frame sections 48”W x 48”H black (55” Wide with arm extensions)
(1) Panel frame section 48”W x 48”H (No arm extension)
(6)Sheets of 1/4” tempered pegboard with 1” on center (O.C.) hole spacing
(2) Wall mount angle plates 3” x 3” x 4” long.
(4) 3/4" X 1-3/4” Phillips flat head masonry screws (for wall mounting angle
attachments)
(2) 3/8”-16 x 2-1/4” Hex head bolt (pivoting pins)
(4) 3/8” Flat washers (for pivoting pins)
(4) 3/8”-16 Hex head nuts (for pivoting pins)
(2) 3/8” Lock washer (for pivoting pins)
(84) Self tapping truss screws with #2 Phillips head (for tempered pegboard attachment)
(4) 5/16”-16 x 3” Hex head bolts (For attaching frame sections together)
(8) 5/16” Flat washers (For attaching frame sections together)
(4) 5/16” Lock washers (For attaching frame sections together)
(4) 5/16” Hex head nuts (For attaching frame sections together)
(6) Plastic end caps
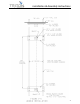
Step 2. Attaching frame sections together: With all 3 frame sections lying flat, with top and bottom
with arm extension pointing in the same direction, align the pre-drilled holes of each section with the
others. (Refer to figure 1-1 ). Using the (4) 5/16”-16 x3” hex head bolts, slide one 5/16” flat washer onto
each bolt and insert through the aligned holes of attaching frame section. Slide a second flat washer on
to each bolt and then a 5/16” lock washer. Secure each bolt using 5/16”-16 hex nuts. (Avoid over-
tightening and crushing tubular frame)
Step 3. Pivoting bolt attachment to arm assemblies: (Refer to figure 1-2 close-up.) Using 3/8”-16 x 2-
1/4” hex bolts, slide (1) 3/8” washer onto bolt and then insert bolt with washer through hole in arm
assembly. Once through arm assembly, install another flat washer and secure using (1) 3/8” hex nut by
hand tightening. Repeat steps for second arm.
Step 4. Attaching tempered pegboard to each side of frame: (Figure 1-1). Using the existing holes in
pegboard and #10-3/4” self-tapping screws, starting with the top frame section, align pegboard outside
edges with the outside edge of the frame section. Using an electric drill with a high performance #1 or
#2 Phillips bit, install self-tapping screws into each of the corners’ opposite arm assemblies; complete
installation using figure 1-1 for tap screw layout. Repeat steps to complete installation for 5 remaining
sections of pegboard. To help expedite installation of your pegboard you may want to pre-drill where
tap screws are to be installed using a 1/8” drill bit.
W1 - 48x72 XtraWall® Swing Pegboard