
Installation guide


LIGHTED LOWTOPPER - FIELD INSTALLATION GUIDE
10
Instructions for Checking the Topper Light Bulb
(AC powered topper only!)
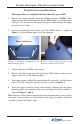
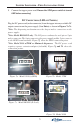
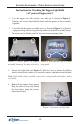
1. Lay the topper on a flat surface, rear side up, as shown in Figure 1.
Remove the screws that hold the front and rear panels of the assembly
together.
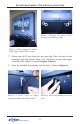
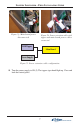
2. Carefully flip the entire assembly over, as shown in Figure 2, so that the
sign panel is up. Lift the sign panel up and away from the rear half. It may
be necessary to tilt the panel to clear the four mounting studs.
Figure 2. Turn sign face up to remove
sign panel.
Figure 1. Rear panel of topper
assembly, showing location of screws.
Mounting studs
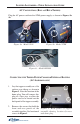
3. Locate the light bulb (see Figure 3). The best way to ensure the bulb is
firmly seated in the socket is to carefully remove and then reseat the bulb.
Note: If the bulb is bad, carefully remove the existing bulb and replace with a
new bulb.
Figure 3. Location of light bulb.
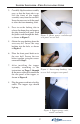
4. Reinstall the topper front panel.
Flip the chassis over and attach
the two halves using the screws
removed in Step 2.