
Installation guide


LIGHTED LOWTOPPER - FIELD INSTALLATION GUIDE
9
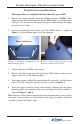
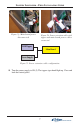
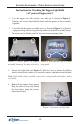
Figure 2. Route power cord through
rear panel access hole.
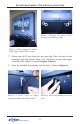
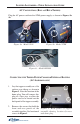
5. Obtain the snap bushing from the
accessory kit. Insert the snap
bushing into the hole, as shown
in Figure 3.
6. Place the front panel back on to
the rear half. Secure the two
halves together, using the screws
removed in Step 2.
Figure 3. Insert snap bushing into
access hole on topper rear panel.
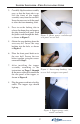
7. After installing the topper
assembly according to the
instructions on Pages 2 through
4, the power cable will extend from
the rear panel of the topper, as
shown in Figure 4.
8. Plug the power cord into a facility
outlet. The topper sign should
light up.
Figure 4. Topper power cable,
routed externally.
3. Carefully flip the entire assembly
over, so that the front side is up.
Lift the front of the topper
assembly away from the rear half.
It may be necessary to tilt the panel
to clear the four mounting studs.
4. Press in on the locking tabs to
release the dome plug and remove
the plug from the rear panel. Feed
the power cord through this hole,
as shown in Figure 2.