
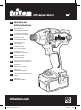
How to Guide


7
GB
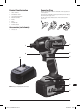
Fitting a driver bit
WARNING: DO NOT fit any attachment with a maximum speed lower than the
no load speed of the machine.
1. Pull the quick release mechanism of the 6mm/¼” Hex Drive (1) forward
and insert the bit
2. Release the quick release mechanism
3. Pull on the bit to check that it is securely fitted. If the bit is not secure,
repeat the above procedure
Note: Make sure screwdriver bits used are hardened and suitable for use with
an impact driver
Direction control
• The rotation direction can be set using the Forward/Reverse Switch (5)
• To let the impact driver rotate clockwise, push the Forward/Reverse Switch
to the left
• To let the impact driver rotate anti-clockwise, push the Forward/Reverse
Switch to the right
• When the Forward/Reverse Switch is in the central position, the tool is
locked
WARNING: DO NOT attempt to move the forward/reverse selector when the
tool is running
Operation
WARNING: Always use adequate protective equipment, including eye
protection, respiratory and hearing protection, when working with this tool.
Switching on and off
• To start the tool, squeeze the Speed Control Trigger Switch (3). The LED
Guide Light (7) will illuminate
• Further pressure on the trigger will increase the running speed of the tool
• Release the Speed Control Trigger Switch to stop the tool
Note: It is possible the impact driver may switch off during heavy use due to
thermal protection of the battery and internal components. This may prevent
the tool being used again for a short period of time and does not represent a
fault condition.
Accessories
• A range of accessories, including a 2Ah battery (T20B), 4Ah high capacity
battery (T20HCB) as well as screwdriver bits is available from your Triton
dealer. Spare parts can be purchased from your Triton dealer or online at
www.toolsparesonline.com
Maintenance
• This tool is manufactured using class leading components and makes
use of the latest in intelligent circuitry that protects the tool and its
components. In normal use it should provide a long working life
Cleaning
• Keep your machine clean at all times. Dirt and dust will cause internal parts
to wear quickly, and shorten the machine’s service life. Clean the body of
your machine with a soft brush or dry cloth. If available, use clean, dry,
compressed air to blow through the ventilation holes
STORAGE
• Store this tool and its accessories after use in its case, in a dry, secure
place out of the reach of children
Disposal
Always adhere to national regulations when disposing of power tools that are
no longer functional and are not viable for repair.
• Do not dispose of power tools, batteries or other waste electrical and
electronic equipment (WEEE), with household waste
• Contact your local waste disposal authority for information on the correct
way to dispose of power tools and batteries
100351_Z1MANPRO1.indd 7 18/08/2014 16:46