
Use and Care Guide

8
GB
Operating Instructions
Speed control
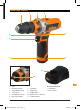
• This drill driver has a 2-speed gearbox:
- 1st gear range: 0 – 400min
-1
- 2nd gear range: 0 – 1300min
-1
• Use the Speed Selector (4) to set the gear. Forward for
first gear, back for second gear
NOTE: The first gear would be used normally for driving
screws for example and offers higher torque and superior
control at low rpm. The second gear would normally be
used exclusively for drilling
Torque control
• This drill driver is fitted with torque control, which limits
the torque output of the drill, enabling screws to be
driven without the risk of damage
• There are 17 torque settings and one drill setting. The
lower the number, the lower the torque
• To adjust the torque, select the first gear and rotate
the Torque Adjustment Collar (3) until the setting you
require is aligned with the arrow on the drill driver
housing
• Check that the torque setting is correct by practising
first on a piece of scrap material
• For drilling select the correct gear, rotate the clutch
ring to the drill symbol. This will lock the control for
maximum torque
Warning: The drill driver can be fitted with a drive adaptor
for use with driving nuts and bolts. Do not attempt to
use this tool in the drill position when doing so. Use the
17 torque settings and the first gear to allow the torque
clutch to protect the tool from excessive load. The use of a
wrench to loosen or tighten the nut/bolt is recommended.
This allows the tool to speed up the operation, without risk
of damage, when high torque is required at the beginning
or end of the operation
Switching on
• To start the tool, squeeze the Trigger Switch (8). The
LED Guide Light (9) will illuminate
• Further pressure on the trigger will increase the running
speed of the tool
NOTE: It is possible the drill driver may switch off during
heavy use due to thermal protection of the battery and
internal components. This may prevent the tool being used
again for a short period of time and does not represent a
fault
Drilling guidance
• Use sharp drill bits and ensure that drill bits are suitable
for the material being drilled
• Begin drilling at slow speeds by partially squeezing the
trigger switch
• Reduce pressure on the trigger when the drill bit is
about to break through to the other side of material
• To avoid splintering on breakthrough, either clamp a
piece of scrap wood to the back of the workpiece or
continue the hole from the back of the wood when the
drill bit first breaks through
Drilling metal
• Support thin material with a piece of scrap wood
• Mark the intended hole position using a hammer and
centre punch
• Use only HSS (high speed steel) drill bits or others
recommended for drilling into metal
• Prior to drilling large holes, use a smaller bit to drill a
pilot hole
• Use a suitable lubricant to prolong the service life of the
drill bit, and produce good results
687235_Z1MANPRO1_15/04/14.indd 8 18/09/2015 15:18