Triton Swath Editor -- User Guide -- By: Tony M.
Triton Imaging Inc. Engineering Office 2121 41st Avenue, Suite 211 Capitola, CA 95010 USA 831-722-7373 831-475-8446 sales@tritonimaginginc.com support@tritonimaginginc.com © 2010 TRITON This user guide is provided as a means to become familiar with TRITON’s software through an explanation of the options available for manual swath editing. The user interface presented in this guide is subject to change to accommodate software upgrades and revisions.
Table of Contents 1.0 Swath Editor Interface.................................................................1 1.1 Triton Swath Editor “Control Panel” ................................................................................................................... 1 1.1.1 Menu Options .............................................................................................................................................. 2 1.1.2 Button Options ..........................................................
1.0 Swath Editor Interface Swath Editor is an add-on application for BathyPro and BathyOne which allows users to manually edit raw soundings in XTF or GSF data files by adjusting how the sounding is flagged for processing.
1.1.1 Menu Options There are three menus along the top of the control panel. These are: File, View and Help. Options included in each menu are presented below. ¾ File: • Open: Launches browser for locating and selecting files to edit. Supported formats include XTF and GSF files. If edit files already exist for the XTF file being loaded, a second window will open allowing the user to select which edit file to apply to the data.
The window shown at the bottom of the previous page has two edit files to select from. Please note that for this to second window to automatically open, the edit files need to be in a subdirectory in the XTF data folder and the file name needs to start with the raw data file name. For this example the raw data file is called BRDG001 and the available edit files are called BRDG001_0 and BRDG001_1. If more edits are applied and saved, they will be saved to a file automatically named BRDG001_2.
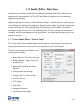
1.1.3 Beam Quality Display and Zoom Options The Beam Quality section of the control panel is used to change how the sounding data is displayed in the editing windows based on how the sounding has been flagged. Triton’s Swath Editor recognizes four distinct beam flag types to indicate how a sounding is used during processing. Other beam flags present in the data files are sorted into one of these groups depending on why it was flagged.
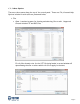
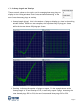
1.1.4 Sweep Length and Overlap These controls, shown to the right, are for managing how many pings to display in the editing windows in one frame and when advancing to the next frame how many pings to overlap. ¾ Sweep Length (pings): this is the number of pings to display at a time in the editing window frames. Below are two examples, the top shows only 15 pings per frame while the bottom shows 100 pings per frame. ¾ Overlap: indicates the number of pings to repeat.
1.1.5 Change Edits To – Good or Bad This will set the value to be applied to the selected soundings. If ‘Bad’ is selected, clicking the Apply button in the control panel will change the beam flag for the selected soundings to ‘Bad’. 1.1.6 Attitude Correct Checking this box will apply attitude corrections to the soundings displayed in the editing windows. 1.1.
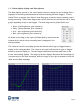
1.1.10 File Information Display At the bottom of the control panel is a readout of the current file loaded into the Swath Editor and also the current edit file being used. 1.2 Swath Edit Window “Sweep End View” A swath edit window is a display of the raw sounding data which allows the user to select individual soundings and manually flag them as ‘Bad’ or ‘Good’. To the right is an example of the Sweep End View showing the across-track view of the swath data.
1.4 Editing Options 1.4.1 Sounding Selection To change the beam flags of the soundings displayed in a Swath Edit Window the soundings must be selected. There are two ways to select soundings for editing. 1. Point and Click: As it sounds, point the cursor at a sounding and click the mouse button. When selected the point will highlight a light blue color. 2. Select by Rectangle: This option allows the user to draw a rectangle around as many points as desired. All points selected will be highlighted.
1.4.2 Editing Shortcuts and Keyboard Options To improve the processing speed of the operator, several keyboard shortcuts and options are available.
2.0 BathyPro Processing Workflow When processing bathymetry data using BathyPro, manual editing of the data is performed with the Swath Editor prior to importing the data into BathyPro. For each XTF file that is edited an EDT file is created to be applied during the processing step. Here is an example workflow for using the Swath Editor with BathyPro: 1. Before starting, make sure all data files to be gridded together are in the same directory on the hard drive. 2.
3.0 BathyOne Processing Workflow When processing bathymetry data using BathyOne, manual editing of the data is performed with the Swath Editor on GSF files after importing raw data into PerspectiveMap and creating a DTM file. In the process of creating the DTM, BathyOne also generates a GSF file for each input file.
A message will popup asking if you want to apply the edits in the GSF file. Selecting ‘Yes’ will apply the beam flags from the GSF file during processing. The processing wizard that will popup is the same as the normal BathyOne processing wizard but the beam suppression page is limited. As shown to the right. If you select ‘No’, then the edits made to the beam flags will be discarded and the full beam suppression page will be available in the processing wizard as shown below.