
User Manual Instruction Manual


116
MODEL FT5000 USER MANUAL
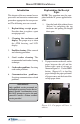
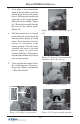
7. If the paper is not automatically
taken-up by the printer, check the
tension roller lever on the printer
chassis. Pull the pin located on the
right side of the printer bracket
above the cutter assembly ( Figure
6-8). Rotate the assembly towards
the front of the control panel.
(Figure 6-9)
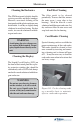
8. The blue tension lever is located
on the right side. It must be in the
closed position (Figure 6-10 and
insert). If not, just move the lever
(moves in 3 positions) to the
correct position. Close the cutter
assembly and retry to feed the
printer paper. If successful,
continue with Step 9. If the paper is
not taken up automatically, contact
your service provider.
9. Close and lock the cabinet sleeve.
Go to Management Functions,
Diagnostics, Printer , and perform
a “Reset/Test Printer”.
Figure 6-9. Cutter assembly opened.
Figure 6-8. Pin location.
Figure 6-7. Paper feeds automatically
when placed in take-up slot.
Figure 6-6. Paper feeds from top of
roll.
Figure 6-10. Blue lever position.
Insert