PET-MONITORING BLOOD GLUCOSE SYSTEM Instructions for Use MADE SPECIALLY FOR DOGS & CATS For in vitro diagnostic use only. For use with capillary or venous whole blood samples taken from a dog or cat. NOT FOR HUMAN USE. PetMeterBook.
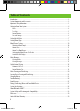
Table of Contents Introduction....................................................................................................................................................2 System Components and Accessories..............................................................................................................2 Important Safety Information.........................................................................................................................3 Getting to Know Your System.........
Introduction Intended Use Test Buddy™ Pet-Monitoring Blood Glucose System is intended for home and professional/ veterinary clinic use for monitoring blood glucose samples taken from dogs or cats. NOT FOR HUMAN USE. Test Buddy Pet-Monitoring Blood Glucose System is for in vitro (outside the body) diagnostic use only.
Important Safety Information WARNING! • Test Buddy Pet-Monitoring Blood Glucose System IS NOT intended for testing human blood and WILL NOT give accurate results if used in humans. • This system contains small parts that may be dangerous if swallowed. Do not ingest or allow your pet to ingest test strip, battery, control solution, or any other component. Keep out of reach of children. • After opening the test strip carton, check the test strip vial for missing, damaged, or broken parts.
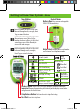
Getting to Know Your System - Meter Top of Meter Back of Meter Battery Door Uses one non-rechargeable CR2032 3V lithium battery. Increase numbers in Meter Set Up; scroll forwards through results, averages, Event Tags, or animal selection. Turn meter on; access Meter Set Up; confirm selections in Meter Set Up; select animal type; access Meter Memory to view results and averages. Decrease numbers in Meter Set Up; scroll backward through results, averages, Event Tags, or animal selection.
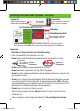
Getting to Know Your System - Test Strip Sample Tip Contact End Touch sample tip to top of blood or control solution drop. Insert into meter test port with blocks (contacts) facing up. Recap vial immediately upon removing a test strip. For home and professional/veterinary clinic use for monitoring blood glucose samples taken from dogs and cats. For in vitro diagnostic use only. PETMONITORING BLOOD GLUCOSE TEST STRIPS For use with capillary or venous whole blood samples taken from a dog or cat.
Getting to Know Your System - Control Solution May 8, 2023 The control solution is used to check that the system is working properly and you are performing the test correctly. Control Solution Bottle Label (Example only) Control Solution Level (1, 2 or 3) Lot Number Write the date on the label when you open a new bottle. Printed Expiration Date Important: • Read the Control Solution Instructions for Use before testing.
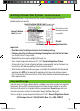
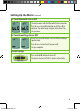
Setting Up the Meter 1. Enter Set Up Start with meter off (no test strip inserted). Press and hold S for about 10 seconds until the full display appears and the meter beeps several times. Release S. The time appears. Note: If the meter turns off at any time during set up, go back to Step 1 and begin again. 2. Set Time Hour AM/PM Minutes (Examples only) Set Hour: The hour flashes first. Press S if correct or press + or – to scroll forward or backward to change to the correct number.
Setting Up the Meter (continued) 4. Turn Bluetooth On or Off The meter comes with the Bluetooth feature turned on. Press + or – to turn Bluetooth on or off. Press S to continue. The meter beeps and goes to the Event Tag set-up screen. 5. Turn Event Tags On or Off Event Tags are used to mark a test result taken during a specific event. Press + or – to turn Event Tags on or off. Set up is complete. 6. Exit Set Up Press and hold S until meter turns off. The meter also turns off after 2 minutes of inactivity.
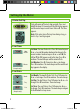
Setting Animal Type Set the animal type ( dog or cat) when you use the meter for the first time. Important! Applying a sample drop (blood or control solution) without first selecting an animal type will give an error message (see Error Messages section). 1. With the meter off, insert a new test strip into the test port. 2. Use the + or – buttons to scroll between the flashing cat and dog symbols. 3. Press S to select the correct symbol for your pet. 4.
Blood Glucose Testing Before testing: • Read all instructions for use and gather testing supplies. • Check dates on test strip vial and control solution bottle. Do not use expired test strips or control solution (see Getting to Know Your System – Test Strip and Getting to Know Your System – Control Solution sections). Obtaining a Blood Sample A capillary blood sample can be taken from the ear or paw pad in dogs and cats. Ask your veterinarian for a recommended test site and instructions.
How to Lance Please read the Lancing Device Instructions for Use for more information. 1. Wash your hands and the test site (e.g. ear or paw pad) with warm water and soap to ensure accurate results. Rinse and dry thoroughly. Gently massage the test site or apply a warm cloth to help the blood drop form. 2. Insert lancet in the lancing device. Pull off the lancet top to expose the needle. Replace the lancing device end cap. 3. Select the desired lancing depth.
How to Test Blood Glucose 1. Remove one test strip from vial and close vial immediately. Use test strip quickly after removing from vial. 2. Insert test strip contact end (blocks facing up) into the meter test port. The meter turns on and performs an automatic self-test. Note: If the test strip has been out of the vial for too long before testing, an error message appears after it is inserted into the meter. Discard the test strip. Use a new test strip for testing.
How to Test Blood Glucose (continued) (Example only) (Example only) 6. Hold the test strip to the blood drop until the meter beeps and dashes move across the display. This means you have applied enough blood and the meter is testing. Remove the test strip from the blood drop. Note: If the meter does not begin testing soon after touching the sample tip to the blood drop, discard the test strip. Retest with a new test strip and new blood drop.
Understanding Blood Glucose Test Results The meter displays blood glucose results in mg/dL. This unit of measurement is preset. You cannot change this setting. The normal glucose range for dogs and cats without diabetes is: 75–120 mg/dL.1 A veterinarian will determine the blood glucose target range for your dog or cat and how often to test. Having most results within the target range shows how well a treatment plan is working to control blood glucose levels.
Meter Memory - Viewing Results The meter stores 1000 blood glucose and control test results with time and date. When the memory is full, the oldest result is replaced with the newest result. 1. With the meter off, press and release S. The meter displays the memory symbol (M) and scrolls through the 7-, 14-, 30-, 60-, and 90day averages. If there are no results in memory, three dashes appear. (Example only) 2. Press and release S again to view most recent control test result in memory.
Quality Control Testing Test Buddy Pet-Monitoring Blood Glucose System has two kinds of quality control tests to ensure that the system is working properly and that your testing technique is good. Automatic Self-Test The meter performs an automatic self-test each time a test strip is inserted correctly into the test port. The meter is working properly if: • the full display appears, then • the time, cat or dog icon, and blinking drop appear.
Performing a Control Solution Test 1. Check control solution and test strip expiration dates Do not use control solution past expiration date. Discard control solution after the printed expiration date (EXP) or the open bottle expiration date has passed, whichever comes first (see the Control Solution Instructions for Use for instructions on determining the open bottle expiration date). Printed Expiration Date May 8, 2023 Do not use test strips past expiration date.
Performing a Control Solution Test (continued) 3. Insert a test strip and turn the meter on Remove one test strip from vial and close vial immediately. Use test strip quickly after removing from vial. Insert test strip into meter. The meter turns on and performs an automatic self-test. Caution! If any display segments are missing, do not use the meter for testing. See Automatic Self-Test section for more information. If meter does not turn on or an error message appears, see Troubleshooting section. 4.
Performing a Control Solution Test (continued) 5. Read your result Recap vial immediately upon removing a test strip. For home and professional/veterinary clinic use for monitoring blood glucose samples taken from dogs and cats. For in vitro diagnostic use only. TMONITORING OOD GLUCOSE TEST STRIPS For use with capillary or venous whole blood samples taken from a dog or cat. NOT FOR HUMAN USE. Store in a dry place at room temperature ufactured by: Trividia Health, Inc. below 86°F.
Meter Cleaning and Disinfecting • Cleaning removes blood and soil from the meter. Disinfecting removes most, but not all possible infectious agents (bacteria or viruses) from the meter, including blood-borne pathogens. • Clean the meter immediately after getting any blood on the meter or if the meter is visibly dirty. Wash your hands thoroughly with soap and water after handling the meter, test strips lancets, or lancing device as contact with blood presents an infection risk.
Meter Cleaning and Disinfecting (continued) To Clean the Meter: 1. Wash hands thoroughly with soap and water. 2. Make sure meter is OFF and a test strip is not inserted. 3. Use fresh PDI Super Sani-Cloth Wipes to wipe all outside surfaces of the meter using three circular wiping motions with moderate pressure on the front, back, left side, right side, top, and bottom of the meter. Discard used wipes. 4. Let meter air dry thoroughly before using to test. 5. Wash hands thoroughly when finished. 6.
Lancing Device Cleaning and Disinfecting • Clean the lancing device immediately after getting any blood on it or if it is dirty. • Remove lancet from lancing device before cleaning. • Clean and disinfect the lancing device at least once a week. The lancing device may be cleaned and disinfected once a day for a 3-year period. • Use only PDI Super Sani-Cloth® Wipes (EPA Reg. No. 9480-4). Other disinfectants have not been tested and may damage the lancing device.
Changing Battery When the battery is low the battery symbol appears. About 50 tests can be done before the battery dies. If there is not enough power to run a test the meter will beep once before turning off. To change battery: 1. Lift the tab on the battery door. 2. Hold the meter in one hand with the battery door facing down over the palm of your other hand. The battery falls out. Dispose of battery according to your local waste disposal regulations. 3.
Troubleshooting Problem Reason Action Meter does not turn on after inserting a test strip Test strip inserted upside down or backwards Remove test strip. Re-insert correctly. Test strip not fully inserted Remove test strip. Re-insert fully into meter. Test strip error Repeat with new test strip. Dead or no battery Replace battery. Meter does not beep, and test does not start after applying sample drop (blood or control solution) Battery in backwards Re-insert battery with + side facing up.
Error Messages Display Reason 25 PetMeterBook.indd 25 Action Temperature Error Temperature is too cold or too hot during the test. Move meter and test strips to an area within the system operating range (50°F–104°F) and wait 10 minutes for the system to adjust to the new temperature before retesting. Sample not detected or Sample applied before selecting animal type (cat or dog) Make sure the animal type (cat or dog) is selected. Retest with a new test strip and larger sample.
Error Messages (continued) Display Reason Action Test strip removed during test Retest with a new test strip. Make sure the result is displayed before removing the test strip from the meter. Communication error Do not use the meter. Contact Customer Care for assistance. Low battery Replace battery. Broken display Do not use the meter. Contact Customer Care for assistance. Out of range high result (>600 mg/dL) WARNING! Retest with a new test strip.
Pairing (Connecting) Meter with Your Mobile Device Pairing enables your meter to wirelessly upload test results to an App (application) on your mobile device. The meter must have the Bluetooth SMART feature turned on and your mobile device must have an App that can receive the results. The meter can be paired with up to four (4) mobile devices. Go to www.testbuddymeter.com for more information on: • App information • List of compatible mobile devices • Instructions for pairing 27 PetMeterBook.
System Specifications Result Range: Sample Size: Sample: 20–600 mg/dL Minimum 0.5 microliter (0.5 μL) Fresh capillary whole blood, venous whole blood collected in an EDTA blood collection tube, or control solution Test Time: About 11 seconds Result Value: Plasma values Assay Method: Amperometric Power Supply: One CR2032 3V lithium battery (non-rechargeable) Battery Life: Approximately 1000 tests or 1 year Automatic shut-off: After two minutes of non-use Weight: 1.7 oz. Size: 3.44” x 2.16” x 0.
About Bluetooth SMART® The Test Buddy Pet-Monitoring Blood Glucose Meter uses Bluetooth SMART® to wirelessly connect (pair) with Apps on a mobile device(s) to transmit test results from the meter memory. Test Buddy Pet-Monitoring Blood Glucose Meter contains FCC ID: 2ADDB-PET-01 This device complies with Part 15 of the FCC rules.
References 1. Bruyette, D. “Diabetes Mellitus in Dogs and Cats.” Merck Veterinary Manual, www.merckvetmanual.com/endocrine-system/the-pancreas/diabetesmellitus-in-dogs-and-cats#. Accessed 9/25/2019. Limited Lifetime Warranty Trividia Health, Inc. provides the following Warranty to the original purchaser of the Test Buddy Pet-Monitoring Blood Glucose Meter: 1. Trividia Health warrants this meter to be free of defects in materials and workmanship at the time of purchase.
Brought to you by: Customer Care • 1-800-803-6025 Monday–Friday • 8AM–8PM EST www.testbuddymeter.com Manufactured by: 2400 NW 55th Court Fort Lauderdale, FL 33309 U.S.A. © 2019 Trividia Health, Inc. Test Buddy, Healthy Tracks for Pets and the Trividia Health logo are trademarks of Trividia Health, Inc. XE4HTK03 Rev. 1 PetMeterBook.
ART INFORMATION Mark 13sep19 DATE: DESIGNER: GRAPHICS White Board/Box Pressure Sensitive/Label Packaging ARamos 4x5.