
Installation Guide


P6
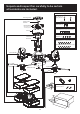
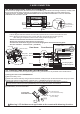
5. BLADE INSTALLATION
5A.
Attach blade to blade
with screws & washers provided
in hardware bag. Make sure that
all screws are firmly tightened.
holder
Attach blade assembly to flywheel,
.
5B.
aligning beveled center hole on
flywheel with beveled motor shaft
before attachment
Thread the cap
to motor shaft until fully tightened.
(*This is reverse threaded.)
5C.
counter-clockwise
Blade
Flywheel
Cap
Blade Assembly
Beveled Motor
Shaft
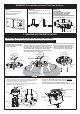
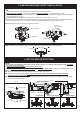
6. LIGHT KIT INSTALLATION
6A.
Install the bulbs (included) to the
medium sockets (sockets) properly.
6B.
Align the hole on the glass with the
threaded tube from light fixture.
Attach the glass to light fixture.
6C.
Attach the nut to the threaded
tube tightly.
Glass
Light kit fitter
Light kit fitter
Light kit fitter
Nut
OSC: Button for ON/OFF oscillation
(*this button only functions
when fan is in operation)
7. REMOTE & SETTING
osc
D/L: ON/OFF button
for down light
Glass
Medium Sockets
Bulb
(13W CFL bulb)
Bulb
(13W CFL bulb)
Turn on power at breaker box for remote setting.
Pressing the button for 3~5 seconds till the , which means this remote control
has done the setting. Now the remote is ready for operation.
“OFF” LIGHT BLINKS
MED:Fan middle speed
HI:Fan high speed
LOW:Fan low speed
OFF: For SETTING /
Fan speed & Oscillation
2
X: for light ON/OFF
(for CFL bulbs)
D: for light dimming
(for incandescent bulbs)
1
2
3
4
X
D
ON
1
2
3
4
X
D
ON
Note: You may switch Light switch code at D position
(DIMMING) when you change to incandescent bulbs
for Down light.
SETTING for before starting fanlight operation