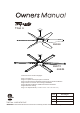
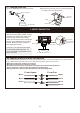
Titan II 6HE66 6HE72 6HE84 This instruction contains 8 pages: Page 1: Foreword Page 2: Unpack and inspect parts contained Page 3: Notes before installation and Hanging system installation Page 4: Wire connection and Canopy installation Page 5: Blade installation and Bottom Plate installation Page 6: Remote setting Page 7~8: Special Note (to install more than 1 fan in the same room) Toll Free: 1-855-676-7247 size Net weight 66" 10.1 KGS. / 22.2 LBS. 72" 12.5 KGS. / 27.5 LBS. 84" 13.0 KGS. / 28.
READ AND SAVE THESE INSTRUCTIONS WARNING : TO REDUCE THE RISK OF FIRE, ELECTRICAL SHOCK, OR INJURY TO PERSONS, PLEASE OBSERVE THE FOLLOWING : 1]. To ensure the success of the installation, be sure to read the instructions and review the diagrams thoroughly before beginning. 2]. To avoid possible electric shock, be sure electricity is turned off at the main power box before wiring. All electrical connections must be made in accordance with local codes, ordinances and/or the National Electric Code.
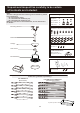
Unpack and inspect fan carefully to be certain all contents are included. Note: This fan is designed for the following 3 sizes of blades, packed in a separate box. * 66” resin blades (6 pcs) * 72” extruded alum. blades (6 pcs) * 84” extruded alum. blades (6 pcs) Make sure you have received two boxes, one for fan and one for blades.
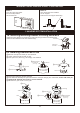
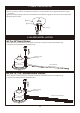
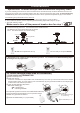
WARNING: blades should be at least 10 feet from floor Note 1: Note 2: Turn off power at breaker box to avoid possible electrical shock. Use metal outlet box suitable for fan support. Outlet box must support 35 lbs min. OFF OFF OFF 1. HANGING SYSTEM INSTALLATION 1A. Installing mounting bracket to ceiling outlet box Install mounting bracket to outlet box in ceiling by using screws included with the outlet box and washers from the hardware bag. Outlet Box Mounting Bracket 1B.
1C. Hanging the fan 1 Lift fan assembly onto mounting bracket. 2 Rotate fan so that the groove on the ball engages the ridge in the mounting bracket. Mounting Bracket Mounting Bracket Ridge Ball Groove Fan Assembly 2. WIRE CONNECTION 2A. Attaching safety cable to ceiling joist Use wood screw, spring washer, and flat washer from hardware bag. Pass wood screw through closed loop of safety cable. Secure wood screw to ceiling joist through any available slot on mounting bracket.
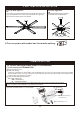
3. CANOPY INSTALLATION Note: Two screws are pre-installed on mounting bracket for canopy installation. 1 Push up canopy until two screws pre-screwed on mounting bracket are engaged with two key holes on canopy. 2 Rotate canopy slightly until two pre-installed screw heads are engaged in the narrow end of key holes. 3 Tighten both screws. 2 1 Canopy 3 Screw (2) Key Hole (2) 4. BLADE INSTALLATION 4A.
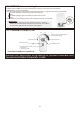
5. BOTTOM PLATE INSTALLATION For use with light kit: For non-light use: 5A. If you have purchased the optional Light Kit please refer to the Light Kit Installation instructions provided with the Light Kit, then resume these instruction at Step 6. 5B. Attach the bottom plate by screwing it clockwise onto the light kit pan. 6.Turn on power at breaker box for remote setting. ON OFF OFF OFF 7.REMOTE SETTING 7A. Initial Settings (Back side of Transmitter) 1. Code setting on TRANSMITTER.
7C. SETTING before starting fan Press the button “SET” for 3-5 seconds till the fan starts reverse operation (clockwise). Install battery cover on transmitter. This fan is doing setting now and will do the following steps to complete its setting automatically. Reverse operation (clockwise) for about 2.5 minutes Stop Forward operation (anti-clockwise) for about 2.
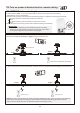
Troubleshoot Special note: To install multiple fans with different frequency codes. If you are installing more than one fan in the same area, the remote setup can affect all fans in the area. To have precise control over each fan and light, each fan / remote must be set-up by itself. To avoid frequency interference, please do the following steps so the fans can be operated independently by its own remote. The following steps are based on the status of a.
7B.Turn on power at breaker box for remote setting. ON OFF OFF OFF 7C. SETTING before starting fan Press the button “SET” for 3-5 seconds till the fan starts reverse operation (clockwise). Install battery cover on transmitter. This fan is doing setting now and will do the following steps to complete its setting automatically. Reverse operation (clockwise) for about 2.5 minutes Stop Forward operation (anti-clockwise) for about 2.