
Installation Guide
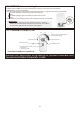

6.Turn on power at breaker box for remote setting.
OF
F
OF
F
O
F
F
ON
7.REMOTE SETTING
P6
5B.
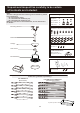
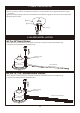
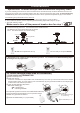
Attach the bottom plate by screwing
it clockwise onto the light kit pan.
For non-light use:
5A.
If you have purchased the optional Light Kit please refer to the
Light Kit Installation instructions provided with the Light Kit,
then resume these instruction at Step 6.
For use with light kit:
5. BOTTOM PLATE INSTALLATION
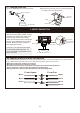
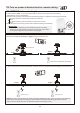
1 Remove battery cover.
2 FAN code setting:
There are 4 switches for 16 possible code combinations just in case your house has other fans installed
with the same codes. You may change your code switches by using a small screwdriver or ball point pen
to slide each code switch up or down.
3 Light "On/Off-Dimming" dip switch:
See below drawing 3
* ON = ON/OFF only
* D = Dimming/ON/OFF
The optional Light Kit for this fan uses a Dimmable LED Array, so this sip switch should remain
in the “D” position unless ON/OFF only operation is desired.
4 Install 12V 23AE battery x 1 pc (included).
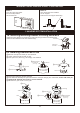
7A. Initial Settings (Back side of Transmitter)
1.Code setting on TRANSMITTER.
3
1
ON D
4 12V 23AE Battery x 1 pc
2
ON ECE
1
2
3
4
Shows default setting of
“D” for Dimming.