
Owner's Manual

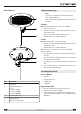
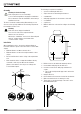


Table Of Contents

6 EN
radiant heater IR 2000 S
Assembly
Warning of electrical voltage
Risk of injury due to incorrect assembly!
Local or national regulations may apply for installation.
We recommend to have the installation carried out by a
qualified electrician.
The device is suited for wall mounting. Alternatively, you can
also use a telescopic tripod. Observe the following requirement
for installation inside a room:
Warning
Risk of fire due to improper installation!
There is a risk of fire if the required minimum
distances are not observed.
Observe the “Installation” section in the “Assembly and
start-up” chapter and the technical data in the
“Technical annex” chapter.
Installation
When installing the device, observe the minimum distances
from walls and other objects as described in the Technical data
chapter.
• Minimum distance of 200cm from the floor.
• Minimum distance of 50cm from adjacent walls or other
objects.
• Do not install the device at the ceiling or directly behind a
door.
• Never install the device in a way that it radiates directly
onto walls or other objects. Observe the minimum
distances from walls or other objects according to the
Technical data chapter.
50 cm
50 cm
50 cm
200 cm
The following is required for installation:
• a pencil for marking the drill holes
• a tape measure for determining the distances
• a suitable drill
• wall plugs appropriate for the structure of the wall
• a screwdriver
• a spirit level
1. Mark the drill holes on the wall according to the following
pattern:
34,5 mm
47,5 mm
50 mm
2. Drill the holes into the wall at the marked positions.
3. Insert suitable wall plugs into the drill holes.
4. Insert the screws into the wall plugs and fasten the
screws.
ð The screws should protrude approx. 0.5cm from the
wall plugs.
5. Hang the device in.
6. Check whether all 4 screws are hooked into the bracket.
7. Make sure that the device is attached securely.
8. Tilt the device to the desired angle. The device can be
tilted downwards by 45°.
45°