Operator’s Manual Electric Start Capable 4-Cycle Trimmer TB6044 XP TABLE OF CONTENTS Service . . . . . . . . . . . . . . . . . . . . . . . . . . . . . . . . . . . . . . . . . . . . . . .1 Safety . . . . . . . . . . . . . . . . . . . . . . . . . . . . . . . . . . . . . . . . . . . . . . .2 Know Your Unit . . . . . . . . . . . . . . . . . . . . . . . . . . . . . . . . . . . . . . . .5 Specifications . . . . . . . . . . . . . . . . . . . . . . . . . . . . . . . . . . . . . . . . .5 Assembly . . . . . . . . .
SAFETY SPARK ARRESTOR NOTE The purpose of safety symbols is to attract your attention to possible dangers. The safety symbols, and their explanations, deserve your careful attention and understanding. The safety warnings do not by themselves eliminate any danger. The instructions or warnings they give are not substitutes for proper accident prevention measures. SYMBOL NOTE: For users on U.S. Forest Land and in the states of California, Maine, Oregon and Washington. All U.S.
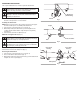
WHILE OPERATING OTHER SAFETY WARNINGS • • • • • • • • • • • • • • • • • • • • • • • Wear safety glasses or goggles that meet current ANSI Z87.1 standards and are marked as such. Wear ear/hearing protection when operating this unit. Wear a face mask or dust mask if the operation is dusty. Wear heavy long pants, boots, gloves and a long sleeve shirt. Do not wear loose clothing, jewelry, short pants, sandals or go barefoot. Secure hair above shoulder level.
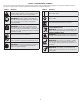
• SAFETY & INTERNATIONAL SYMBOLS • This operator's manual describes safety and international symbols and pictographs that may appear on this product. Read the operator's manual for complete safety, assembly, operating and maintenance and repair information. SYMBOL MEANING SYMBOL MEANING • SAFETY ALERT SYMBOL Indicates danger, warning or caution. May be used in conjunction with other symbols or pictographs.
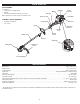
KNOW YOUR UNIT APPLICATIONS As a trimmer: • Cutting grass and light weeds. • Edging • Decorative trimming around trees, fences, etc. Other optional accessories may be used with this unit.
ASSEMBLY INSTALLING THE CUTTING HEAD SHIELD Cutting Head Shield Screws (4) WARNING: To prevent serious personal injury, never operate the unit without the cutting head shield in place. Mount Bracket Use the following instructions if the cutting head shield is not installed. Use only the instructions that apply to the type of shaft and shield equipped with this unit. 1. Place the cutting head shield under the mount bracket. Align the holes in the cutting head shield with the holes in the mount bracket.
OPERATING THE COUPLER The coupler enables the use of various optional attachments. WARNING: Before using any attachment, read and understand the manual that came with the attachment. Follow all safety information contained within. WARNING: To avoid serious personal injury and damage to the unit, shut the unit off before removing or installing an attachment. 90˚ Edging Hole (Trimmer Only) Knob NOTE: To make installing or removing the attachment easier, place the unit on the ground or on a work bench.
OIL AND FUEL USING THE RIGHT OIL Use a high-quality SAE 30 weight oil of API (American Petroleum Institute) service class SJ. DO NOT use dirty oil. Failure to use clean oil of the correct type can cause premature engine wear and failure. ADDING OIL: INITIAL USE Funnel Spout WARNING: OVERFILLING THE CRANKCASE MAY CAUSE SERIOUS PERSONAL INJURY. Check the oil level before each use. The importance of maintaining the proper oil level cannot be overemphasized.
USING THE RIGHT FUEL The use of old fuel is the most common cause of performance problems. Use only fresh, clean unleaded gasoline. Definition of Blended Fuels Today's fuels are often a blend of gasoline and oxygenates such as ethanol, methanol or MTBE (ether). Alcohol-blended fuel absorbs water. As little as 1% water in the fuel can make fuel and oil separate, forming acids when stored. ALWAYS use fresh fuel (less than 30 days old).
STARTING AND STOPPING WARNING: Operate this unit only in a well-ventilated outdoor area. Carbon monoxide exhaust fumes can be lethal in a confined area. On ( I ) / Start Off (O) / Stop Throttle Lockout WARNING: Avoid accidentally starting the unit. To avoid serious injury, the operator and the unit must be in a stable position when pulling the starter rope (Fig. 11). STARTING INSTRUCTIONS 1. Check the oil level. Refer to Checking the Oil Level. 2. Fill the fuel tank. Refer to Fueling the Unit.
USING THE ELECTRIC START ACCESSORY This unit can be started with an optional electric start accessory (items sold separately). Refer to the electric start accessory operator’s manual for the proper use of this feature. Please contact your local retailer, call the Customer Support Department or visit our website for more information. Item No. Description 49M2027P966 . . . . . . . . . . . . . . . . . . . . . . . . . . . . . . .Electric Starter 49MESCBP966 . . . . . . . . . . . . . . . . . . . . . . . . . .
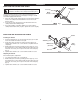
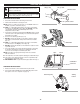
OPERATION HOLDING THE TRIMMER WARNING: Always wear eye, hearing, hand, foot and body protection to reduce the risk of injury when operating this unit. • • • • • Stand in the operating position (Fig. 13). Hold the shaft grip with the right hand. Keep the right arm slightly bent. Hold the handle with the left hand. Keep the left arm straight. Hold the unit at waist level. Keep the cutting head parallel to the ground so that it easily contacts the grass without the need for bending over. Fig.
MAINTENANCE WARNING: To prevent serious injury, never perform maintenance or repairs while the unit is running. Always allow the unit to cool before servicing or repairing the unit. Disconnect the spark plug wire to prevent the unit from starting accidentally. MAINTENANCE SCHEDULE Perform these required maintenance procedures at the frequency stated in the table. These procedures should also be a part of any seasonal tune-up. NOTE: Some maintenance procedures may require special tools or skills.
Removing Old Trimming Line and Obstructions Spool Cover If necessary, remove any old trimming line and/or obstructions from the cutting head. 1. Firmly press in the tabs on the cutting head (Fig. 18). 2. Remove the spool cover (Fig. 18). 3. Remove any old trimming line and/or obstructions. 4. Use a clean cloth to clean the inner reel, outer spool and spool cover (Fig. 18). 5. Align the tabs on the spool cover with the holes on the outer spool (Fig. 18).
CHANGING THE OIL Change the oil while the engine is still warm. The oil will flow freely and carry away more impurities. 1. Clean the area around the oil fill plug (Fig. 7) to prevent debris from entering the oil fill hole. 2. Unscrew the oil fill plug. 3. Tip the unit vertically to pour the oil out of the oil fill hole and into a container (Fig. 21). Allow ample time for complete drainage. NOTE: Dispose of the old oil according to federal, state and local regulations. 4.
ADJUSTING THE IDLE SPEED Idle Speed Screw WARNING: The cutting head may spin during idle speed adjustments. Wear protective clothing and observe all safety instructions to prevent serious personal injury. NOTE: Careless adjustments can seriously damage the unit. An authorized service dealer should make carburetor adjustments. If, after checking the fuel and cleaning the air filter, the engine still will not idle, adjust the idle speed screw as follows: 1. Start the engine. Refer to Starting and Stopping.
CLEANING AND STORAGE CLEANING STORAGE • WARNING: To avoid serious personal injury, always stop the engine and allow it to cool before cleaning or maintaining the unit. • • • • Use a small brush to clean the outside of the unit. Do not use strong detergents. Household cleaners that contain aromatic oils such as pine and lemon, and solvents such as kerosene, can damage plastic. Wipe off any moisture with a soft cloth. Never store a fueled unit where fumes may reach an open flame or spark.
TROUBLESHOOTING PROBLEM SOLUTION THE ENGINE WILL NOT START The fuel tank is empty Fill the fuel tank with fresh fuel The primer bulb was not pressed enough Press the primer bulb 10 times or until fuel is visible The fuel is old (over 30 days) Drain the fuel tank and add fresh fuel The spark plug is fouled Replace the spark plug The cold weather start lever is in the closed position Move the cold weather start lever to the open position THE ENGINE WILL NOT IDLE The air filter is dirty Clean or r
NOTES 19
MANUFACTURER’S LIMITED WARRANTY FOR: The limited warranty set forth below is given by Troy-Bilt LLC (Troy-Bilt) with respect to new merchandise purchased and used in the United States, its possessions and territories. Troy-Bilt warrants this product against defects in material and workmanship for a period of three (3) years commencing on the date of original purchase and will, at its option, repair or replace, free of charge, any part found to be defective in material or workmanship.
Manual del Operador ÍNDICE Recortadora de 4 tiempos con capacidad para arranque eléctrico TB6044 XP Reparación y mantenimiento . . . . . . . . . . . . . . . . . . . . . . . . . . . .21 Seguridad . . . . . . . . . . . . . . . . . . . . . . . . . . . . . . . . . . . . . . . . . . .22 Conozca su unidad . . . . . . . . . . . . . . . . . . . . . . . . . . . . . . . . . . . .25 Especificaciones . . . . . . . . . . . . . . . . . . . . . . . . . . . . . . . . . . . . . .25 Montaje . . . . . . . . . . . . . . . .
SEGURIDAD NOTA SOBRE EL AMORTIGUADOR DE CHISPAS El objetivo de los símbolos de seguridad es dirigir su atención hacia posibles peligros. Los símbolos de seguridad, así como sus explicaciones, necesitan su atención y comprensión completas. Las advertencias de seguridad no eliminan por sí mismas ningún peligro. Las instrucciones o advertencias que contienen no reemplazan a las medidas adecuadas de prevención de accidentes. NOTA: Para usuarios de los territorios de bosques de EE. UU.
• ADVERTENCIAS DE SEGURIDAD PARA LAS UNIDADES A GASOLINA • ADVERTENCIA: La gasolina es sumamente inflamable y sus vapores pueden explotar si se encienden. Adopte las siguientes precauciones: • • • • • • • Almacene el combustible únicamente en recipientes diseñados específicamente y aprobados para el almacenamiento de dichos materiales. Detenga siempre el motor y déjelo enfriar antes de llenar el depósito.
• SÍMBOLOS INTERNACIONALES Y DE SEGURIDAD • Este manual del operador describe símbolos de seguridad e internacionales, así como pictogramas, que pueden aparecer en este producto. Lea el manual del operador para obtener información completa sobre seguridad, montaje, funcionamiento, mantenimiento y reparaciones. SÍMBOLOS SIGNIFICADO SÍMBOLOS SIGNIFICADO • SÍMBOLO DE ALERTA DE SEGURIDAD Indica peligro, advertencia o precaución. Puede utilizarse junto con otros símbolos o pictogramas.
CONOZCA SU UNIDAD APLICACIONES Bujía de encendido Como recortadora: • Corta hierbas y malezas ligeras. • Bordeado • Recorte decorativo alrededor de árboles, vallas, etc. Con esta unidad se pueden usar otros accesorios opcionales: HERRAMIENTAS DE ENSAMBLADO REQUERIDAS: • • Destornillador Phillips n.
MONTAJE INSTALACIÓN DEL PROTECTOR DEL CABEZAL DE CORTE Protector del cabezal de corte Tornillos (4) ADVERTENCIA: A fin de evitar que se produzcan lesiones personales graves, no opere nunca la unidad sin el protector del cabezal de corte en su lugar. Soporte de montaje Utilice las siguientes instrucciones si no está instalado el protector del cabezal de corte. Use únicamente las instrucciones que corresponden según el tipo de eje y de protector que se suministran con la presente unidad. 1.
FUNCIONAMIENTO DEL ACOPLADOR El acoplador permite el uso de varios accesorios opcionales. ADVERTENCIA: Antes de comenzar a utilizar cualquiera de los accesorios, lea y comprenda el manual que viene con dicho accesorio. Tenga en cuenta toda la información de seguridad que incluye. Orificio de recorte de bordes de 90° (recortadora únicamente) ADVERTENCIA: A fin de evitar lesiones personales graves y daños a la unidad, apáguela antes de extraer o instalar un accesorio. Perilla Fig.
ACEITE Y COMBUSTIBLE USO DEL ACEITE CORRECTO Use un aceite pesado de alta calidad SAE 30 de API (American Petroleum Institute) clase de servicio SJ. NO utilice aceite sucio. Si no se utiliza aceite limpio del tipo adecuado se puede producir un desgaste y una falla prematura del motor. Pico del embudo INCORPORACIÓN DE ACEITE: USO INICIAL ADVERTENCIA: SI SE LLENA EXCESIVAMENTE EL Fig. 6 CÁRTER SE PUEDEN PRODUCIR LESIONES PERSONALES GRAVES. Controle el nivel de aceite antes de cada uso.
Uso de combustibles mezclados Si utiliza un combustible mezclado: • Utilice siempre gasolina nueva sin plomo • Use el aditivo para combustible STA-BIL® u otro equivalente • Drene el depósito y ponga en marcha el motor en seco antes de almacenar la unidad ADVERTENCIA: NO UTILICE COMBUSTIBLE E85 EN ESTA UNIDAD. Se ha demostrado que el combustible que contiene más de un 10% de etanol es probable que dañe este motor y anule la garantía.
ARRANQUE Y PARADA ADVERTENCIA: Opere esta unidad únicamente en una zona bien ventilada, al aire libre. Los humos de escape de monóxido de carbono pueden ser mortales en un lugar cerrado. On ( I ) / Arranque Off (O) / Parada Bloqueo del acelerador ADVERTENCIA: Se debe evitar arrancar accidentalmente la unidad. A fin de evitar que se produzcan lesiones graves, el operador y la unidad deben estar en una posición estable cuando se jala la cuerda de arranque (Fig. 11).
USO DEL ACCESORIO DE ARRANQUE ELÉCTRICO Esta unidad se puede arrancar con un accesorio de arranque eléctrico opcional (artículos que se venden por separado). Consulte el manual del operador del accesorio de arranque eléctrico para obtener instrucciones para el uso adecuado de esta función. Comuníquese con el distribuidor minorista local, llame al Departamento de Asistencia al Cliente o visite nuestro sitio web para obtener más información. N.° de artículo Descripción 49M2027P966 . . . . . . . . . . . . .
FUNCIONAMIENTO CÓMO SUJETAR LA RECORTADORA ADVERTENCIA: Utilice siempre protección ocular, auditiva, de manos, pies y corporal para reducir el riesgo de sufrir lesiones durante la operación de esta unidad. • • • • • Párese en la posición de arranque (Fig. 13). Sujete la empuñadura del eje con la mano derecha. Mantenga el brazo derecho ligeramente doblado. Sostenga la manija con la mano izquierda. Mantenga el brazo izquierdo bien derecho. Mantenga la unidad al nivel de la cintura.
MANTENIMIENTO ADVERTENCIA: Para evitar lesiones graves, nunca realice el mantenimiento ni las reparaciones con la unidad en funcionamiento. Siempre deje que se enfríe la unidad antes de hacer el mantenimiento o las reparaciones de la unidad. Desconecte el cable de la bujía para evitar que la unidad arranque accidentalmente. PROGRAMA DE MANTENIMIENTO Realice estos procedimientos de mantenimiento requeridos con la frecuencia establecida en la tabla.
5. Gire la perilla de impacto en el sentido de las agujas del reloj para enrollar el hilo hasta que sobresalgan aproximadamente 5 pulgadas (12.7 cm) por cada lado del cabezal de corte (Fig. 17). NO oprima la perilla de impacto mientras se enrolla el hilo. NO se deben alinear las flechas cuando se termine de enrollar el hilo.
CAMBIO DE ACEITE Cambie el aceite mientras el motor aún está caliente. El aceite fluirá libremente y arrastrará más impurezas. 1. Limpie la zona que rodea el tapón de llenado de aceite (Fig. 7) a fin de evitar que ingresen residuos en el orificio de carga de aceite. 2. Desenrosque el tapón de llenado de aceite. 3. Incline la unidad verticalmente para verter el aceite fuera del orificio de llenado de aceite y al interior del recipiente (Fig. 21). Deje bastante tiempo para que se drene completamente.
AJUSTE DE LA VELOCIDAD DE RALENTÍ Tornillo de velocidad de ralentí ADVERTENCIA: El cabezal de corte puede girar durante los ajustes de la velocidad de ralentí. Utilice vestimenta de protección y respete todas las instrucciones de seguridad para evitar que se produzcan lesiones personales graves. NOTA: Los ajustes que se realizan de manera descuidada pueden dañar gravemente la unidad. Los ajustes del carburador debe realizarlos un distribuidor de servicio autorizado.
LIMPIEZA Y ALMACENAMIENTO LIMPIEZA ALMACENAMIENTO • ADVERTENCIA: A fin de evitar lesiones personales graves, siempre pare el motor y deje que se enfríe antes de limpiar o mantener la unidad. • • Use un cepillo pequeño para limpiar el exterior de la unidad. No utilice detergentes fuertes. Los productos de limpieza para el hogar que contienen aceites aromáticos como pino y limón, y los disolventes como el queroseno, pueden dañar el plástico. Limpie todo rastro de humedad con una tela suave.
SOLUCIÓN DE PROBLEMAS PROBLEMA SOLUCIÓN EL MOTOR NO ARRANCA El depósito de combustible está vacío Llene el depósito de combustible con combustible nuevo El bulbo del cebador no se presionó lo suficiente Oprima el bulbo del cebador 10 veces o hasta que se vea combustible El combustible está viejo (más de 30 días) Drene el depósito de combustible y agregue combustible nuevo La bujía está averiada Vuelva a colocar la bujía La palanca de arranque en clima frío está en la posición cerrada Mueva la pal
NOTAS 39
GARANTÍA LIMITADA DEL FABRICANTE PARA: La garantía limitada que se extiende a continuación es otorgada por la empresa Troy-Bilt LLC (Troy-Bilt) y cubre mercaderías nuevas compradas y utilizadas en los Estados Unidos, sus posesiones y territorios.