
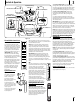
Operating Guide


Service
4
15
Maintenance Schedule
Before
Each use
Every
10 Hours
Every
25 Hours
Every
50 Hours
Every
100 Hours
Prior
to Storing
Clean Hood/Dash Louvers
P P
Clean Battery Terminals
P P
Lube Front Axles and Rims
P P
Clean Engine Cooling Fins
P P
Lube Pedal Pivot Points
P P
IMPORTANT: It is important to consult the
specific Engine Operator’s Manual included with
this machine for detailed engine maintenance
procedures and intervals.
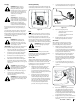
WARNING: Before performing any
maintenance or repairs, disengage
PTO, move shift lever into neutral
position, set parking brake, stop
engine and remove key to prevent
unintended starting.
Engine
Refer to the Engine Operator’s Manual for engine
maintenance instructions.
Check engine oil level before each use as instructed
in the Engine Operator’s Manual. Follow the
instructions carefully.
Changing Engine Oil
Oil Drain Hose Models
WARNING! If the engine has been
recently run, the engine, muffler and
surrounding metal surfaces will be
hot and can cause burns to the skin.
Exercise caution to avoid burns.
NOTE: The oil filter (if equipped) should be
changed at every oil change interval.
To complete the oil change, proceed as follows:
1. Run the engine for a few minutes to allow
the oil in the crankcase to warm. Warm oil
will flow more freely and carry away more
of the engine sediment which may have
settled at the bottom of the crankcase. Use
care to avoid burns from hot oil.
2. Open the tractor’s hood and locate the oil
drain port on the left side of the engine.
3. Unscrew the oil fill cap and remove the
dipstick from the oil fill tube.
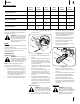
4. Snap the small end of oil drain sleeve onto
the oil sump. See Figure 4-2.
Figure 4-2
5. Remove drain plug and drain oil into a
suitable container with a capacity of no less
than 64 oz.
6. Service oil filter (if equipped) as instructed in
the separate Engine Operator’s Manual.
7. Perform the previous steps in the opposite
order after oil has finished draining.
8. Refill the engine with new oil. Refer to the
Engine Operator’s Manual for information
regarding the proper quantity and viscosity
of engine oil.
Lubrication
WARNING! Before lubricating,
repairing, or inspecting, always
disengage PTO, move shift lever into
neutral position, set parking brake,
stop engine and remove key to
prevent unintended starting.
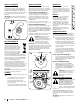
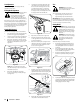
3. Open the protective cap on the end of the
oil drain valve to expose the drain port. See
inset of Figure 4-1.
OPENED
CLOSED
Figure 4-1
4. Remove the oil fill cap/dipstick from the oil
fill tube.
5. Push the oil drain hose (provided) onto the
oil drain port. Route the opposite end of
the hose into an appropriate oil collection
container with at least a 2.5 quart capacity,
to collect the used oil.
6. Slightly push in on the oil drain valve and
rotate counter-clockwise to open and allow
the flow of oil. See Figure 4-1.
7. After the oil has finished draining, push the
oil drain valve back in and rotate into the
locked position. Re-cap the end of the oil
drain valve to keep debris from entering the
drain port.
8. Replace the oil filter (if equipped) as
instructed in the Engine Operator’s Manual.
9. Refill the engine with new oil. Refer to the
Engine Operator’s Manual for information
regarding the proper quantity and viscosity
of engine oil.
Oil Drain Sleeve Models
WARNING! If the engine has been
recently run, the engine, muffler and
surrounding metal surfaces will be
hot and can cause burns to the skin.
Exercise caution to avoid burns.
To complete the oil change, proceed as follows: