
Product Manual


10 Section 3— ASSembly & Set-Up
Tire Pressure
WARNING! Maximum tire pressure under any
circumstances is 30 psi. Equal tire pressure should be
maintained at all times. Never exceed the maximum
inflation pressure shown on the sidewall of the tire.
The recommended operating tire pressure is:
• Approximately 10 psi for the rear tires
• Approximately 14 psi for the front tires
IMPORTANT: Refer to the tire sidewall for exact tire
manufacturer’s recommended or maximum psi. Do not
overinflate. Uneven tire pressure could cause the cutting deck to
mow unevenly.
Gas and Oil Fill-up
OIL
IMPORTANT: Your tractor is shipped with motor oil in the
engine. However, you MUST check the oil level before operating.
Be careful not to overfill.
Service and check the engine oil as instructed in the separate
Engine Operator/Owner Manual packed with your tractor. Read
the instructions carefully.
GASOLINE
The gasoline tank is located under the hood. Do not overfill.
WARNING! Use extreme care when handling
gasoline. Gasoline is extremely flammable and the
vapors are explosive. Never fuel machine indoors or
while the engine is hot or running. Extinguish
cigarettes, cigars, pipes, and other sources of ignition.
NOTE : Purchase gasoline in small quantities. Do not use gasoline
left over from the previous season, to minimize gum deposits in
the fuel system.
• This engine is certified to operate on unleaded gasoline.
For best results, fill the fuel tank with only clean, fresh,
unleaded gasoline with a pump sticker octane rating of 87
or higher.
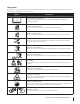
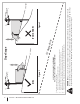
Attaching The Steering Wheel
If the steering wheel for your tractor did not come attached, the
hardware for attaching it has been packed within the steering
wheel, beneath the steering wheel cap. Carefully pry off the
steering wheel cap and remove the hardware.
1. With the wheels of the tractor pointing straight forward,
place the steering wheel over the steering shaft.
2. Place the washer (with the cupped side down) over the
steering wheel and secure with the hex bolt. See Fig. 3-3.
3. Place the steering wheel cap over the center of the steering
wheel and push downward until it “clicks” into place.
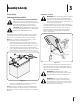
Attaching The Seat
If the seat for your tractor was not attached at the factory, refer
to the following steps.
NOTE: For shipping reasons, seats are either fastened to the
tractor seat’s pivot bracket with a plastic tie, or mounted
backward to the pivot bracket. In either case, free the seat from
its shipping position and remove the adjustment knob from the
bottom of seat before proceeding with the instructions below.
1. Position the shoulder screws (found on the base of the
seat) inside the slot openings in the seat pivot bracket.
Fig. 3-4.
2. Slide the seat slightly rearward in the seat pivot bracket,
lining up the center rear slot in the pivot bracket with the
remaining hole in the seat’s base.
3. Select desired position for the seat, and secure with the
adjustment knob removed earlier.
4. To adjust the position of the seat on models so equipped,
loosen the adjustment knob on the bottom of the seat.
Slide the seat forward or backward as desired. Retighten
the adjustment knob.
Figure 3-3
Figure 3-4
10