Safe Operation Practices • Set-Up • Operation • Service • Troubleshooting Operator’s Manual Push Mower Powered by CORE™ Model Series TB 510 1 8 E C 7 7 Table of Contents Safe Operation Practices......................................... 2 Troubleshooting......................................................14 Assembly & Set-Up................................................... 7 Spanish.....................................................................15 Controls & Operation..........................
1 Important Safe Operation Practices WARNING! This symbol points out important safety instructions which, if not followed, could endanger the personal safety and/or property of yourself and others. Read and follow all instructions in this manual before attempting to operate this machine. Failure to comply with these instructions may result in personal injury. When you see this symbol. 4. 5.
Slope Operation: Service Slopes are a major factor related to slip and fall accidents which can result in severe injury. Operation on slopes requires extra caution. If you feel uneasy on a slope, do not mow it. For your safety, use the slope gauge included as part of this manual to measure slopes before operating this machine on a sloped or hilly area. If the slope is greater than 15 degrees, do not mow it. 1. Remove key and store mower indoors when not in use.
Battery Charger Safety WARNING: Only use a 4044 battery charger to charge 4144 or 6216 batteries. DO NOT attempt to charge any other batteries with a 4044 battery charger. Other types of batteries may burst, causing fire, personal injury or property damage. 1. A nameplate on the charger indicates the voltage used. Never connect the charger to an AC voltage that differs from this voltage. 2. An extension cord should not be used unless absolutely necessary.
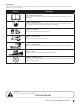
Safety Symbols This page depicts and describes safety symbols that may appear on this product. Read, understand, and follow all instructions on the machine before attempting to assemble and operate. Symbol Description READ THE OPERATOR’S MANUAL(S) Read, understand, and follow all instructions in the manual(s) before attempting to assemble and operate DANGER — ROTATING BLADES To reduce the risk of injury, keep hands and feet away.
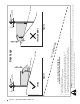
Section 1 — Important Safe Operation Practices Figure 1 line Figure 2 (TOO STEEP) 15° Slope WARNING! Slopes are a major factor related to slip and fall accidents which can result in severe injury or death. The machine is heavy and can speed up when going downhill. Be prepared to maintain control of the machine. To avoid loss of control, operate across slopes, not up and down. When turning, turn uphill, not down. Do not operate machine on slopes in excess of 15 degrees.
2 Assembly & Set-Up Thank You Thank you for purchasing this product. It was carefully engineered to provide excellent performance when properly operated and maintained. Please read this entire manual prior to operating the equipment. It instructs you how to safely and easily set up, operate and maintain your machine. Please be sure that you, and any other persons who will operate the machine, carefully follow the recommended safety practices at all times.
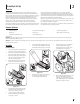
Grass Catcher Assembly Charging Battery 1. IMPORTANT: If battery is included with the mower, follow the steps below for charging the battery. The battery is not shipped fully charged. Follow steps below to assemble the grass catcher (if needed). Make certain bag is turned right side out before assembling (warning label will be on the outside). See Figure 2-4. a. b. Place bag over frame so that its black plastic side is at the bottom. Slip plastic channel of grass bag over hooks on the frame.
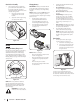
Side Discharge Chute/Mulch Plug Cutting Height Installing Battery Your mower was shipped as a mulcher. To convert to side discharge, make sure grass catcher is not installed and rear discharge door is closed. The cutting height adjustment lever is located above the front and rear left wheel. 6216 batteries 1. 1. Lift up the battery housing lid. 1. Pull the cutting height adjustment lever towards wheel. 2. Move lever to desired position for a change in cutting height. See Figure 2-9. 2.
3 Controls & Operation Push Start Safety Key Handle Panel Low Charge Full Charge Battery Level Indicator Blade Control Motor Load Indicator Blue Green Red Battery † Cutting Height Adjustment Lever Grass Catcher Handle Adjustment Lever Battery Charger † Cutting Height Adjustment Lever Side Discharge Chute † If Equipped Mulch Plug Figure 3-1 Controls and Features Motor Load Indicator (Handle Panel) Mulch Plug Push Start Safety Key The motor load indicator is located on the handle panel.
Stopping Motor Using Your Lawn Mower 1. WARNING: The operation of any lawn mower can result in foreign objects being thrown by the blade. Always wear safety glasses while operating the mower, or while performing any adjustments or repairs. Be sure lawn is clear of stones, sticks, wire, or other objects which could damage mower or bethrown by the blade in any direction and cause serious injury to the operator, others, or the equipment.
4 Service Maintenance Blade Care WARNING: When removing the cutting blade for sharpening or replacement, protect your hands with a pair of heavy gloves or use a heavy rag to hold the blade. Be certain to remove the battery(ies). General Recommendations • Always observe safety rules when performing any maintenance. • The warranty on this lawn mower does not cover items that have been subjected to operator abuse or negligence.
Battery Disposal Disposing of Damaged or Worn-Out Batteries WARNING: The following toxic and corrosive material is used in this battery: LITHIUM-ION, a toxic material. WARNING: To prevent contamination of the environment, contact your local waste disposal agency for specific instructions before disposing of damaged or wornout lithium-ion batteries. Take batteries to a local recycling and/ or disposal center, certified for lithium-ion battery disposal.
5 Troubleshooting Problem Battery will not charge Mower fails to start Battery dies quickly Mower stops while mowing Excessive vibration Mower will not mulch grass Uneven cut 14 Cause Remedy 1. The battery charger is not plugged in. 1. Plug the battery charger into a 120V 60hz AC source. 2. The battery is not fully inserted into the battery charger. 2. Remove and then reinsert the battery into the battery charger. 3. The battery and/or charger are too hot or too cold. 3.
Medidas de seguridad • Montaje • Funcionamiento • Servicio • Solución de problemas Manual del Operador Cortadora de césped de empuje impulsada por tecnología CORE™ Modelo Serie TB 510 1 8 E C 7 7 Índice Medidas de Seguridad............................................. 2 Solución de Problemas.......................................... 14 Armado e Instalación.............................................. 7 Piezas/Garantía..... Consulte el suplemento que se Controles y Funcionamiento.......................
1 Importantes medidas de seguridad ¡ADVERTENCIA! Este símbolo indica instrucciones de seguridad importantes que, de no seguirse, pueden poner en peligro su seguridad personal y/o material y la de otras personas. Lea y cumpla todas las instrucciones de este manual antes de intentar hacer funcionar esta máquina. El incumplimiento de estas instrucciones puede producir lesiones personales. Cuando vea este símbolo. 5.
y use el sentido común. Comuníquese con Asistencia al Cliente para solicitar el nombre del distribuidor de servicio más cercano a su domicilio. Servicio 1. Funcionamiento en pendientes: Las pendientes son un factor importante en los accidentes ocasionados por derrapes y caídas y pueden producir lesiones graves. El funcionamiento en pendiente exige mayor precaución. Si no se siente seguro en una pendiente, no corte el césped.
Seguridad del cargador de baterías No coloque el cargador de baterías en lugares donde se lo pueda pisar, donde alguien pueda tropezar o que se pueda dañar. SI el fluido de la batería entra en contacto con la piel: • Lave inmediatamente el área con jabón y agua. 10. No cargue las baterías bajo la lluvia ni en condiciones mojadas. Guarde el cargador de baterías en un área fresca y seca. • Neutralice el fluido de la batería con un ácido suave (jugo de limón, vinagre, etc.). 11.
Símbolos de seguridad En esta página se presentan y describen los símbolos de seguridad que pueden aparecer en este producto. Lea, comprenda y siga todas las instrucciones incluidas en la máquina antes de intentar armarla y hacerla funcionar. Símbolo Descripción LEA LOS MANUALES DEL OPERADOR Lea, entienda y siga todas las instrucciones incluidas en los manuales antes de intentar armar la unidad y hacerla funcionar.
6 Sección 1 — Importantes medidas de seguridad ¡ADVERTENCIA! Las pendientes son uno de los principales factores asociados a los accidentes por derrapes y caídas y pueden ocasionar lesiones graves o la muerte. La máquina es pesada y puede acelerar al descender una pendiente. Debe estar preparado para mantener el control de la máquina. Para evitar perder el control, desplácese en sentido transversal a la pendiente, no hacia arriba y abajo.
2 Armado e Instalación Muchas gracias Gracias por comprar este producto. Ha sido cuidadosamente diseñado para brindar excelente rendimiento si se lo hace funcionar y se lo mantiene correctamente. Por favor lea todo este manual antes de hacer funcionar el equipo. El manual le indica cómo configurar, hacer funcionar y mantener la máquina de manera fácil y segura.
Tolva para recorte de césped Carga de la batería 1. IMPORTANTE: Si se incluye la batería con la cortadora, siga los pasos de abajo para cargarla. La batería no se embarca con carga completa. Siga los pasos a continuación para ensamblar el colector de recortes de césped (si fuera necesario). Asegúrese que la bolsa para recortes está con el lado derecho hacia afuera antes de ensamblar (la etiqueta de advertencia estará hacia afuera). Vea la Figura 2-4. a.
Tolva de descarga lateral/adaptador para abono Su cortadora ha sido enviada como abonadora. Para la conversión a descarga lateral, asegúrese de que el colector de césped no esté instalado y que la puerta de descarga trasera esté cerrada. 1. Altura de corte Instalación de la batería La palanca de ajuste de altura de corte se ubica por encima de las ruedas izquierdas delantera y trasera. IMPORTANTE: Estas instrucciones se aplican únicamente para las baterías de los modelos 4144 o 6216. 1.
3 Controles y Funcionamiento LlaveStart de seguridad del Push Safety Key Panel de la manija Handle Panel botón de arranque Carga baja Low Charge Carga completa Full Charge Battery Level Indicador de nivel de la batería Indicator Control de laControl cuchilla Blade Motor Load Indicador de Indicator carga del motor Azul Blue Batería†† Battery Colector de Rojo Red Cutting Height Palanca de ajuste de Adjustment la altura de corte Lever Grass Catcher césped Cargador de batería† † Battery Charger G
Funcionamiento Detención del motor Uso de la descarga lateral Uso de la cortadora de césped 1. Coloque la tolva de descarga lateral siguiendo las instrucciones de la página 8, en la sección Armado e instalación. Cuando se usa la descarga lateral, el patrón de corte más eficaz es el que permite descargar los recortes en un área del césped aún no cortada.
4 Servicio Mantenimiento Cuidado de la cuchilla ADVERTENCIA: Cuando saque la cuchilla de corte para afilarla o reemplazarla, protéjase las manos usando un par de guantes gruesos o un trapo grueso para sostener la cuchilla. Asegúrese de extraer la(s) batería(s). Recomendaciones generales • • • • Respete siempre las reglas de seguridad al realizar tareas de mantenimiento. La garantía de esta cortadora no cubre elementos que han estado sujetos al mal uso o la negligencia del operador.
Eliminación de las baterías Eliminación de baterías dañadas o agotadas ADVERTENCIA: En esta batería, se utiliza el siguiente material tóxico y corrosivo: IÓN DE LITIO, un material tóxico. ADVERTENCIA: Para evitar la contaminación ambiental, póngase en contacto con su agencia local de eliminación de residuos para solicitar instrucciones antes de eliminar baterías de ion de litio dañadas o agotadas.
5 Solución de Problemas Problema La batería no carga Causa Solución 1. El cargador de baterías no está enchufado. 1. Enchufe el cargador de batería en una fuente de alimentación de 120 V 60 hz CA. 2. La batería no está bien insertada en el cargador de baterías. 2. Retire y luego reinserte la batería en el cargador de baterías completamente. 3. La batería y/o el cargador están demasiado calientes. 3.