
User's Manual


8 Section 3— ASSembly & Set-Up
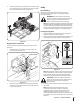
3. Pull the beam lock outward, line it up with the hole in the
beam bracket and release the beam lock. See Figure 3-3.
Figure 3-3
4. Fasten the tongue tube to the frame by reinstalling the two
three-inch hex screws removed earlier and tightly securing
with the two flange lock nuts. See Figure 3-3.
Positioning the Jack Stand
CAUTION: Do not attempt to move the log splitter
off of the crate base until after the jack stand has
been positioned downward.
The jack stand is shipped in the transport position. It must be
repositioned prior to fully removing the log splitter from the crate.
1. Remove the spring clip and clevis pin and pivot the jack
stand toward the ground, into the operating position.
2. Secure the jack stand in position with the clevis pin and the
spring clip. See. Figure 3-4.
Clevis Pin
Spring Clip
Figure 3-4
3. Carefully pry the small block of wood from the base of the
crate and position it beneath the jack stand. See Figure 3-5.
Figure 3-5
Removing the Supports
CAUTION: Do not attempt to move the log splitter
off of the crate base until after the crate supports
and plastic tie-straps have been removed.
There are three tie-straps securing the log splitter to the crate,
one on the beam support and one on each side of the reservoir
tank, near each fender. There are also two supports found on the
log splitter crate, one beneath the engine and one beneath the
beam. Carefully cut and discard each tie-strap and remove and
discard each support. See Figure 3-6.
Figure 3-6
NOTE: The jack stand, repositioned in the previous step, will
support the weight of the log splitter with the supports removed.