
Product Manual


10
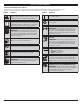
STOPPING INSTRUCTIONS
1. Release your hand from the trigger. Allow the engine to cool
down by idling.
2. Press and hold the On/Off switch in the OFF (O) position until
the unit comes to a complete stop (Fig. 15, A).
STARTING/STOPPING INSTRUCTIONS
WARNING:
Operate this unit only in a well- ventilated
outdoor area. Carbon monoxide exhaust fumes can be
lethal in a confined area.
WARNING:
Avoid accidental starting. Make sure you
are in the starting position when pulling the starter rope
(Fig. 16). To avoid serious injury, the operator and unit
must be in a stable position while starting.
To avoid serious personal injury, make sure that the
blower tube is locked in place or firmly installed.
Using the Cruise Control
1. Once the engine has started and warmed up, squeeze the
trigger to accelerate the unit as needed (Fig. 15, A).
2. For longer periods of operation and to eliminate possible finger
fatigue, move the cruise control toward the FAST position to
incrementally increase or maintain the unit’s engine speed (Fig.
15, B). When the cruise control is pressed, the trigger will
recede into the handle.
3. To decrease engine speed, move the cruise control to the SLOW
position and the trigger will return to idle position (Fig. 15, B).
IF USING THE OPTIONAL ELECTRIC STARTER OR POWER START BIT™ ACCESSORY
NOTE- This Unit Can Use an Electric Start or Power Start Bit™
Optional Accessory!
Please refer to the Electric Starter or Power Start Bit
TM
operator’s
manual for proper use of this feature. (Items Sold Separately!
Please refer to page 15 of this manual about purchasing these
accessories.)
STARTING INSTRUCTIONS
1. Check the oil level in the crankcase. Refer to Checking the Oil
Level.
2. Fill the fuel tank with fresh, clean unleaded gasoline. Refer to
Fueling the Unit.
NOTE: There is no need to turn the unit on. The On/Off Control is in
the ON ( I ) position at all times.
3. Fully press and release the primer bulb 10 times, slowly. Some
amount of fuel should be visible in the primer bulb (Fig. 14). If
fuel cannot be seen in the bulb, press and release the bulb until
fuel is visible.
4. Move the choke lever to Position 1 (Fig. 14).
NOTE: The unit should be started in idle. Do not squeeze the
trigger until step 10 (Fig. 15, A).
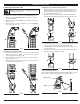
5. Crouch in the starting position (Fig. 16). Insert the electric
starter or Power Start Bit™ into the back of the unit (Fig. 32).
Refer to the Operation section of the Electric Starter or Power
Start Bit
TM
operator’s manual.
6. Do not squeeze the trigger. Press and hold the electric starter
or drill’s ON (I) button for 2 seconds.
7. Move the choke lever to Position 2 (Fig. 14).
8. Do not squeeze the trigger. Press and hold the electric starter
or drill’s ON (I) button for 2-second intervals until the unit starts.
9. Remove the electric starter or drill from the unit.
10. Squeeze and hold the trigger, or press down the cruise control
(Fig. 15, A), and allow the engine to warm up for 30 to 60
seconds.
11. Continue to squeeze the trigger. Move the choke lever to
Position 3 (Fig. 14) and continue warming the engine for an
additional 60 seconds. During this time the unit may be used.
IF... the engine does not start, go back to step 3.
IF... the engine fails to start after a few attempts, place the choke
lever in Position 3 and squeeze the throttle control. Press and
hold the electric starter or drill ON (I) button for 2-second
intervals until the unit starts.
IF WARM... If the engine is already warm, go back to step 7.