DIMM Installation Guide TROY DIMM (Dual Inline Memory Module) Installation Instructions Follow the instructions specified for your model of Hewlett-Packard printer to install the TROY DIMM. Click on the desired selection below to view the instructions for your HP printer. • HP 1200 printer…………………………………………………. Page 2 • HP 1300 printer…………………………………………………. Page 4 • HP 1320 printer…………………………………………………. Page 6 • HP 2100 / 2200 printer……………………………………….… Page 8 • HP 2300 printer………………………………………………….
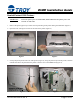
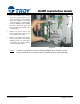
DIMM Installation Guide Hewlett-Packard 1200 Printers: IMPORTANT: Ensure the printer power is switched OFF, and then disconnect the printer power cord from the AC wall outlet. 1. Remove the printer paper tray to allow easier repositioning of the printer during the installation (Figure 1). 2. Open the toner cartridge access door at the front of the printer (Figure 2). Figure 1 Figure 2 3.
DIMM Installation Guide CAUTION: The DIMM is a static-sensitive device and can be permanently damaged if handled improperly. Avoid touching any components or the metal contacts along the edge of the DIMM. Before removing the DIMM from the anti-static bag, ground yourself by touching the metal portion of the printer chassis to dissipate any static charge. 4. Push the DIMM slot retaining clips out to the side (Figure 5), and remove the existing DIMM to allow installation of the new image DIMM.
DIMM Installation Guide Hewlett-Packard 1300 Printers: IMPORTANT: Ensure the printer power is switched OFF, and then disconnect the printer power cord from the AC wall outlet. 1. Remove the printer paper tray to allow easier repositioning of the printer during the installation (Figure 1). 2. Open the toner cartridge access door at the front of the printer (Figure 2). Figure 1 Figure 2 3.
DIMM Installation Guide 4. Push the DIMM slot retaining clips out to the side (Figure 5) to allow installation of the DIMM. Ensure the DIMM is positioned correctly (Figure 5), and then fully insert the DIMM into the DIMM slot until it snaps into place (the white retaining clips should close automatically). 5. Replace the printer panels, and then reconnect the printer power cord and printer data cable. 6.
DIMM Installation Guide Hewlett-Packard 1320 Printers: IMPORTANT: Ensure the printer power is switched OFF, and then disconnect the printer power cord from the AC wall outlet. 1. Open the toner cartridge access door at the front of the printer (Figure 1). 2. Unsnap the printer panel at the rear of the printer by lifting the edge of the panel at the two small dimples (Figure 2), swing the panel away from the printer, and unhook and then remove the panel from the printer to allow access to the DIMM slot.
DIMM Installation Guide 4. Replace the printer side panel by hooking the tab on the right-hand edge of the panel into the slot on the printer body (Figure 5 and Figure 6), and then swinging the panel toward the printer until it snaps into place. Figure 5 Figure 6 5. Reconnect the printer power cord and printer data cable. 6. Refer to the TROY Quick-Start Guide (provided with your TROY DIMM Solution) for instructions on installing the required TROY software and support files.
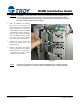
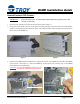
DIMM Installation Guide Hewlett-Packard 2100 / 2200 Printers: IMPORTANT: Ensure the printer power is switched OFF, and then disconnect the printer power cord from the AC wall outlet. 1. Depress the two buttons located at the rear of the printer, and pull the cover open (Figures 1 and 2). Figure 1 Figure 2 2. Unhinge the cover, and remove the cover from the printer (Figure 3). Figure 3 Document #50-70395-001 Rev.
DIMM Installation Guide 3. Open the toner compartment door, depress the interlock button on top of the printer (Figure 4), and then slide the printer panel forward about ½ of an inch. Pull panel away from printer (Figure 5). Figure 4 CAUTION: Figure 5 The DIMM is a static-sensitive device and can be permanently damaged if handled improperly. Handle the DIMM by the edges only. Avoid touching any of the components on the DIMM or the metal contacts along the edge of the DIMM.
DIMM Installation Guide 6. Refer to the TROY Quick-Start Guide for instructions on installing the required software and support files. NOTE: If assistance is required for removing or installing the DIMM, please call TROY Technical Support at (800) 332-6427. Customers outside the United States, please call (304) 232-0899. Document #50-70395-001 Rev.
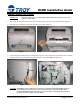
DIMM Installation Guide Hewlett-Packard 2300 Printers: IMPORTANT: Ensure the printer power is switched OFF, and then disconnect the printer power cord from the AC wall outlet. 1. Depress the two buttons located at the rear of the printer, and pull the cover open (Figures 1 and 2). 2. Unhinge the cover, and remove the cover from the printer (Figure 3). Figure 1 Figure 2 Figure 3 NOTE: If assistance is required for removing or installing the DIMM, please call TROY Technical Support at (800) 332-6427.
DIMM Installation Guide 3. Open the toner compartment door, depress the interlock button on top of the printer (Figure 4), and then slide the printer panel forward about ½ of an inch. The panel should easily pull away and detach from the printer (Figure 5). Depress the interlock button, then slide panel forward about 1/2 of an inch. Figure 4 Figure 5 CAUTION: The DIMM is a static-sensitive device and can be permanently damaged if handled improperly.
DIMM Installation Guide 6. Refer to the TROY Quick-Start Guide (provided with your TROY DIMM Solution) for instructions on installing the required TROY software and support files. Document #50-70395-001 Rev.
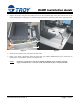
DIMM Installation Guide Hewlett-Packard 4100 Series Printers: IMPORTANT: Ensure the printer power is switched OFF, and then disconnect the printer power cord from the AC wall outlet. 1. Unsnap and slide the right-rear panel toward the rear of the printer (Figure 1). 2. Open the DIMM access door (Figure 2). For easier access, the metal door can easily be removed by lifting the door off the hinge slots.
DIMM Installation Guide 4. Close the DIMM access door, replace printer panels, and reconnect the power cord and printer data cable. 5. Refer to the TROY Quick-Start Guide for instructions on installing the required software and support files. Document #50-70395-001 Rev.
DIMM Installation Guide Hewlett-Packard 4200 / 4300 Printers: IMPORTANT: Ensure the printer power is switched OFF, and then disconnect the printer power cord from the AC wall outlet. 1. Unsnap and slide the right-rear panel toward the rear of the printer (Figure 1). 2. Pull open the DIMM access door (Figure 2). The metal door can easily be removed by lifting the door off the hinge slots. Slide panel toward rear of the printer. Figure 1 Open the DIMM access door.
DIMM Installation Guide 4. Ensure the TROY Font DIMM is oriented correctly (Figure 5), fully insert the DIMM into DIMM slot #2 (Figure 6), and then push firmly on each corner of the DIMM until the DIMM snaps into place. The retaining clips will close automatically. Verify the DIMM retaining clips are closed (retaining clips pressed against the DIMM) to ensure the DIMM is properly seated in the DIMM slot. Do not remove or change the slot location of any existing DIMMs.
DIMM Installation Guide Hewlett-Packard 8100 / 8150 Series Printers: IMPORTANT: Ensure the printer power is switched OFF, and then disconnect the printer power cord from the AC wall outlet. 1. Loosen the thumbscrews (turn counter-clockwise) at rear of the printer (Figure 1 and Figure 2), and then carefully slide the formatter board out of printer (Figure 3). Figure 1 Figure 2 Figure 3 2. Set the formatter board on a clean flat surface.
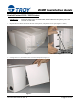
DIMM Installation Guide 4. Ensure the DIMM is positioned correctly, and then fully insert the DIMM into the DIMM slot until the DIMM snaps firmly into place (Figure 6). The retaining clips will close automatically. Verify the DIMM retaining clips are fully closed. Correct installation of the font DIMM The DIMM is keyed and can only be inserted when the with the retaining clips pushed closed. two notches are aligned with the tabs in the DIMM slot.
DIMM Installation Guide Hewlett-Packard 9000 Series Printers: IMPORTANT: Ensure the printer power is switched OFF, and then disconnect the printer power cord from the AC wall outlet. 1. Loosen the two thumbscrews (turn counter-clockwise) at the rear of the printer (Figure 1 and Figure 2), and then carefully slide the formatter board out of the printer (Figure 3). Carefully slide the formatter board out of the printer. Figure 1 Figure 2 Figure 3 2. Set the formatter board on a clean flat surface.
DIMM Installation Guide 4. Ensure the DIMM is positioned correctly, and then fully insert the DIMM into the DIMM slot until the DIMM snaps firmly into place (Figure 6). The retaining clips will close automatically. Verify the DIMM retaining clips are fully closed. Correct installation of the font DIMM The DIMM is keyed and can only be inserted when the with the retaining clips pushed closed. two notches are aligned with the tabs in the DIMM slot.
DIMM Installation Guide Hewlett-Packard 2015 Printers: IMPORTANT: Ensure the printer power is switched OFF, and then disconnect the printer power cord from the printer. Never install or remove the DIMM when the printer power is ON! 1. Open the DIMM access door at the left side of the printer using your finger to press and unlatch the door (Figure 1). 2. Detach the DIMM access door from the printer by fully opening the door and then unhooking the two hinge tabs from the printer panel.