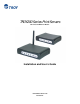
TROY200 Series Print Servers Ethernet and Wireless Models Installation and User’s Guide Part Number 40181-120 Revision A
Notice TROY GROUP, INC. SPECIFICALLY DISCLAIMS THE IMPLIED WARRANTIES OF MERCHANTABILITY AND FITNESS OF THIS PRODUCT FOR A PARTICULAR PURPOSE. TROY shall not be liable for any errors contained in this manual or for any damages resulting from loss of use, data, profits, or any incidental or consequential damages arising from the use of TROY products or services. The information contained in this documentation is subject to change without notice.
User’s Guide TABLE OF CONTENTS Section 1 – Product Overview Introduction............................................................................................................................ 1-1 Package Contents ................................................................................................................... 1-1 About this User’s Guide......................................................................................................... 1-2 Windows System Requirements ............
User’s Guide Appendix A – Safety and Regulatory Notices Information for United States Users ..................................................................................... A-1 Declaration of Conformity (FCC)......................................................................................... A-2 Information for Canadian Users (IC notice) ......................................................................... A-2 Information for European Users .....................................................
User’s Guide Section 1 – Product Overview Introduction TROY200 Series Print Servers allow you to share a printer equipped with a USB or parallel port on a wired or wireless network. The print server supports and automatically senses both 100baseTX Fast Ethernet and 10baseT Ethernet network connections, and the wireless version allows connections to 802.11a, 802.11b, and 802.11g wireless networks as well.
User’s Guide About This User’s Guide This User’s Guide contains information on system requirements, basic troubleshooting, and instructions on the following: Installing the print server hardware Configuring the print server for use on your network Windows print queue configuration Macintosh print queue configuration Windows™ System Requirements To configure the print server settings (wired and wireless versions) using the provided ExtendView Utility in Windows, your Windows-based system should include the
User’s Guide Wireless Print Server Requirements To print using a wireless print server, you will need an 802.11a, 802.11b, or 802.11g wireless network consisting of either of the following: An 802.11a, 802.11b, or 802.11g wireless-enabled PC or Macintosh printing straight to the printer (Ad-Hoc or Peer-to-Peer Mode). An 802.11a, 802.11b, or 802.11g wireless access point that allows wireless and wired Ethernetenabled computers to print to the wireless print server.
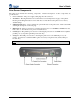
User’s Guide Print Server Components The print server includes the following components. Detailed descriptions of these components are provided below: Power connector – The power supply cable plugs into this connector. Test button – Pressing this button for less than three seconds will print a test page on the printer. Pressing and holding this button for more than five seconds will reset the print server to factory default settings.
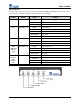
User’s Guide LED Indicators The front edge of the print server provides five Green/Orange LEDs (Light Emitting Diode) indicators for easy monitoring. The following table defines the function of each LED.
User’s Guide Pushbutton Functions The front edge of the print server provides a momentary pushbutton that can be used to print a test/configuration page or reset the device to factory default settings. Action Function Press pushbutton for > 1/8 second but < 5 seconds Prints a test/configuration page on each connected port Press pushbutton for > 5 seconds Resets the device configuration to factory defaults. The unit will reinitialize itself after updating the configuration memory.
User’s Guide Section 2 – Hardware Installation Before You Begin Before installing the print server, make sure you have installed and set up your printer as described in the documentation that came with the printer and that your printer functions properly. TROY200 Series Print Servers support a parallel and/or USB connection to your printer.
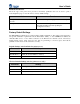
User’s Guide 3. Connect the print server to your printer(s) using the USB and/or parallel port of your printer. For a USB connection, use a standard USB A (print server side) to B (printer side) cable. For a parallel connection, use an IEEE 1284-compliant parallel printer cable. 4. Plug the print server power supply adapter into a suitable AC receptacle, and then plug the power supply cable into the print server. The print server will run through a sequence of power-up diagnostics for a few seconds.
User’s Guide Verifying the Connection to the Printer NOTE: Before attempting to print, it is very important to verify the connection between the print server and printer. If this connection is not working, you will not be able to print! 1. Verify that both the print server and the printer are powered on and ready, and that a USB or parallel printer cable is properly connected between the print server and printer. 2. Print a test page by pressing the Test button once.
User’s Guide Section 3 – Configuration and Management Configuration Options TROY200 Series Print Servers (wired and wireless models) can be configured using a variety of options, some of which do not require any software installation on the host PC.
User’s Guide HP Web JetAdmin Utility a web browser-based HP utility (e.g., Internet Explorer or Mozilla). can be downloaded from the HP web site http://www.hp.com. Configuration Console a command-line-oriented console. contains advanced features not available through ExtendView or the Web Browser Interface. the default password is ACCESS. can be accessed via TELNET using the print server’s Ethernet connection. type HELP for a list of console commands.
User’s Guide Configuring the Print Server via an Ethernet Connection For Microsoft Windows operating systems, the TROY ExtendView Utility (provided on the TROY200 Series Print Server Installation CD) is the recommended method of configuring one or more print servers on your network.
User’s Guide USING THE WEB BROWSER INTERFACE TO CONFIGURE THE PRINT SERVER (NON-WINDOWS SYSTEMS): To configure the print server using non-Windows operating systems (e.g., Unix systems), a standard web browser (e.g., Microsoft Internet Explorer or Netscape Navigator) can be used to access the print server’s embedded Web (HTTP) server pages, which contain the print server’s configuration options. No additional software is required. 1. Ensure your PC is connected and has access to your network. 2.
User’s Guide USING A THE INTERNAL COMMAND CONSOLE TO CONFIGURE THE PRINT SERVER: The command console can be accessed using a Telnet connection via an Ethernet connection. To use a Telnet connection, follow these steps: 1. Ensure the print server is connected via an Ethernet cable to the host computer. 2. From the Windows Start menu, click on Run, and then type the following command (where x.x.x.x. is the IP address of the print server. telnet X.X.X.
User’s Guide Windows Print Queue Configuration TROY recommends using the ExtendNet Connect for TCP/IP software for Windows printer port configuration (provided on the TROY200 Series Print Server Installation CD). TROY200 Series Print Servers are also compatible with Windows standard TCP/IP port and LPR ports. If you are using the Windows standard TCP/IP port, the default port number is 9100. Perform the following steps to install and use ExtendNet Connect for TCP/IP: 1.
User’s Guide Macintosh Print Queue Configuration TROY200 Series Print Servers support the AppleTalk protocol running over Ethernet (also known as EtherTalk). This capability allows Macintosh computers to print jobs to a printer simultaneously with jobs from Windows, UNIX, NetWare, and other computers.
User’s Guide MACINTOSH CONFIGURATION (OS 10.X) 1. If you have not done so already, set the name of your computer by going to the Applications folder*, selecting System Preferences, and then Sharing. Type in the computer name in the Network Identity section (you can also set the IP address here if you want). 2. Turn on Ethernet and AppleTalk by clicking on the Applications folder and clicking on Network. Next to Configure: select Built-in Ethernet (you can leave the Location: setting as Automatic). 3.
User’s Guide Section 4 – Troubleshooting Introduction This section describes procedures for troubleshooting problems you may encounter with the TROY print server, and is divided into the following sections: Installation Problems Intermittent Problems Protocol-Specific Troubleshooting If you have followed the steps in this section and you believe that you have a defective print server, then please refer to Section 5 – Where to Get Help for information on returning defective products.
User’s Guide If the self-test page prints successfully but you cannot print a job or you get distorted printouts, make sure the printer is set for the correct Page Description Language. Most new printers support AUTO mode, which means that they will automatically switch between PCL and PostScript. However, older printers like the LaserJet II, LaserJet III, and LaserJet IIISi require that the printer be set to the desired language through the printer control panel.
User’s Guide Troubleshooting Network Configuration Problems If you are using TCP/IP, make sure that your computer and the print server are on the same IP segment or can reach each other with a PING command from the host. The IP address you assign to the print server must be on the same logical network as your host computers (e.g., if your computer has an IP address of 192.189.207.3, the print server should have an IP of 192.189.207.
User’s Guide Troubleshooting Wireless Configuration Problems Make sure your computer’s wireless adapter and/or access point is configured properly and note the settings, paying special attention to the wireless mode, SSID or network name, WEP or security, and IP address settings so you can configure your print server to the same wireless settings. Make sure the radio mode is configured properly for 802.11a or 802.11g if auto mode is not connecting properly.
User’s Guide Section 5 – Where to Get Help Obtaining Technical Assistance TROY technical support is available to assist you with any questions concerning the setup, operation, or maintenance of your TROY200 Series Print Server. Worldwide Web Support Located at http://www.troygroup.com/wireless, the TROY web site provides answers to many common technical questions and also includes copies of product manuals and literature, as well as utilities and firmware load images.
User’s Guide Returning Products If you need to return a TROY product for any reason (failures, incorrect shipments, etc.), follow the steps below: 1. Contact the TROY Technical Support group at (304) 232-0899 to request a Return Goods Authorization (RGA) number (for North and South American customers), or call +49-7032-9454-21 (for European customers) and request a Return Material Authorization (RMA) number. 2. Be prepared with the serial number of the unit you are returning.
User’s Guide Appendix A – Safety and Regulatory Notices Information for United States Users This equipment has been tested and found to comply within the limits for a Class B digital device pursuant to Part 15 of the FCC Rules. These limits are designed to provide reasonable protection against harmful interference in a residential installation.
User’s Guide Declaration of Conformity (FCC) According to 47CFR, Part 2 and 15 for Class B Personal Computers and Peripherals; and/or CPU Boards and Power Supplies used with Class B Personal Computers: We: Located at: TROY GROUP, INC. 2331 South Pullman Street Santa Ana, CA USA Declare under sole responsibility that the product identified herein, complies with 47CFR Part 2 and 15 of the FCC rules as a Class B digital device FOR HOME OR OFFICE USE.
User’s Guide Information for European Users The print server and its built-in 802.11a, 802.11b, and 802.11g wireless technology is in compliance with the Class B Information Technology Equipment requirements and other relevant provisions of European Directive 1999/5/EC. The limits for Class B equipment were derived for typical residential environments to provide reasonable protection against interference with licensed communications devices. The internal function is a radio device using the 2.
User’s Guide Appendix B – Updating Firmware Loading New Firmware (Using the TCP/IP Update Utility) The TROY print server’s internal firmware can be easily updated as updates become available from TROY. Please visit the TROY web site for more information on how to download the latest firmware updates at http://www.troygroup.com. Updating the print server’s firmware will not change any userdefined configuration options.
User’s Guide 3. Verify that the file(s) are correct, and then click on OK. The utility will start searching for qualified print servers present on the network. 4. When the search process is complete, click on OK to continue. A list of discovered devices will be displayed. Document #40181-120 Rev.
User’s Guide 5. Select the desired print server to be upgraded, click on the green icon, or click on UPDATE Æ START. The firmware update process will begin automatically as soon as the print server is ready. 6. When the print server is ready, the firmware upgrade will begin. The IP address of the print server as well as the file you are loading will be displayed. Document #40181-120 Rev.
User’s Guide 7. The update log will be displayed when the update process is finished. Click on Close to continue. Loading New Firmware (Macintosh OS-X) NOTE: To upgrade your print server’s firmware from operating systems other than Windows or Macintosh, refer to the Print server Administrator’s Guide (provided in PDF format on the TROY200 Series Print Server Installation CD). 1. If you are using the Macintosh OS-X operating system, download the firmware file to your desktop. 2.