
Installation Sheet

8/25/2015
1
F4298 INSTALLATION INSTRUCTIONS
WARNING
DISCONNECT POWER BEFORE RELAMPING OR WIRING THE FIXTURE.
READ ALL INSTRUCTIONS COMPLETELY BEFORE STARTING INSTALLATION.
CAUTION
• TO AVOID THE RISK OF FIRE OR SHOCK, FIXTURE MUST BE INSTALLED IN COMPLIANCE WITH
ALL APPLICABLE NATIONAL AND LOCAL ELECTRICAL/BUILDING CODES.
• INSTALLATION AND MAINTENANCE OF THIS UNIT REQUIRES AN ELECTRICIAN OR
CERTIFIED FACTORY TRAINED TECHNICIAN.
• If an existing fixture is being replaced, remove it and note to which of the wires in the outlet box the fixture was attached.
DO NOT SEPARATE ANY OTHER WIRES THAT MAY BE IN THE BOX. DO NOT DAMAGE THE INSULATION OF OLDER WIRING.
In regular circumstances the BLACK wire will be the "Hot" lead and the WHITE wire will be the "Neutral" or "Common" lead.
A GREEN or BARE COPPER wire is the "Ground". In older buildings it is always good practice to reconfirm the polarity of the wiring.
NOTICE
• The important safeguards and instructions outlined on this sheet cannot cover all possible conditions and situations that may occur.
It must be understood that common sense, caution and care are factors that cannot be built into any product.
Caution and care must be supplied by the person(s) installing, operating and caring for this lighting fixture.
• This fixture is designed to be mounted on a correctly installed standard round or octagon box or a through wiring box
with a plaster frame. The box must be securely mounted to the structure of the building.
The crossbar and hardware supplied should be used. Directly mounting the fixture to the outlet box may make it impossible to
correctly align the fixture.
• NOTE: For your safety be certain that the circuit breakers controlling outdoor lighting and equipment are GFI breakers.
FIXTURE PREPARATION
1. Remove the fixture, parts and parts bag(s) from the carton.
NOTICE:
Before discarding the carton, double check to make certain that all parts are found.
.
FIXTURE INSTALLATION
New construction: Double check that APPROVED BOX and SUPPORT
were correctly installed following the manufacturers instructions.
Remodeling (with enclosed ceiling) Install APPROVED BOX and SUPPORT
following manufacturer's instructions.
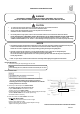
1. Slide crimp-on cable clamps onto the SAFETY CABLE.
The outlet box may have to be removed for this step.
Loop the SAFETY CABLE over the structure or brace.
Thread the long end of the SAFETY CABLE
back through the crimp-on cable clamps. Adjust the cable and tightly set the clamps.
Thread the SAFETY CABLE into the outlet box (from the top).
Reinstall the outlet box if necessary.
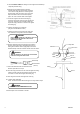
2. Attach the crossbar to the 10-24 STUDS in the outlet box.
DO NOT
USE THE BOX "EARS"
Thread nipple into the crossbar and hex nut onto the nipple.
Place the canopy against the ceiling.
Adjust the nipple so that 1/4" of thread is exposed beyond the canopy.
Tighten the hex nut against the crossbar.
SEE P
A
GE 2 FOR SUGGESTED FIELD CONSTRUCTED SUPPORT