0 ® m m _m_m ual / Manual dei Operario Operator's Pressure _r!i Washer / Lavadora de Presi6n Model / Modelo 020213 WARN|NG _!'1 Before using this product, read this manual and follow all Safety Rules and Operating ADVERTENCIA Antes de utilizar el producto, lea este manual y siga todas las Instructions. Reglas de Seguridad e Instrucciones Quesdons. _ Pregunms. _ HeIpline = 1=888=611=6708 de Uso.
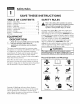
Safety Rules SAVE THESE iNSTRUCTiONS TABLE OF CONTENTS Section I - Safety Rules .......................... Section 2 - Features and Controls ................... Section Section Section Section 3 4 5 5 - Assembly ............................ - Operation ......................... - Product Specifications ................... - Maintenance ........................ SAFETY RULES 2-5 6 7-9 I 0-14 15 15-16 Section 6 - Storage .............................. Section 7 - Troubleshooting ......................
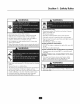
Section 1: Safety Rules WARNING WARNING WHEN ADDING FUEL Turn pressure washer OFF and let it cool at least 2 minutes before removing gas cap. Operate pressure washer ONLY outdoors. Fill fuel tank outdoors. Keep exhaust gas from entering a confined area through windows, doors, ventilation intakes or other openings. DO NOT DO NOT operate pressure washer inside any building or enclosure, even if doors or windows are open. Use a respirator or mask whenever vapors may be inhaled.
Section 1: Safety Rules WARNING WARNING ALWAYS point gun in safe direction trigger, to release pressure and squeeze and avoid kickback before starting engine. Engage trigger When starting engine, pull cord slowly spray gun each time, lock when NEVER aim spray gun at people, animals or plants. not in use. until resistance DO NOT is felt allow CHILDREN to operate pressure washei: and then pull rapidly to avoid kickback. NEVER repair high pressure hose. Replace it.
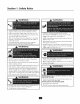
Section 1: Safety Rules [ • DO NOT , i CAUTION tamper with governed CAUTION If you have questions speed. contact DO NOT operate pressure washer above rated pressure. DO NOT use, ask dealer or Power Products. siphon standing water for the water NEVER operate without DO NOT secure spray gun in open position. DO NOT leave spray gun unattended while units with protective DO NOT broken or missing parts, or housing or covers. by-pass any safety device on this machine.
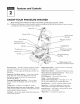
Features and Controls KNOWYOUR PRESSURE WASHER Read this Operator's Hanna[ and safety Compare the illustrations with your pressure and adjustments. Save this manual for future rules before operating your pressure washer. washer to familiarize yourself with the locations of various controls reference. Spray Gun Accessory Tray Quick Connect SprayTips Recoil Nozzle with Starter.
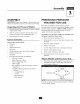
Assembly ASSEMBLY iMPORTANT: Read entire Operator's Manual before you attempt to assemble or operate your new pressure washer. Unpacking the Pressure Washer i. Remove the parts bag, accessories, and inserts included with pressure washer. 2. Slice two corners at the end of carton from top to bottom so the panel can be folded down fiat. 3.
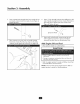
Section 3: Assembly 2. Insert carriage bolts through holes from outside of unit and attach a plastic knob from inside of unit (Figure 2). Tighten by hand. 4. m Insert"U' bolt through hole just above billboard on left side of handle (viewing from front of unit). Hold bolt in place and attach a plastic knob from inside of unit (Figure 4).Tighten by hand. % Spray Gun Hook 5. 3. Place accessory tray over holes on handle (viewing from front of unit).
Section 3: Assembly Connect Hose and Water Supply 4. to Pump_ iMPORTANT: To avoid pump damage, you must assemble the nozzle extension to the spray gun and attach all hoses before you start the engine. NOTE: Run water through your garden hose for 30 seconds to clean out any debris. iMPORTANT: DO NOT siphon standing water for the water supply. Use ONLY cold water (less than 100°F). 5.
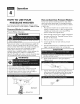
Operation HOWTO USEYOUR How to StartYour PRESSURE WASHER If you have any problems operating your pressure washer, please call the pressure washer helpline at I =888=61 I =6708. Pressure Washer Pressure Washer [ Location Clearance A wA..i.G 1 " Keep at least 5 ft. (I 52 cm) clearance on all sides of pressure washer including overhead. Place pressure washer in a well ventilated area, which will allow for removal of deadly exhaust gas.
Section 4: Operation 8. Engage trigger lock on spray gun trigger (Figure II). NOTE: Always )osition when keep the throttle operating the lever pressure in the "Fast" washer. WARNING Loci< 9. When starting engine,position yourself as recommended in Figure 12 and start engine according to instructions given in engine operator's manual.Alsosee operating instructions tag located on the pressure washer. DO NOT Allow touch hot surfaces and avoid hot exhaust gases.
Section 4: Operation How to Use Accessory Tray The unit is equipped with an accessory tray with places to store your spray gun, nozzle extension and quick connect spray tips.There is also a hook at the front of the accessory tray to hold your high pressure hose. NOTE:The brush.The nozzle.The How to Use Quick Tips washer.You can buy these Spray The quick-connect on the nozzle extension allows you to switch between four different quick connect spray tips.
Section 4: Operation 2. Pull back collar on quick-connect and puii current spray tip off. Store spray tips in holder provided on the accessory tray. 3. To apply 2. Prepare detergent manufacturer. 3. Place small filter end of detergent detergent container. Pull back on collar, insert new spray tip and release collar. Tug on spray tip to make sure it is securely in place. 5. For most effective cleaning, keep spray tip from 8 to 24 inches away from cleaning surface.
Section 4: Operation Pressure Washer Rinsing Cleanin ent For Rinsing: I. Engage trigger lock on spray gun. 2. Remove black detergent extension. 3. Select and install desired high pressure spray tip following instructions "How to Use Quick Connect SprayTips". 4. Siphoning I. Place detergent clean water. 2. Engage trigger loci< on spray gun. 3. Attach 4. Flush for I-2 minutes. Keep spray gun a safe distance from the area you plan 5. Shut off engine. to spray. 6.
Maintenance SPECIFICATIONS Max Outlet Pressure Max Flow Rate Detergent ..................... .......... 2.3 gallons per minute (gpm) Use detergent Water Supply Temperature 2550 psi approved for pressure washers ................ Automatic Coo[ Down System Will cycle when water reaches 125°- 155°F ...........................
Section 5: Maintenance I. 2. Detach spray gun and nozzle extension from high pressure hose. Detach nozzle extension from spray gun and remove o-ring and screen from nozzle extension. Flush screen, spray gun, and adjustable nozzle extension with clean water to clear debris. 6. Place in-line filter screen into threaded end of nozzle extension. Direction does not matter. Push screen in with eraser end of pencil until it rests flat at bottom opening.Take care not to bend the screen. 3.
Storage Data Tag Protecting Data tag information is very important if you need help from our Customer Service Department or an authorized service dealer. To protect the pump from damage caused by mineral deposits or freezing, use PumpSaver, Model 6039, to treat pump.This prevents freeze damage and lubricates pistons and seals. • The data tag (Figure 18) is located on the base of the pressure washer.
Troubleshooting 7 TROU B LES H OOT| NG Problem Cause Correction I. I. Low pressure nozzle installed. Replace nozzle with high pressure nozzle. Pump has following problems: failure to produce pressure, erratic pressure, chattering, loss of pressure, low water volume. 2. Water 3. 2. Clear Inadequate water supply. 3. Provide 4. Inlet hose is kinked or leaking. 4. Straighten 5. Clogged inlet hose strainer. 5. Check fails to mix with 6. Water adequate stops during water flow.
Effective February t, 2006 replaces all undated Warranties LIMITED and all Warranties dated before February t, 2006 WARRANTY Troy-Bilt® is a registered trademark of Troy-Bilt, LLC and is used under license to Briggs & Stratton Power Products. Briggs & Stratton Power Products Group, LLC will repair or replace, free of charge, any part(s) of the pressure washer that is defective in material or workmanship or both.
Reglas de Seguridad CONSERVE TABLA ESTAS |NSTRUCC|ONES DE CONTENIDOS Secci6n I Reglas De Seguridad Secci6n 2 CaracteHsdcas REGLAS ...................... y Controles 20-23 ................... Secci6n 3 Secci6n 4 Ensamblaje .............................. Funcionamiento .......................... Secci6n Secci6n 5 5 Especificaciones Mantenimiento Secci6n 6 Almacenamiento 24 25-27 28-31 De[ Producto ........................... ................. 34 Secci6n 7 Diagnosticos De Averlas ....
Secd6n 1: Reglas de Seguridad ADVERTENClA ADVERTENClA CUANDO Opere el lavadora de presi6n SOLAiVlENTE AI_IADA COMBUSTIBLE Apague el lavadora de presi6n (posici6n menos por 2 minutos antes de remover al aire libre. AsegQrese de que los gases de escape no puedan entrar por ventanas, puertas, tomas de aire de ventilaci6n u ou*as aberturas en un espacio cerrado en el que puedan acumularse. Llene el tanque al aire libre. NO opere el lavadora de presi6n dentro aunque haya puertas o ventanas abierras.
Secd6n l: Reglas de Seguridad ADVERTENClA Antes de arrancar el motor, apunte hacia una direcci6n segura y apriete presi6n y evitar el retroceso. SIEMPRE con la pistola el gatillo rociadora para descargar la NUNCA apunte la pistola a la genre, animales o plantas. NO permita en ningtin momento lavadora a presi6n. Cuando arranque el motor, tire lentamente del cable hasta sentir una resistencia y, a continuaci6n, tire r_pidamente de 61 para evitar su que NIIqIOS operen la m_quina retroceso.
Secci6n 1: Reg[as de Seguridad PRECAUCION PRECAUCI6N NO juegue con partes que puedan aumentar de mando. NO opere la m_quina lavadora a presi6n superior a su clasificaci6n de presi6n. o disminuir la velocidad Si usted tiene alguna pregunta acerca de las finalidades de uso del generador, pregOntele a su concesionario o contacte a Briggs & Stratton Power Products. con un valor de presi6n Hace no agua de parar de siphon para el abastecimiento agua SOLO fria (menos que 100°F).
Caracteristicas y Controles CONOZCA i!-_i SU MAQUINA LAVADORA DE PRESlON i_ Lea el Manual de[ Operario las regiaslavadora de seguridad de poner enconmarcha su m_.quina presibn. Compare las ilustraciones con suy m_quina a presi6n antes para familiarizarse las ubicaciones de loslavadora diferentes a controles y ajustes. Guarde este manual para referencias fumras.
Montaje PREPARANDO HONTAJE IMPORTANTE: Lea to_lmente que intente ensamblar Desembale u operar el Manual del Operario ALTA antes su lavador a alta presi6n, la Lavadora EL LAVADORA PRESlON Si usted tiene un problema al ensamblar algunas piezas o se encuentran a Presi6n PARA SU USO la unidad o si hacen falta daffadas, Ilame a la [inea direcCa del [avador a alta presi6n, a[ [=888-6 [ 1-6708. I. Saque todo el contenido de la caja de cart6n, a excepci6n de la lavadora a presi6n. 2. 3.
Secci6n 3: Montaje 2. Inserte el perno del soporte a trav6s de los orificios desde fuera de la unidad y sujete una perilla de pl_sdco desde el Inserte un gancho en "L" a trav6s del oriflcio situado iusto encima gel panel, en el lado izquierdo del manubrio (vista interior desde la parte delantera de la misma unidad.Apriete manualmente (Figura 20). posici6n y coloque de la unidad). Sujete el gancho en su el pomo de pl_stico desde el interior la unidad. (Figura 22).Apriete de a mano.
Secci6n 3: Montaje Conecte Agua la Manguera a la Bomba IMPORTANTE: y el Surninistro 4. de Haga correr el agua a craves de la manguera de su iardin por 30 segundos para limpiar cualquier escombro que se encuentre Usted deber_ armar la extensi6n en ella. Corte el agua. para boquillas IMPORTANTE: y conecgar todas las mangueras antes de darle arranque al motor. La bomba resulgar5 da_ada si arranca el motor sin tenet todas las abastecimiento mangueras conecgadas y el suministro 5.
Operaci6n COMO USAR LAVADORA SU MAQUINA A PRESlON C6mo Darie Lavadora Arranque a Presi6n Para darle arranque a su m_quina lavadora a presi6n movida a Si tiene prob[emas operando su m_quina [avadora a presi6n, por favor [lame a la [inea de ayuda para m_.quinas [avadoras a presi6n al 1-888-611-6708. motor por primera vez, siga estas inscrucciones paso a paso.
Secci6n 4: Operaci6n 8. Coloque el pasador de seguridad rociadora (Figura 29), al gatillo de la pistola ADVERTENCIA El Pasador de la Seguridad 9. Cuando arranque recomendada el motor, col6quese en la posici6n en la Figura 30 y siga las instrucciones manual del operario de instrucciones del moron Consulte situada en la limpiadora tambi6n del NO la edqueta toque las superficies calientes y evite los gases del escape a alta temperatura.
Secci6n 4: 0peraci6n Utilizaci6n de la Bandeja 3. de Accesorios La unidad est;t equipada con una bandeja de accesorios con habit;iculos para guardar la pistola rociadora, el prolongador de [a boquilla y [as puntas de rocio. La parte delantera de la bandeja t_mbi6n incluye un gancho para suietar la manguera de alta presi6n. Seleccione " . la punta - _® de rociado • ®e- La Presidn ® deseada: e- _® 40 c' Blanca 1750 PSI 2.
Secci6n 4: Operaci6n Limpieza y Aplicaci6n de[ Detergente IMPORTANTE: Utilice detergentes diseffados especificamente para m_quinas lavadoras a presi6n. detergentes caseros podrian daffar [a bomba. [ Los PRECAUCl6. 1 2. Retire la puntas de rocio de detergente prolongador de la boquilla. 3. Seleccione e instale la puntas de rocio de alta presi6n deseada conforme alas instrucciones de la secci6n "C6mo Usar el Puntas de Rocio'. 4.
Mantenimiento ESPECIFICACIONES Presi6n de Salida Caudal M_ixirno Detergente ..................... .............. Que no pase de 100°F ..................... Autorrl_tico Funcionari cuando el agua alcance de 125% 155°F ............................... 75 Ibs.
Secci6n 5: Mantenimiento 3. 4_ Coloque el anillo 'o' en la ranura respectiva. Empuje el anillo 'o' hasta que quede ajustado contra el colador del filtro en linea. Mantenimiento Conecte la extensi6n para boquillas a la pistola de rociado la manera descrita anteriormente en este manual. central.
Secci6n 6: Almacenamiento Etiqueta Localice de Datos [a etiqueta Proteger de datos informaci6n en el espacio informaci6n es fundamental disponib[e M diente de datos mode[o 7 de serie, presi6n. Copie de presi6n a continuaci6n. para poder departamento de servicio servicio autorizado. La etiqueta de[ lavadora recibir los n6meros de presi6n en el espacio futuras consultas.
Diagnosticos de Averias 7 REPARAClON DE AVERIAS Problema Causa Soluci6n I. I. Est_ usando la boquilla de baja presi6n (negra). La bomba presenta problemas: los siguientes no produce una presi6n errada, traqueteo, p6rdida de presi6n, volumen de agua esc_ bloqueada. 2. Limpie la encrada. 3. Suministro de agua inadecuado. 3. Proporcione 4. La manguera de entrada presenca fugas, 6. 7.
Fecha de entrada en vigor:t de Febrero de 2006. Sustituye a todas las garantias GARANTiA sin fecha y a las de fecha anterior al 1 Febrero de 2006 LIMITADA "Troy-Bilt® es una marca registrada de Troy-Bilt, LLC bajo licencia de Briggs & Stratton Power Products. Briggs & Stratton Power Products Group, LLC reparara o sustituira sin cargo alguno cualquier componente de la lavadora a presi6n que presente defectos de materiales y/o mano de obra.