0 ® d Pressure Washer / Lavadora de Presi6n Modem / Modemo 020240 Before using this product_ read this manuaH and follow aHH Safety P,uHesand Operating Instructions. Questions_ Troy=BilleD is a registered Pregun_.as_ Helpiine trademark Antes de utiHizar eHproducto_ Heaeste manuaH7 siga todas Has P,egHasde Seguridad e Instrucdones de Uso.
Safety Rules SAVE THESE TABLE [NSTRUCTmONS OF CONTENTS SAFETY H o Safety RuHes .......................... 2 - Features and ControHs ................... Section Section Section 3 o AssembHy ............................ Section 4 o Operation .......................... 5 ° Product Specifications ................... 5 o Maintenance ........................
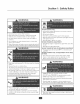
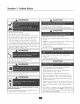
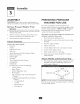
Section 1: Safety Rules WARNING WARNING WHEN ADDING FUEL Turn pressure washer OFF and let it cool at least 2 minutes before removing fuel cap. Operate pressure washer ONLY outdoors, Fill fiJeI tank outdoors. Keep exhaust gas from entering a confined area through windows, doors, ventilation intakes or other openings. DO NOT operate DO NOT over{ill tank.AIIow Keep fueI away from sparks, other ignition sources. pressure washer inside any building or space for fuel expansion.
Section 1: Safety Rules WARNING CAUTION DO NOT tamper with governed DO NOT operate pressure speed. washer above rated pressure. CAUTION DO NOT Allow touch hot surfaces. equipment to coo[ before touching. The pressure washer must be at [east 5 feet from structures having combustible wails and/or other combustible materials.
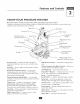
Features and Controls KNOWYOUR Read this owner's PRESSURE WASHER manual and safety rules before operating Compare the illustrations with your pressure washer to familiarize adjustments. Save this manual for future reference.
ASSEMBLY mNPORTANT: Read entireowner's manual beforeyou attempt to assemble or operate your new pressure washer. Remove I, Remove with 2, 3. Pressure the parts pressure Slice two Washer at the end of carton bottom so the panel can be folded Remove pressure Carton inchded washer, corners washer from from down PRESSURE FOR USE If you have any problems with the assembly of your pressure washer or if parts are missing or damaged, ca[[ the pressure washer helpline at 1=888=6 [ 1=6708.
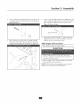
Section 3: Assembly 2, Insert carriage boks through holes from outside of unit and attach a phstic knob from inside of unit (Figure 2). Tighten by hand. 4, Insert"L" bolt through hole just above billboard on left side of handle (viewing from front of unit). Hold bolt in place and attach a plastic knob from inside of unit (Figure 4).Tighten by hand. !l % Spray Gun Hook 5, 3, Place accessory tray over holes on handle (viewing from front of unit).
Section 3: Assemb(y Connect Hose and Water 4. Supp)y to iMPORTANT: To avoid pump damage, you must assemb(e the nozzle extension to the spray gun and attach all hoses before you start the engine. NOTE: Run water through your garden hose for 30 seconds to clean out any debris. mMPORTANT: DO NOT siphon standing water for the water supply. Use ONLY cold water (less than [O0°F). 5.
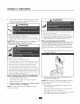
Operation HOWTO USEYOUR PRESSURE WASHER How Pressure Washer Washer StartYour Pressure Washer To start your pressure washer for the first time, follow these instructions step-by-step.This starting information also applies if you have let the pressure washer sit idle for at least a day. I. Place pressure washer near an outside water source capable of supplying water at a flow rate greater than 3.3 gallons per minute and no less than 2.0 PSI at pressure washer end of garden hose.
Section 4: Opecation Start engine owner's according to instructions manuaH.AHso Hocated on the see operating pressure given in engine instructions WARNING tag washer. 1 WARNING Keep high pressure hose connected while system is pressurized. Hfengine starts and fails to continue to run or if increased resistance is felt during starting pull attempts, squeeze trigger on spray gun.
Section 4: Operation How to Use ProiectPro TM Nozzle 2. Pull back collar on quick-connect and pull current ProiectPro TMnozzle off. Store ProiectPro TMnozzles in holder provided on the accessory tray. 3. Select desired ProiectPro TM nozzle: System The quick-connect on the nozzHe extension allows you to switch between four different ProiectPro TMsystem nozzHes. The ProiectPro TM nozzHes vary the spray pattern as shown (FigureH3).
Section 4: Operation For maximum rinsing (higher pressure and lower fiow)_ for stubborn or hard to reach surface such as second story surfaces_ paint removal oiH stains_ rust removal or other stubborn substances (tar, gum_ grease_ wax, etc.)_ sdect red 0° ProjectPro TM nozzHe (Figure H6). How to Use the Turbo Nozzle The turbo nozzle rotates the high pressure stream in a rapid circular pattern.
Section 4: Operation Cleaning and mNPORTANT: pressure the Chemical Use soaps designed washers_ Household Pressure for speci_caHy detergents could damage Washer Rinsing [=or Rinsing: I. Apply 2. Remove black cleaning extension, trigger lock to spray gun. 3. Select and install pump.
SPECIFICATIONS Na_ outmet Detergent Water .......... "25_0 psi 2.3 gallons per minute (gpm) Use detergentapproved forpressurewashers Suppmy ................ Automatic coom Down System Shipping ..................... Pressure Max Fmow Rate Weight GENERAL PRESSURE WASHER MAINTENANCE Check and Clean ............. WiHHcycHewhen water reaches H25 °° H55°F ........................... 75 Hbs. MAINTENANCE Examine the screen on the pump's water inHet.
Section 5: Maintenance I. Detach spray gun and nozzle pressure hose. Detach gun and remove 2. and screen from with Place in4ine filter screen Direction eraser care into inoline fiker screen. recess. Assemble nozzle earlier in manual. trigger principal clogged etc.
Section 5: Maintenance Pump Changing ENGINE Maintenance Pump oim See the engine owner's Change oil every 50 hours or once yearly, whichever occurs first. NOTE: Purchase a premeasured number H90586GS, by contacting service center. Change properly maintain manuaH for instructions on how to the engine. CAUTION bottle of pump oil item the nearest authorized Used motor oil has been shown to cause skin cancer in certain laboratory animals. oim as fommows: pump MAINTENANCE H.
Storage PREPARING THE FOP, STORAGE fJNmT VVater shouHd not remain in the unit for Hong periods of time. Sediments or mineraHs can deposit on pump parts and "freeze" pump action. If you do not pHanto use the pressure washer for more than 30 days_follow this procedure: H. Rush chemicaH injection hose by pHadng fiker into a paiH of dean water whiHe running pressure washer in How pressure mode. Rush for one to two minutes. 2. Shut off engine and Het it cool then remove high pressure and garden hoses.
TROU B LES H OOTi NG Probmem Cause Correction I. I. Low pressure nozzle installed. Replace nozzle with high pressure nozzle. Pump has following faimure to produce problems: pressure, pressure_ chattering_ pressure_ mow water 2. VVater inlet is blocked. 2. Clear inlet. 3. Inadequate 3. Provide 4. Inlet hose is kinked or leaking. 4. Straighten 5. Closed 5. Check and clean inlet hose strainer. 6. VVater 100°E 6. Provide is blocked 7. Clear blocks 8. Replace 9.
TROYoBILT® OWNERWARRANTY POLICY Effective November [, 2004 LiMiTED WARRANTY "Troy°Bik® is a registered trademark ofTroy°Bik_ LLC and is used under license to Briggs & Stratton Power Products. Briggs & Stratton Power Products will repair or rephce_ free of charge_ any part_ or parts of the equipment** that are defective in material or workmanship or both.Transportation charges on parts submitted for repair or replacement under this warranty must be borne by purchaser.
Reglas de Seguddad CONSERVE TABLA ESTAS DE CONTENIDOS Secd6n U Reglas De Seguridad Secd6n 2 Caracteris_icas REGLAS ...................... y Controles 20-22 ................... EnsambJaje .............................. Fundonamienm .......................... 24-26 27-3U Secci6n 5 Secci6n 5 Espedficaciones Del Producm ................. Hantenimiento ........................... 32 32-34 Secci6n Almacenamiento ............................ ......................
$ecd6n 1: Re Jas de $eguddad ADVERTENCIA CUANDO Opere el lavadora de presi6n SOLAHENTE AI_ADA COMBUSTIBLE Apague e] bvadora de presi6n (posid6n OFF) y d6jelo enfl ia! al menos pot 2 rninuEos antes de lemoveF la tapa de la gasolina. al aile libre. Aseg0rese de que los gases de escape no puedan entlal pot ventanas, puertas, tomas de aile de vendlaci6n u o_las abeltutas en un espacio cerlado en el que puedan acumula! se. Llene el tanque al aire lible.
5ecd6n 1: Reglas de Seguddad PRECAUCION ADVERTENCIA NO iuegue con partes que puedan aurnentar de mando. NO opere la rn_quina lavadola a presi6n superior a su dasificaci6n de plesi6n. o disminuir la velocidad con un valor de presi6n PRECAUCI6N NO toque las superficies calientes. Perrnita que el equipo se enfrie antes de tocarlo. El lawldora a plesi6n debe estar situado a un minimo de 152 em (5 pies) de toda estructuta con mu!os combustibles y/o otras materias combustibles.
Caracter[sticas y ControIes CONOZCA Lea el manual Compare $U MAQUINA del propietario LAVADORA y [as regmas de seguridad Ias ilustraciones con su m_quina I_vadora a presi6n Guarde este manual para referencias antes DE PRESION de porter en marcha para familiarizarse su m_quina con las ubicaciones mavadora a presi6m de los diferentes controJes y ajustes, futuras.
Montaje PREPARANDO iMPORTANTE: Lea to_Jmente que intente ensambiar Remueva u operar e[ Lavador el manual del propietario a Presi6n ALTA antes su [avador a alta presi6n. Si usted tiene un problema lavador y las adiciones induidas con e! lavador de presi6n, Corte dos esqonas en los extremos parte superior desde la hasta la parte inferior, de tal manera que el p_inel pueda set" dobJado en forma Remueva el Javador a presi6n Contenido del cart6n plana.
Secci6n 3: Montaje 2. Inserte un gancho en "L" a trav6s del orificio situado iusto encima del panel, en el lado izquierdo del manubrio (vista Inserte el perno del soporte a trav6s de los oHficios desde fuera de la unidad y su]ete una perilla de pl_,sdco desde el interior de la misma unidad.Apriete manualmente (Figura desde Ia parte delantera 26). posici6n y coloque de la unidad).
Secci6n 3: Montaje Conecte [a Manguera Agua a [a Bomba iMPORTANTE: y conectsr La bombs Usted y e[ Suministro conectsdss 4. Hags correr 30 segundos encuentre deber_ armsr todss las msngueras antes resultar4 daffsda si arrsnca mangueras de y eJ suministro la extensi6n de dsrle el motor pars el sgua a trsv@s de Js msnguera pars limpiar cuslquier escombro en ella. Corte Antes de conectar srrsnque sl motor: sin tener todas Jss JMPORTANTE: Hsce sbsstecimiento 5. agua sbierto.
Operad6n ¢OMO USAR SU MAQUINA LAVADORA Si dene problemas C6rno DaHe Arranque Lavadora a Presi6n A PRE$1ON operando Para darle arranque a su rn_iquina lavadora a presi6n movida a su m_iquina lavadora a presi6n, pot motor favor IJame a la linea de ayuda para m_.qonas lavadoras a presi6n al to888o6t 1o6708. por primera informaci6n acerca a darle arranque Ubicaci6n de[ Lavadora Libre Amrededor del Lavadora a Presi6n Coloque vez, siga estas instrucciones paso a paso.
$ecd6n 4: Operaci6n Pour d6marrer le moteur, sovez Ies instructions qo figurent dans Ie manuel d'utilisation. Consulte tambi_n [a etiqueta de instrucciones situada en Ia Iimpiadora a presi6n. ADVENTENCIA Hantenga conectada la manguera a la m_quina rociado cuando el sistema est6 presurizado, Apriete el disparador en el fusil del iocio para alivia! la plesi6n atrapada, cada vez usted para motoe Comprometa la eerradura dispa[ado! en el fusil del rocio.
$ecci6n 4: Operaci6n C6mo Usar ei $istema ProiectPro 2. de Bociuiiias TM en e[ soporte El conector r_pido del prolongador [a boquilla y montar Desp[ace hacia arras el anillo de[ conector r_pido y tire de las boquillas ProiectPro TM.Ouarde las boquiJlas ProiectPro TM de la boqui[[a perm[te una de [as cuatro diferentes de la bande]a de accesorios. cambiar que incluye el 3. Eliia la boquilla ProiectPro TM que desee: s[stema Pro]ectPro TM.
$ecci6n 4: Operaci6n Para un enju_gado de m_ixima potenda (aka presi6n y baio caudal), para superficies rebeldes o de difidl acceso, como superficies de prantas akas, eliminad6n de pinmra, manchas de aceite, eliminaci6n de 6xido u otras sustandas difidles (alqukr_n, resina, grasa, cera, etc.), C6rno Usar [a Boquilla a Chorro La boquiHa a chorro hace girar la corriente de alta presi6n en un patr6n circular r@ido.
$ecci6n 4: Operaci6n Lirnpieza y Apiicaci6n [HPORTANTE: UdIice espedficamente para detergentes dei Quirnico quimicos lavadoras de la M_quina Lavadara a Presi6n Pars Enjuage: diseffados mgquinas csseros podrian Enjuage a presi6n. Los daffar Jabombs. [ I. Co[oque el cerrojo 2. Retire [a boquiJJa de detergente boquilJa. de seguridad a la pistols de rociado. 3.
de Sa[ida Caudal M_x[mo Detergente M_xima ..................... .............. de Agua 2550 PSI 2.3 ga[ones por minuto Use el detergente Temperatura HAQUINA de[ $uministro Que no pase de [00°F ............ Funcionar4, cuando el agua alcance de ................................ 125°- 155°F Revise A y Limp[e ............................... el Colador de Entrada Examine et co[ador de entrada de la manguera de iardin.
$ecd6n 5: Mantenimiento [. 2. Retire Ia pistola y la extensi6n para boquillas de la manguera de alta presi6n, Retire Ia extensi6n para boquillas de Ia pistola y reth-e et anilIo 'o' y eI colador de la extensi6n para boquillas. Lave el colado_; pistola y extensi6n para boquillas 9. con agua Iimpia para etiminar Nantenimiento toda cJase de residuos. CoIoque e[ colador det fiitro en I[nea en e[ extremo con rosca de la extensi6n para boquillas. Su direcci6n no importa.
$ecd6n 5 y 6: Mantenimiento PIANTENIMIENTO DEL MOTOR I. Vac[e el tubo de detergente, co[ocando el filtro en un envase Ileno de agua limpia mientras est6 corriendo el agua a baia presi6n. Lave por I o 2 minutos. 2. Apague el motor y permita refrescar, entonces quJta mangas aitas de presi6n y iardin. Desconecte el alambre de ia bujia. 3. Vacie todos los liquidos presentes en la bomba, halando la manecilla de retroceso hasta sos veces.
Diagnosticos de Aver[as REPARACION DE AVERIAS Prob[ema Causa Somuci6n [. I, Est_ usando la boquiJla de baja presi6n (negra). La bomba presenta prob[emas: produce los siguientes no produce una pres[6n traqueteo, p6rd[da vo[umen La entrada de agua est'. bJoqueada. 2. Limpie la entrada. 3. Sumin[stro 3, Proporcione 4. La manguera de entrada est,. dobhda presenta fugas. 5. presi6n, El colador de pres[6n, bajo 6.
POLiTiCA PARA EL PROPiETARIO Efectiva desde e[ GARANTIA "Troy-Bik® es una rnarca regiscrada de Troy-Bik, reparar_, o sustituir_ transporce sin cargo alguno cualquier Iocalice el distribuidor Stratton e[ periodo de servicio Power Products componente conforme LIMITADA m_is pr6ximo a los t6rminos alas condiciones Briggs & Stratton servicio Power Produces defectos de rnaceriales y/o rnano de obra Los gastos de de esta garantla correr_n a cargo del comprado_: estipuJadas en Ia misma_ Par