
Manual


Operation
HOWTO USEYOUR
PRESSURE WASHER
If you have any problems operating your pressure washen
please call the pressure washer heIpline at 1-888-611-6708.
Pressure Washer Location
Pressure Washer Cmearance
WANNING
Operate pressure washer ONLY outdoors.
Keep exhaust gas from entering a confined area through
windows, doors, ventilation intakes or other openings.
DO NC)T operate pressure washer inside any holding or
endosure_
The pressure washer must be at least 5 ft. (I 52 cm) from
structures having combustible walls and/or other
combustible materials. Leave at least 3 ft. (92 cm) all around
pressure washer including overhea& for adequate cooling,
maintenance and servicing.
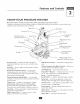
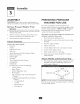
Place pressure washer in a well ventilated area, which will
allow for removal of deadly exhaust gas. DO NOT place
pressure washer where exhaust gas could accumulate and
enter inside or be drawn into a potentially occupied
building. Ensure exhaust gas is kept away from any
windows, doors, ventilation intakes or other openings that
can allow exhaust gas to collect in a confined area
(Figure 8). Prevailing winds and air currents should be taken
into consideration when positioning pressure washer.
/
/
/
/
Typical Pressu_ e
Washe_ Shown
Exhaust Port
How to StartYour Pressure Washer
To start your pressure washer for the first time, follow
these instructions step-by-step.This starting information
also applies if you have let the pressure washer sit idle for
at least a day.
I. Place pressure washer near an outside water source
capable of supplying water at a flow rate greater than
3.3 gallons per minute and no less than 2.0 PSI at
pressure washer end of garden hose.
2. Check that high pressure hose is tightly connected to
spray gun and pump. See "Preparing Pressure VVasher
for Use" for illustrations.
3. Make sure unit is in a level position.
4. Connect garden hose to water inlet on pressure
washer pump. Turn ON water.
• Damage to equipment resulting from failure to follow this
instruction will void warranty.
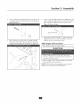
5. Attach nozzle extension to spray gun (Figure 9).
Tighten by hand.
6. Choose desired ProjectPro TMnozzle, pull back nozzle
extension collar, insert nozzle and release collar.Tug on
nozzle to make sure it is securely in place (Figure I 0).
See "How to Use ProjectPro TMNozzle System".
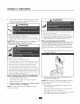
7. Engage trigger loci< on spray gun trigger (Figure I I).
O