
Manual


Section 4: Opecation
Start engine according to instructions given in engine
owner's manuaH.AHso see operating instructions tag
Hocated on the pressure washer.
WARNING
When starting engine, pull cord slowly until resistance is felt
and then pull rapidly to avoid kickback.
Hfengine starts and fails to continue to run or if increased
resistance is felt during starting pull attempts, squeeze trigger
on spray gun.
NOTE; Always keep the throttle lever in the "Fast"
)osition when operating the pressure washer.
WARNING
DO NOT touch hot surfaces,
Allow equipment to coot before touching.
The pressure washer must be at least 5 feet from structures
having combustible walls and/or other combustible materials.
Keep at least 3 feet of clearance on all sides of pressure
washer for adequate coding, maintenance and servicing.
Hnthe State of California a spark arrester is required by law
(Section 4442 of the California Public Resources Code). Other
states may have similar laws. Federal laws apply on federal
lands. [f you equip the muffler with a spark arrester; it must be
maintained in effective working order:
How to Stop Your Pressure Washer
H. Let engine idHe for two minutes.
2. Turn engine off according to instructions given in
engine owner's manual
3. Squeeze trigger on spray gun to relieve trapped
pressure in hose to avoid iniury.
NOTE: A smaHH amount of water wiHHsquirt out when
pressure is reHeased.
1
WARNING
Keep high pressure hose connected to pump and spray gun
while system is pressurized.
Squeeze trigger on spray gun to rdieve trapped pressure,
every time you stop engine. Engage trigger lock on spray gun.
4. Engage trigger Hock on spray gun when not in use.
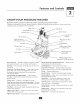
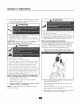
The unit is equipped with an accessory tray with pHacesto
store your rotating brush, utility brush, turbo nozzHe,and
ProjectPro TM nozzHes.There is aHsoa hook at the front of
the accessory tray to hoHdyour high pressure hose.
H. Store your gun and nozzHeextension on the hooks
attached to the base and handHe,as shown in Figure H2.
2. PHacerotating brush through hoHeon accessory tray on
right side of unit (Figure H2).
3. PHaceutility brush through hoHeon accessory tray, as
shown in Figure H2.
3. Push turbo nozzHe up and into chipon accessory tray
untiH it snaps in, as shown in Figure H2.
4. Hang high pressure hose on hook attached to accessory
tray on front of tray, as shown in Figure H2.