Safetyo Assembly o Operation oTips & Techniques o Maintenance * Troubleshooting o Parts Lists oWarranty ® 21-inch Rotary Mower -- Model Series 836 READ SAFETY RULES AND mNSTRUCTmONS CAREFULLY BEFORE OPERATION Warning: This unitis equippedwith an internalcombustionengineand shouldnot be usedon or nearany unimprovedforest-covered,brush= coveredor grass=coveredland unlessthe engine'sexhaustsystemis equippedwith a sparkarrestermeetingapplicablelocalor state laws (if any), If a sparkarresteris used,
This Operator's Manua_ is an important part of your new lawn mower. Jt wH_ he_p you assembJe, prepare, and maintain the unit for best performance. P_ease read and understand what it says. Table of Contents SJope Gauge ....................................................... Safe Operation Practices ................................... Setup and Adjustment ....................................... Operating Your Lawn Mower .............................. Maintaining Your Lawn Mower .........................
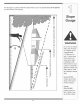
yourlawnmoweronsuchslopes. / t / / / / / o WARNING w_ Do not mowon inclines with a dope in excess of 15 degrees (a rise of approximately 2-" feet). A riding r could overturn and cause serious injury. if operating a walb behind mower on such a dope, it is extremely footing and you could dip, resulting in serious injury. Operate RiDiNG mowers up and down dopes, neveracross the face of dopes. o Operate WALK-BEHIND mowers across the face of dopes, never up and down slopes. \ 3
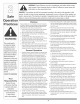
manual.Aswithanytypeofpowerequipment, carelessness or erroronthepartoftheoperatorcan resultinseriousinjury.Thismachine is capableofamputating handsandfeetandthrowingobjects. Failuretoobservethefollowingsafetyinstructions couldresultin seriousinjuryordeath. ! Children 6. Alwayswear safetyglasses or safetygogglesduringoperation andwhile performingan adjustmentor repairto protect youreyes. Thrownobjectswhich ricochetcan causeserious injury to the eyes.
The cutting bladecontinuesto rotatefor a fewseconds after the engine is shut off. Neverplace any part of the bodyin the blade area untilyou are surethe blade has stopped rotating. 7. Extinguishall cigarettes,cigars, pipes andothersources of ignition. 8. Neverfuel machineindoorsbecauseflammablevaporswill accumulatein the area. 20. Neveroperate mowerwithoutpropertrailshield, discharge cover, grasscatcher,bladecontrolhandle,or othersafety protectivedevices in place andworking.
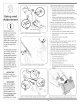
as shownin Figure34. Makecertain the lower handleis seatedsecurelyinto the handlemounting brackets. b. Tighten handknobs securingupperhandleto lowerhandle.Makesure thateach carriagebolt is seatedproperlyin the handb. 2. Replaceand tighten hand knobsremovedearlbr securinglowerhandb to handlebrackets,Figure3-2. 3. The ropeguide is attachedto the right sideof the upperhandle.Loosenthe wingnut whichsecuresthe rope guide,Figure3-3. HandleMounting Stand behind the moweras if you were going to operate it, a.
8. The batterypackwithin the ElectricStartermustbe charged8 to 10 hoursbeforeuse. Referto "Charging Battery"in the Maintenancesectionfor instructions. 9. Followthe stepsbelowto install the mulchingbaffle: a. Lift the rear dischargedoor and lift the grass catcherup and off ofthe pivotrod, if installed. b. Insertthemulchingbaffleas shown in Figure3-5 and releasethe reardischargedoor. 10.Toconvertto side discharge,makesure grasscatcheris off of the unitand rear dischargedoor is closed. a.
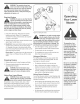
Know Your Lawn Mower Drive Control Oil Fill WARNING The blade control mechanism is a Figure4-1:The major componentson the mower. safety device. Never B_ade Contro_ attempt to bypass its The blade control is attached to the upper handle of the mower. Depress and squeeze it against the upper handle to operate the unit. Release it to stop engine and blade. operations. Use extreme care when handling gasoline. Gasoline is extremely flammabb and the vapors are explosive.
WARNING:The operation of any lawn mower can result inforeign objects being thrown intothe eyes, which can damage your eyes severely. Always wear safety glasses while operating the mower or while performing any adjustments or repairs on it. f l Figure4-2:Startingthe mower. 1. Pushprimerthreetimes.Wait abouttwo seconds betweeneachpush, Figure4=2.In temperature around55°For below,primefive times. Do notprime to restarta warmengine. stop the engine.
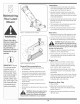
f "_ Lubrication 1, Lubricatepivot pointson the bladecontrolat least oncea seasonwith lightoil The bladecontrol must operatefreely in both directions,Figure54, 2, Lubricatethe wheelsat least oncea seasonwith lightoil (or motoroil), If wheelsare removedfor any reason,lubricatesurfaceof the axleand innersurface of the wheelwith lightoiL 3, Lubricatethe torsionspringand pivot pointon the rear dischargedoor and side mulchplug periodicallywith lightoil to preventrust, 4, Thetransmissionis pre-lubricatedand sea
the carburetorare up, 2, Removebolt, blade bell support,blade,and adapter from the enginecrankshaft,Figure5=3, NOTE:Whenremovingthe blade,adapter,etc,, be care= ful notto removeor misplaceparts aboveit associated with the engine pulley, 3, The bladecan be sharpenedwith a file or on a grind= ing wheel Do notattemptto sharpenthe blade while it is still on the mower,Whensharpeningblade,follow originalangle of grind,Grind cuttingedgesequallyto keepbladebalanced, J Figure5-3:Remove thebolt,support,blade,andadap
release toxic materials. 1. Loosenround handleknobssecuringupperand lowerhandlesand carefullyfold the upperhandle downtowardthe lowerhandleas shownin Figure 5=3. 2. Removethetwo screwssecuringbatterycoverto batteryhousingand placethem to the side, Figure 5=3. 3. Open batterycover,removepositiveand negathfe leadsfrom battery,removeand replacewith new battery,Figure5-4. Connectthe positiveleadto the positiveside of the batterypack,then connectthe negativeside.
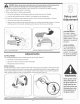
Replacing Fuse "_ The electricstartercircuit and batteryare protectedby a 40 amperefuse,If the fuse burnsout, theelectricstarter will not operate,If the unitfails to startwith the electric starter,performthe followingstepsto checkthe fuse insidethe batteryhousing: 1. Open the batterycover as describedin Replacing Battery, see Figure5-3. 2. Removefuse from socketand inspectasshown in Figure5-6. If it is burnedout, replacewith standard automotive40 amperefuse. _- 3.
Engine runs erratic For repairs beyond the minoradjustments listed here, eentact an authorize d serviee dealer, I Eng ne overheats 1. Sparkplugwire loose. 1. Connectand tightenspark plug wire. 2. Blockedfuel line or stale fuel 2. Cleanfuel line; fill tank with clean, fresh gasoline. 3. Ventin gas cap plugged. 3. Clearvent. 4. Water or dirt in fuelsystem. 4. Drainfueltank. Refillwith fresh fuel 5. Dirtyair cleaner. 5. Referto enginemanual 6. Carburetorout of adiustment. 6.
Safety Labels Found On Your Lawn Mower mower fet any reasen, \ 15
Shown fo_rde_el_ce _ Q Q Shown for relerence 16
1 75&04093 WBelt 2 73b04338 SpringLever 3 720-0230 FoamGrip 4 717-04184A SpurGear,14T-LH 5 710-0599 6 750-04305A Spacer 7 749-04267 8 687_02204 FrontBracketAssembly 9 731-05470 TT Screw,1/&20 x 0.50 CrossBracket C@ Spacer 10 741-04136B SplitHex FlangeBearing 11 73&O4014B FrontWheel 12 71b04065 FlangeLockNut,3/8d6 13 63&04207C RearWheel 14 710-04531 Screw,1/&20x.
\ \ \ 18
1 746-04265A DriveCable RubberGrommet 29 731-05017A Rear Door 30 710=1241 Screw,1/4=15x 1,00 2 735-04059 3 753-05096A DriveControlAssembly 31 720_04072 Star Knob 4 731-04204 Bail Cover 32 73b04264 TorsionSpring,RH 5 747d161A BladeControl 33 711_04374 Door PivotRod 6 746_04213 ControlCable 34 647_04051 GrassCatcherFrame 7 749-04037 LowerHandle 35 664-04045 GrassCatcher 8 725-0157 CableTie 36 710=1174 CarriageBolt, 5/16=18x 2,00 9 73b04265 TorsionSpring,LH 37 72
MANUFACTURER'S LIMITED WARRANTY FOR ® The limitedwarrantyset forth belowis givenbyTroy_BiltLLCwith respect to newmerchandisepurchasedand usedin the UnitedStates,its posses_ sionsand territories. "Troy_Bilt"warrantsthis productagainstdefects in materialand workmam shipfor a periodof two (2) years commencingon thedate of original purchaseand will, at its option,repair or replace,freeof charge,any part foundto be defectivein materialsor workmanship.