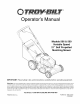
® Operator's Manual Models 566 & 569 Variable Speed 21" Self Propelled Mulching Mower IMPORTANT: Warning: Read safety rules and instructions This unit is equipped with an internal combustion carefully before operating engine and should not be used on or near any unimproved equipment. forest-covered, brush- covered or grass-covered land unless the engine's exhaust system is equipped with a spark arrester meeting applicable local or state any).
TABLEOFCONTENTS Content Important Safe Operation Practices Slope Gauge Assembling Your Lawn Mower Know Your Lawn Mower Operating Your Lawn Mower Maintaining Your Lawn Mower Page 3 6 7 10 11 12 Content Service and Adjustments Off Season Storage Trouble Shooting Illustrated Parts List Page 14 15 16 18 Warranty 20 FINDINGMODELNUMBER This Operator's Manual is an important part of your new lawn mower. It will help you assemble, prepare and maintain the unit for best performance.
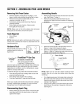
SECTION 1: IMPORTANT SAFEOPERATION PRACTICES WARNING: This symbol points out important safety instructions which, if not followed, could endanger the personal safety and/or property of yourself and others. Read and follow all instructions in this manual before attempting to operate this machine. Failure to comply with these instructions may result in personal injury. When you see this symbol--HEED ITS WARNING.
yourfooting,releasethebladecontrolhandle 2. Do not mow slopes greater than 15 degrees as immediately andthebladewillstoprotatingwithin shown on the slope gauge. threeseconds. 3. Do not mow on wet grass. Unstable footing could 9. Mowindaylightorgoodartificiallight;walk,notrun. cause slipping. 10.Stopthebladewhencrossinggraveldrives, walkwaysor roads. Children 11.
9. Neverremovegascapor addfuelwhiletheengine ishotor running.Allowenginetocoolatleasttwo minutesbeforerefueling. 10.Neveroverfillfueltank.FilltanktonomorethanY2 inchbelowbottomoffillernecktoprovidespacefor fuelexpansion. 11.Replacegasolinecapandtightensecurely. 12.If gasolineis spilled,wipeitofftheengineand equipment. Moveunittoanotherarea.Wait5 minutesbeforestartingtheengine. 13.
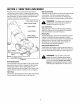
SIGHT AND HOLD THIS LEVEL WITH A VERTICAL TREE I q A POWER POLE I A CORNER OF A BUILDING I OR A FENCE POST I I I _o 15 ° ,_ 09 WARNING Do not mow on inclines with a slope in excess of 15 degrees (a rise of approximately 2-1/2 feet every 10 feet). A riding mower could overturn and cause serious injury. If operating a walk-behind mower on such a slope, it is extremely difficult to maintain your footing and you could slip, resulting in serious injury.
SECTION3: ASSEMBLING YOURLAWNMOWER RemovingUnitFromCarton Assembling Handle • • • • • Remove staples, break glue on top flaps, or cut tape at carton end and peel along top flap to open. Remove loose parts included with unit (i.e., operator's manual, oil, etc.). Cut corners and lay carton down flat. Remove packing material. Roll or slide unit out of carton. Check carton • Remove grass bag from the unit and set it out of the way. See Figure 1 (step 1).
Assembling GrassCatcher Carriage Bolt Wing Nut \. _andle \ \ / NOTE: If the grass catcher came pre-assembled, proceed to the next section. If not, follow the steps below to assemble it before attaching to the mower. Insert frame into grass bag with the black plastic side on the bottom of bag. See Figure 5.
AttachingGrassCatcher ConvertingToSide Discharge • • Lift the rear discharge door and place the grass catcher on the pivot rod. Let go of discharge door so that it rests on the grass catcher. See Figure 6. Rear Discharge Door • • • Make sure the grass catcher is off the unit and the rear discharge door is closed. Refer to Figure 7. On the side of the mower, lift the mulching plug. See Figure 7. Slide the two hooks of the side-discharge chute under the hinge pin on the mulching plug assembly.
SECTION4: KNOWYOURLAWNMOWER BladeControl Handle Read this owner's manual and safety rules before operating your lawn mower. Compare the illustrations in Figure 8 with your lawn mower to familiarize yourself with the location of various controls and adjustments. Save this manual for future reference. The blade control handle is located on the upper handle of the mower. The blade control handle must be depressed in order to operate the unit. Release the blade control handle to stop the engine and the blade.
SECTION5: OPERATING YOURLAWNMOWER _ _ instructions ARNING: andRead warnings and understand on the machine all and in this manual before operating. WARNING: Never run engine indoors or in enclosed, poorly ventilated areas. Engine exhaust contains carbon monoxide, an odorless and deadly gas. Gas& OilFill-Up • • _ operator ARNING: is standing Be sure nearnothe onelawn other mower than while the starting engine or operating mower. Check oil level and add oil if necessary.
For best results in mowing, keep the cutting height position high until you can determine a suitable height. Mulching For effective mulching, do not cut wet grass because it tends to stick to the underside of the deck, preventing proper mulching of grass clippings. New or thick grass may require a narrower cut. The ground speed should be adjusted to the condition of the lawn. If mowing has been delayed and the grass has been allowed to grow in excess of 4", mulching is not recommended.
Lubrication • Turn mower on itsside making sure that the air filter and the carburetor are up. To RemoveBlade: • Remove the hex bolt which holds the blade adapterpulley assembly to the engine crankshaft. See Figure 10. Remove the pulley assembly and the bell support from the crankshaft. Remove blade from the blade adapter and pulley. Lube Adapter-Pulley Assembly Blade Lube Blade Bell Support Lube _...
SECTION7: SERVICE& ADJUSTMENTS Tighten the screw, loosened earlier, to secure the belt tension spring to the transmission, and reassemble the front drive cover. ReplacingDriveBelt • Remove two shoulder screws securing the front drive cover to the mower deck. See Figure 11.
Height Adjustment Lever Bottom View ® .............. _Upper Adjustment Wheel\ \ \ Handle \ \ Drive Clutch Control Figure 15 Figure 14 NOTE: For some people the drive clutch control may not be in a comfortable position. You can adjust the handle by tightening the adjustment wheel. DriveClutchControl EngineAdjustments The adjustment wheel is located in the drive clutch control handle housing and is used to tighten or loosen the drive belt.
• NOTE: Fuel stabilizer is an acceptable altemative to emptying the tank of fuel in minimizing the formation of fuel gum deposits during storage. • • • Add stabilizer to gasoline in fuel tank (on model 569 if FreshStart TM fuel preserver cartridge is empty) or storage container. Do not drain the gas tank and carburetor if using fuel stabilizer.
NOTES 17
SECTION10: PARTSLIST FORMODELSERIES566 & 569 ® Q Q Q 18
ModelSeries566 & 569 Ref. No 1. 2. 3. 4. 5. 6. 7. 8. 9. 10. 11. 12. 13. 14. 15. 16. 17. 18. 19. 20. 21. 22. 23. 24. 25. 26. 27. 28. 29. 30. Part No. 710-0599 736-0270 17032A 732-1014 747-0710 710-0654A 787-01222 710-0216 712-0431 782-5002B 750-04404 750-04405 734-04018A 716-0865 717-1762 717-1761 782-7551A 716-0102 736-0474 687-02018 687-02044 782-0512B 782-0511A 736-0447 748-0355 741-0604A 732-0708 687-02057 687-02056 687-02033 687-02031 687-02039 687-02040 732-0866 720-0312 Description Ref.
ModelSeries566 & 569 2O
ModelSeries566 & 569 Ref. No 1. 2. 3. 4. 5. 6. 7. 8. 9. 10. 11. 12. 13. 14. 15. 16. 17. 18. 19. 20. 21. 22. 23. 24. Part No. 731-04204 731-1059 731-1058 731-1057 787-01258 747-1161A 749-04206 720-0279 720-0284 710-1205 746-0957 710-1174 731-0620 710-0599 746-04206 726-0240 749-0928A 664-04011 747-04080 731-04998 732-0700 731-04134A 747-0996 750-04162 Ref. No Description Deluxe Bail Cover 25. Cable Mounting Cap Control Cover Lower Half 26. 27. 28. 29. 30. 31. 32. 33. 34. 35. 36. 37. 38. 39. 40. 41.
NOTES 22
NOTES; 23
MANUFACTURER'S LIMITED WARRANTY FOR: ® The limited warranty set forth below is given by Troy-Bilt LLC with respect to new merchandise purchased and used in the United States, its possessions and territories. e. "Troy-Bilt" warrants this product against defects in material and workmanship for a period of two (2) years commencing on the date of original purchase and will, at its option, repair or replace, free of charge, any part found to be defective in materials or workmanship.