0 TRtll BILT" OPERATOR'S MANUAL Chipper Shredder Model 494 IMPORTANT: READ SAFETY RULES AND INSTRUCTIONS CAREFULLY Warning: This unit is equipped with an internal combustion engine and should not be used on or near any unimproved forestcovered, brush-covered or grass-covered land unless the engine's exhaust system is equipped with a spark arrester meeting applicable local or state laws (if any). If a spark arrester is used, it should be maintained in effective working order by the operator.
TABLEOFCONTENTS Content Page Important Safe Operation Practices ................................................................... 3 Assembling Your Chipper Shredder ................................................................... 5 Know Your Chipper Shredder ............................................................................ 7 Operating Your Chipper Shredder .................................................................... 8 Maintaining Your Chipper Shredder ......................
SECTION1: IMPORTANT SAFEOPERATION PRACTICES WARNING: This symbol points out important safety instructions which, if not followed, could endanger the personal safety and/or property of yourself and others. Read and follow all instructions in this manual before attempting to operate this machine. Failure to comply with these instructions may result in personal injury. When you see this symbol - heed its warning.
j. Toreduceafirehazard,keepmachinefree ofgrass,leaves,orotherdebrisbuild-up. Cleanupoilorfuelspillageandremoveany fuelsoakeddebris. k. Allowmachinetocoolatleast5 minutes beforestoring. Operation 1. 2. 3. 4. 5. 6. 7. 8. 9. Do not put hands and feet near rotating parts or in the feeding chambers and discharge opening. Contact with the rotating impeller can amputate fingers, hands, and feet.
YourResponsibility Restrict the use of this power machine to persons who read, understand and follow the warnings and instructions in this manual and on the machine. Net all safety labels shown may apply to your chipper shredder. SECTION2: ASSEMBLING YOURCHIPPERSHREDDER IMPORTANT:This unit is shipped without gasoline or oil in the engine. Be certain to service engine with gasoline and oil as instructed in the separate engine manual before operating your machine.
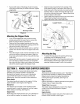
AttachingtheHopperAssembly • • • • • • • Remove the 8-3/8" long hex bolt and the hex nut from the bottom of the inlet guide opening. See Figure 2. Place the hopper assembly on the ground and hold it in the position. Holding the hopper, push hopper pivot door down inside the hopper. Slide the hopper assembly towards the chippershredder housing so that the upper guide on the hopper assembly slides under the stop washer on each side of the inlet guide.
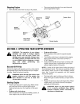
Securebothsidesofdischarge chutetohousing usingwingknobsthatyouearlierremoved. Tighten wingknobs. • Align the holes towards the front opening of the chute with the holes on the brace. See Figure 5. Insert one each of the hex bolts, lock nuts, and flat washers (that you earlier removed) through each hole in the chute and the brace. Tighten these bolts to secure brace to the chute. • Hex Lock Nut _Hex Bolt Tighten bolts securing the brace to the lower frame. These bolts had been removed earlier.
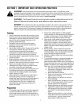
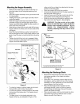
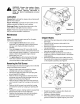
StoppingEngine • • Move throttle control lever to stop or off position. Disconnect spark plug wire from spark plug and ground against the engine. Chipper Chute \ \ \ \ \ Discharge Tamper Plug Hopper / Assembly Releasej Rod Rear Wheel j Lock Lever \Starter Handle Figure 6 SECTION4: 0PERATINGYOURCHIPPERSHREDDER WARNING: The operation of any chipper shredder can result in foreign objects being thrown into the eyes, which can damage your eyes severely.
ToEmptyBag UsingtheChipperShredder • Yard waste such as leaves and pine needles can be raked up through the hopper assembly for shredding. After material has been shredded by the flail blades on the impeller assembly, it will be discharged out of opening or into catcher bag. Do not attempt to shred or chip any material other than vegetation found in a normal yard (i.e. branches, leaves, twigs, etc.) Avoid fibrous plants such as tomato vines until they are thoroughly dried out.
WARNING: Always stop engine, disconnect spark plug, and ground against engine before cleaning, lubricating or doing any kind of maintenance on your machine. Discharge Lubrication Release Rod: Lubricate the release rod and spring with light oil once a season. Hopper Assembly: Lubricate the pivot points on the hopper assembly with light oil once a season. pin Clips Discharge Chute: Lubricate the pivot points on the chute deflector with light oil once a season.
make sure to remove an equal amount from each blade and torque to 250 - 300 in. Ibs. that each cutting edge receives an equal amount of grinding to prevent an unbalanced blade. NOTE: Make certain blades are reassembled with the Discharge Chute sharp edge facing upward. ShredderBlade • • • • Blade Disconnect the spark plug wire and ground against the engine. Lower the hopper assembly and block up the housing. Remove the six hex lock nuts and flat washers from Weld Stud Flat Screw.
SECTION6: TROUBLESHOOTING Problem Engine fails to start Cause 1. 2. 3. Remedy Spark plug wire disconnected. Fuel tank empty or stale fuel. Throttle control lever not in correct 1. 2. 3. Connect wire to spark plug. Fill tank with clean, fresh gasoline. Move throttle lever to FAST position. 4. Move choke to CHOKE position. 5. 6. Prime engine. Clean fuel line. 5. 6. starting position. (If Equipped) Choke not in CHOKE position. (If equipped) Engine not primed. Blocked fuel line. 7.
Notes 13
SECTION7: PARTSLISTFORMODEL494 15 5 19 23 21 27 _/ 14 _w/ 13 18 / 28 6 29 48 98 \6 13 8 91 \6 8 17 8 \ 67 \\\ / 52 74 z 51 z 56 73 69 78 I 61 63 59 80 79 91 14
Model494 Ref. No. Part No. Ref. No. Part Description 1 2 11480 681-0118 Stop Washer 3 681-0144 4 710-0542 5 Part No. Part Description 50 51 734-0255 750-0793 52 712-3027 Chute Hinge Spacer Hex Ctr. Lock Nut 1/4-20 Thd 53 714-0149B Internal Cotter Pin 710-0607 Arm Bracket Assembly Hex Flange Bolt: 5/16-18 x 8.375" Hex Washer Screw: 5/16-18 x 0.5" 55 720-0170 Hand Knob 6 710-3256 Button-Head 56 710-0805 Hex Bolt 5/16-18 x 1.
MANUFACTURER'S LIMITED WARRANTY FOR: 0 TRD RILT° The limited warranty set forth below is given by Troy-Bilt LLC with respect to new merchandise purchased and used in the United States, its possessions and territories. Troy-Bilt LLC warrants this product against defects for a period of two (2) years commencing on the date of original purchase and will, at its option, repair or replace, free of charge, any part found to be defective in materials or workmanship.