
User manual


• Handle the product with care; it can be damaged by impacts, blows or falls even
from a low height.
• Avoid the following unfavourable ambient conditions at the installation point or
during transportation or storage:
- Damp or excess air humidity
- Cold or heat, direct sunlight
- Dust or ammable gases, fumes or solvents
- Strong vibrations, impacts or blows
- Strong magnetic elds such as those found close to machinery or loudspeakers
• Never connect the product to the power supply immediately after it has been trans-
ferred from a cold room into a warm one (e.g., during transport). The condensation
that forms might destroy the device. Moreover, there is danger of electric shock!
Allow the product to reach room temperature. Wait until the condensation has
evaporated. This might take several hours. Only after this, should it be plugged
into the mains supply and put into use.
• Only use the device in a moderate climate, do not use it in a tropical climate.
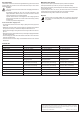
For more information on acceptable environmental conditions, see the chapter
“Technical data”.
• The dimmer housing of the dimmer gets warm during operation (depending on
the connected luminaire and the brightness set). Thus, always ensure adequate
ventilation and never cover the product.
• In schools, educational centres, hobby and self-help workshops, the operation of
the product must be supervised by trained employees.
• Disconnect the product from the mains voltage when you no longer need it (e.g.,
when it is put in storage). Disconnect the mains plug from the mains socket.
• Unplug this product from the power supply during a lightning storm to protect both,
product and the connected equipment, from damage.
• Do not use the product if it is damaged. There is a risk of a life-threatening electric
shock! A faulty power cable must only be replaced only by a specialist.
• If it can be assumed that safe operation is no longer possible, the product must be
turned off and precautions are to be taken to ensure that it is not used unintention-
ally. Do not touch the product.
First switch off the mains voltage to all poles (switch off the connected circuit
breaker or remove the fuse and then switch off the connected RCD).
Disconnect the product from the mains voltage after that. Unplug the mains plug
from the socket.
Let a professional check the product or dispose of it in an environmentally friendly
way.
• Safe operation can no longer be assumed if:
- the product shows visible signs of damage
- the product does not work at all or well (ickering light, leaking smoke or a smell
of burning, the light ickers, audible cracking noises, discolouration to the prod-
uct or the adjacent surfaces.)
- the product was stored under unfavourable conditions
Installation and connection
It is important that you read these operating instructions, including the safety instruc-
tions thoroughly and carefully before rst use to ensure that you will launch the relay
board properly! If in doubt, let a specialist do the installation and connection.
Only connect boards when they are disconnected from voltage/current. Otherwise,
there is a risk of a life-threatening electric shock!
Do not lengthen the cables already connected to the dimmer (with Item no. 1661884,
1661885, 1661886 and 1661887).
The current draw of the loads must not exceed the rated current of the dimmer. Ad-
hered strictly to the minimum connection values. Refer to chapter “Technical data”
for relevant details.
a) Slide dimmer Item no. 1661882 and 1661883
The construction of the product corresponds to protection class II (double or rein-
forced insulation). However, an internal connector for the protective earth conductor
is provided. The product may thus be used for with protection class II and with
protection class I luminaires. A mains cable with protective earth conductor must
be used for luminaires of protection class I. The protective earth conductor of the
mains cable must be connected to the protective earth conductor of the connected
luminaire. Failure to observe this poses a danger to life from electric shock!
The slide dimmer is only suitable for luminaires powered by mains voltage.
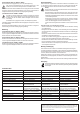
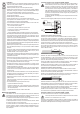
Connection diagram (dashed line shows protective earth conductor, if used):
N
N
L
L
L
N
PE
Connecting a protection class I luminaire
Remove the screws at the bottom and take off the housing cover.
A three-core mains cable with protective earth conductor must be used for luminaires of pro-
tection class I. The protective earth conductor of the mains cable must be connected to the
protective earth conductor of the connected luminaire. To do this, use the two screw terminals
in the middle marked with a grounding symbol.
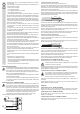
Remove 20 mm of the outer insulation of the mains cable and of the connection cable to the
luminaire. Strip the three wires for a length of approx. 6 mm. The cable of the protective earth
conductor (yellow-green cable) should be at least 6 mm longer so that in the event of a fault it
will remain in the terminal as the last cable.
20 mm
6 mm
Remove the two straps of the strain relief if fastened tight. Connect the three wires of the mains
cable (L, N, PE) and the cable to the luminaire with the screw terminals in the dimmer, see wir-
ing diagram above (brown = L/phase, blue = N/neutral conductor, yellow-green = PE/protective
earth conductor/grounding symbol).
Fix the two cables using the straps of the strain relief; This should apply pressure on the outer
insulation of the cables and not on the three individual wires.
Put the housing cover back on and make sure that the slide in the housing cover sits exactly in
the pin of the slide potentiometer on the board. Then screw down the housing.
Connecting a protection class II luminaire
Remove the screws at the bottom and take off the housing cover.
Luminaires of protection class II will need a two-core mains cable without protective earth
conductor (two-pole cable).
Remove 20 mm of the outer insulation of the mains cable and of the connection cable to the
luminaire. Strip the two wires for a length of approx. 6 mm.
20 mm
6 mm
Remove the two straps of the strain relief if fastened tight. Connect the two wires of the mains
cable (L, N) and the cable to the luminaire with the screw terminals in the dimmer, see wiring
diagram above (brown = L/phase, blue = N/neutral conductor).
Fix the two cables using the straps of the strain relief. This should apply pressure on the outer
insulation of the cables and not on the two individual wires.
Put the housing cover back on and make sure that the slide in the housing cover sits exactly in
the pin of the slide potentiometer on the board. Then screw down the housing.
b) Slide dimmer Item no. 1661884 and 1661887
The dimmer provides an output voltage of 12 V/AC (alternating voltage).
A luminaire that works with mains voltage or a voltage other than 12 V/AC cannot be
connected to the dimmer and operated!
Connect the two open cable ends to the input of your luminaire. Here, the polarity is irrelevant.
Read the operating instructions of your luminaire to see how to make the connection. Pay
particular attention to a suitable strain relief.
c) Rotary dimmer knob Item no. 1661885 and 1661886
The construction of the product corresponds to protection class II (double or rein-
forced insulation). Use the product thus only for luminaires of protection class II.
Failure to observe this poses a danger to life from electric shock!
The rotary dimmer is only suitable for luminaires powered by mains voltage.
Connect the two open cable ends to the input of your luminaire (brown = L/phase,
blue = N/
neutral wire).
Read the operating instructions of your luminaire to see how to make the connection. Pay
particular attention to a suitable strain relief.
Operation
a) Slide dimmer Item no. 1661882 and 1661883
Plug the mains plug into a mains socket. Move the slider on the dimmer to set the desired
brightness or to turn the light off. An indicator light is activated when the dimmer is working.
b) Slide dimmer Item no. 1661884 and 1661887
Plug the mains plug into a mains socket. Move the slider on the dimmer to set the desired
brightness or turn the light off.
c) Rotary dimmer knob Item no. 1661885 and 1661886
Plug the mains plug into a mains socket. Turn the rotary control on the dimmer to set the de-
sired brightness or to turn the light off.