
Product Manual


2
that the inner hex tube is centered inside the outer
roll tube assemblies. Screw each roll tube assembly
to the inner hex tube using one ¼" x 1" self drilling
and taping screw (item 9A) 2" from the end of the
outer tube.
6. Slide the complete roll tube assembly into the 5"
loop in the end of the tarp. Verify that the
webbing in the seams of the tarp will be on the
bottom when installed. Note: The roll tube end of
the tarp only has one row of webbing
reinforcement.
7. Center the roll tube assembly in the tarp.
Holding the roll tube assembly tightly in the end of
the pocket, screw in place with five evenly spaced
¼" x 1" self-drilling tapping screws (item 9A) and
fender washers (item 9B). Make sure the screws
are centered in the hex tube and the screws on
each end are at least 2” from the end of the roll
tube assembly. Be careful not to screw into the
shaft adaptors (item 2B) on each end.
8. Remove one of the bearing bracket assemblies
and slide the tarp roll assembly in to the remaining
bearing. Slide removed bearing bracket over shaft
and reassemble to the dump body. Tighten 3/8"
bracket mounting bolts at this time.
9. Center the tarp roll assembly between the
mounting brackets and tighten set screws in each
bearing race.
10. Assemble sprocket (item 6) onto the 1" shaft of
the driver’s side roll tube assembly (item 2). With
the detent lever (item 5C) in the open position,
slide the sprocket down the shaft until it is tight
against the bearing.
11. Assemble crank handle assembly (item 7) onto
the driver’s side roll tube shaft using the 1/4" X 2"
screw and lock nut provided.
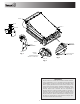
12. Assemble the four S-hooks (item 12) to the two
tarp straps (item 11). The small end of the s-hook
is assembled into the hole in the strap and should
be bent around the strap to permanently attach the
hook to the strap. The two strap assemblies should
be attached to the rear corner holes in the tarp.
The large hooks should be bent around the tarp
grommets to permanently attach straps to tarp.
(See figure 1.)
13. Assemble pull rope assembly to the center
grommet on the rear of the tarp. (See figure 3.)
14. Assemble two rope storage hooks to the dump
body tailgate to wrap the pull rope for storage
when tarp is covering the body. The hooks should
be mounted horizontally and may be bolted (bolts
not included) or welded to the dump body. The
recommend distance between the hooks is 15-17".
(See figure 3.)
15. Assemble two rope storage hooks to the side
dump body near the crank handle assembly to
wrap the pull rope for storage when tarp is
retracted. The hooks should be mounted vertically
and may be bolted (bolts not included) or welded to
the dump body. (See figure 2.)
Optional Accessory
DTB102 Optional Retention Bow Kit Installation
Note: For tarps narrower than 6 feet the center
tube (item 14A) will need to be shortened and
re-drilled.
1. Assemble outer bars (item 14B) to the center
tube (item 14A) using the two 5/16" x 1" roll pins
(item 14F) supplied.
2. Slide rear bar assembly into the pocket in the
rear of the dump body tarp. Center the bar in the
tarp. The same amount of bar should exposed on
each side of the tarp.
3. Assemble a lock collar (item 14E), guide washer
(item 14D), PVC roller tube (item 14C), and second
lock collar, in that order, onto each end of the rear
bar assembly.
4. Measure the inside width of the top of dump
body or bed extension boards where the guide
washers will slide in between. Adjust and tighten
the lock collars so that the guide washers are held
½" narrower than the body measurement. Make
sure that the PVC roller tubes can spin freely on
the rear bar
5. After the rear bar is adjusted to fit the body,
the excess bar may be cut off to limit the amount
of bar protruding outside the body. If the rear bars
are cut, the cut ends should be painted to prevent
premature rusting.