
Instructions / Assembly

Instruction Manual
Mini Pendtnt Lighting
Overview
Assembly Instruction
Wiring Instruction
Product Specifications
Input voltage 120V
Rated power 60W MAX
Lamp socket E26
Cord Length 7ft.
Product Packaging
CONTACT US
E-mail:service@24h-reply.com
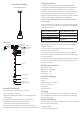
1.Install Stem (B) to Fixture body (A) as required.
To clean, wipe fixture with a soft cloth. Clean glass with a mild soap.
Do not use abrasive materials such as scouring pads or powders, steel
wool or abrasive paper.
1. Insert the green grounding screw into the hole with two raised
dimples on the mounting bar. Wrap the ground wire from the fixture
(if supplied) around the green grounding screw, then connect it to
ground wire from the outlet box (if not fixed on the outlet box) using a
wire connector(not supplied). If ground wire from the fixture is not
supplied, wrap the ground wire (if not fixed on the outlet box) from the
outlet box around the green grounding screw and tighten it.
2.Screw Canopy (D) to Stem (B).
2.Take note of the color of the wire(s) on your fixture. Identify which
group your fixture wire(s) falls into and connect the wires according
to the directions below:
5.Connect the wires according to the picture above.
(Please refer to the wiring instruction for details )
4.Fix Mounting starp (G) to the outlet box with Screw (E).
6. Connect the fixture wire from [Group B] to the white wire from the
outlet box in the same manner. Make sure no bare wires can be seen
outside wire connectors.
5.Try gently to pull the connector off the wires. If you can pull the
connector off, carefully re-do steps 3 and 4 as above, and check again
for a firm connection.
3.Take your fixture wire(s) from [Group A] and place evenly against the
black wire from the outlet box. Do NOT twist wires together before
using wire connectors.
6.Pass Canopy (D) through Screw (F) and fix it with Finial (C).
4.Fit a wire connector over the wires and screw the connector
clockwise until you feel firmness.
3.Attach Glass shade (H) up onto the socket , then tighten with
Socket ring (I).
7.Install Bulb (J)(not included) into socket inside the Glass shade (H).
Always switch off the electricity supply and allow to cool for 10 minutes
before changing the light bulbs.
Fixture body × 1
Stem × 5
Mounting strap × 1 & Canopy × 1
Screw × 2 & Wire nut × 3
Glass shade × 1
Lamp instruction × 1
Outlet box
Black
Wire nuts
Smooth
White
Green(Ground)
Bare copper wire(Ground)
Ribbed
A.Fixture body
H.Glass shade
I.Socket ring
J.Bulb(not included)
B.Stem
C.Finial
D.Canopy
E.Screw
F.Screw
G.Mounting strap
NEVER CONNECT GROUND WIRE TO BLACK OR WHITE POWER
SUPPLY WIRES.
[GROUP A]:
Connect to Black House Wire
[GROUP B]:
Connect to White House Wire
BLACK WHITE
*PARALLEL WIRE (round & smooth) *PARALLEL WIRE (square & ridged)
WHITE OR GREY WITH TRACER WHITE OR GREY WITHOUT TRACER
BROWN, GOLD OR BLACK
WITHOUT TRACER
BROWN, GOLD OR BLACK
WITH TRACER
Cleaning
Safety Information
[GROUP A]
[GROUP B]