TRUE INDUCTION DOUBLE BURNER MINI DUO COOKTOP MANUAL 1 DOUBLE BURNER MINI DUO INDUCTION COOKTOP MANUAL
TABLE OF CONTENTS Control Panel Overview Cooktop Installation Important safety Information Product Specifications How to Use > Power Invariance Technology > Using the Temperature Setting > Using the Timer Function > Built-In Safety Shut Off > Turning Off Unit VI. Compatible Cookware VII. Cleaning & Maintenance VIII. Troubleshooting Error Codes I. II. III. IV. V. 1 2-5 6-7 7 8 8-9 9 9 10 10 10 11 11-12 Thank you for purchasing the True Induction Double Burner Mini Duo cooktop.
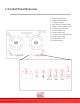
I. Control Panel Overview 1. Left Cooking Zone 2. Right Cooking Zone 3. Ceramic– Glass 4. Left Touch Control Panel 5. Right Touch Control Panel 6. Power Option Display 7. Lower Power Key 8. Raise Power Key 9. Cooking Zone ON/OFF Key 10. Time Control Key 11. Child Safety Lock 12. Power Button 3 DOUBLE BURNER MINI DUO INDUCTION COOKTOP MANUAL P.
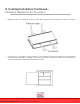
II. Cooktop Installation Portable Installation For Portable Unit Install To use the Mini Duo as a portable unit, locate the 4 feet in the packaging and screw them into the bottom as illustrated below. Parts *Take out screw before installing 4 DOUBLE BURNER MINI DUO INDUCTION COOKTOP MANUAL P.
II. Cooktop Installation Continued... Dimensions and Placement for Cut-out in Countertop This appliance is not user serviceable. Installation must be completed by a qualified technician. WARNING! FOR YOUR SAFETY: Do not store or use gasoline or other flammable vapors and liquids in the vicinity of the unit. To eliminate the risk of burns or fire due to overheating, cabinets located above the induction cooktop should be avoided or allowed a minimum of 30’’ clearance.
II. Cooktop Installation Continued... First feed the power wire through the hole and to the location of the power receptacle underneath the cabinet. The 'h'' overhang on the induction cooker comes with pre-installed foam gasket. Peel off the adhesive protector on the bottom of the gasket and set the induction cooker into the cutout. Gently press down on the induction cook top to secure the adhesive gasket to the countertop. The cook top should be sitting on the supports previously installed.
II. Cooktop Installation Continued... Clearance Needed for Air Circulation Below you will see a diagram of the air flow. Be sure not to block either the intake or exhaust For proper air circulation, allow at least 3" of clearance from the bottom of the induction cooker to any shelving or storage. The underside of the countertop should not be closed off from the cabinetry underneath for better air flow. 7 DOUBLE BURNER MINI DUO INDUCTION COOKTOP MANUAL P.
III. Important Safety Information When using electrical appliances, basic safety precautions should always be followed. For the True Induction cooker, even with built-in safety features, it is essential to heed all precautions: When the unit is on, do not touch outside the control panel as the surface may contain residual heat. To protect against electric shock, do not immerse cord plugs or cooker in water (or other liquid substances).
III. Important Safety Information Continued... This appliance has a polarize plug (one blade is wider than the other). To reduce the risk of electric shock, the plug will fit on the outlet only one way. If the prongs do not fit fully, reverse the plug. If it still does not fit, contact the seller for warranty support; do not attempt to modify the plug in anyway. To properly turn off unit press the Power button.
V. How to Use Plug the power plug into a standard outlet. The Power button will light up and the unit will sound to indicate on. The device will remain in standby mode, awaiting user direction. Place ferromagnetic cookware (with water, oil or food already inside) on the center of the glass-ceramic top center. Now press the Power button on the control panel, this will turn the cooktop on. The power display will blink and sound another indicator. Press the Heat function key once.
V. How to Use Continued... Power Invariance Technology Continued... NOTE: This function is equipped with safeguards against parching. The unit might shut off automatically when this function is used for frying, stir-frying, grilling and other high temperature cooking formats. Using the Temperature Setting Using the +/ - keys you can change the temperature settings at any time. Settings range from 150-450 degrees Fahrenheit. (Exact temperatures: 120, 150, 180, 210, 260, 300, 360, 420 and 460 F).
V. How to Use Continued... Built-In Safety Shut Off The True Induction cooktop is designed to automatically shut off after 150 minutes of use. This built-in auto shut off is a safety feature. This function occurs for both the HEAT and TEMP settings. The panel displays EE code and sounds indicating this auto-off setting.
VII. Cleaning & Maintenance Please follow these directions along with important safety steps for cleaning advised at the beginning of the manual: Before cleaning always switch OFF the device and wait for it to be completely cool. Clean the unit after each use to remove food residues. Wipe off the glass-ceramic plate and the plastic surface with a slightly damp cloth (mico-fiber works best). Dishwashing soap may be used when necessary. Make sure that no water seeps into the device.
VII. Troubleshooting Error Codes Continued... If the display shows an error code, please reference this sheet for a potential solution: Error Code Possible Cause Power Sharing When two heating zones are turned on, will create a total max 10 setting See POWER SHARING IGBT (Insulated Gate Bipolar Transistor) overheating Turn off unit to allow IGBT to cool. Restart unit.