
Overlay Template


26
TRUE RESIDENTIAL
®
DRAWER OVERLAY PANEL INSTALLATION
Required Tools:
• Phillips Screwdriver
• 1/8" Drill Bit
SEE PAGE 21 FOR OVERLAY PANEL DIMENSIONS
BEFORE INSTALLING.
FOR EASY OVERLAY INSTALLATION, DRAWER FRONT
REMOVAL IS REQUIRED.
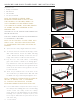
1. Open the drawer and detach the front drawer panel
by removing four #2 Phillips screws (two on each
side). (See image 1). Save all these screws for later
reinstallation.
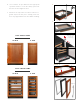
2. Remove front drawer panel gasket.
3. Using a 1/8" drill bit, drill out the eight pilot holes
(each drawer) from the front of the drawer panel.
Drill completely through the panel.
4. Attach drawer handle to the front of the overlay
panel. Attach handle before step 5.
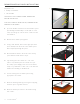
5. Lay overlay panel face-down on a safe solid
surface. Lay drawer panel face-down on top of
the overlay panel. Align panels and secure with a
clamp. Lay cardboard or other soft or safe material
down before working on drawer front.
6. Secure overlay panel to drawer panel using
appropriate size screws.
7. Reattach drawer gasket by pressing and snapping
back into place in gasket channel.
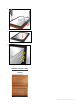
8. Reattach drawer panel front to the drawer using
four screws.
1
2
3
4
5
Front of
drawer