
Owner's manual


P-SOLO Ribbon OPERATION MANUAL
5
INTRODUCTION
The P-SOLO Ribbon is designed to provide the detailed, transparent sonic performance
necessary for the most critical recording and live sound applications. It’s unique desktop
enclosure saves space and makes it easy to transport and connect to any recording or
live sound system. This preamp is optimized for use with ribbon microphones. It
provides accurate and detailed performance with dynamic microphones, as well.
P-SOLO Ribbon does not have 48V phantom power capability. This prevents the
possibility of accidentally damaging ribbon microphones
We appreciate the confidence you have placed in TRUE Systems by purchasing this
product. Please feel free to contact us with questions or comments.
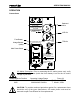
OVERVIEW
In addition to our acclaimed TRUE preamp, P-SOLO Ribbon features an instrument
direct input (DI) that offers sonic performance previously available only with dedicated,
high-end DI’s. You’ll get incredible articulation and control for electric bass, detail and
smoothness for stringed instruments and keyboards.
Additional features of the P-SOLO Ribbon are:
High-Gain Mode - to accommodate lower output ribbon and dynamic mics
Selectable High-Pass Filter - to minimize breath and wind noise
XLR and TRS output connectors - for easy connectivity
Phantom Power is not provided. This unit will not power condenser mics. Please
note that some ribbon microphones have built-in preamplifiers that operate on +48V
Phantom Power. This type of microphone cannot take advantage of the P-SOLO
Ribbon . The standard P-SOLO model should be used for these applications.
UP-AND-RUNNING IN A HURRY
1. Read the “SAFETY and OPERATING PRECAUTIONS” on page 2 of this manual.
2. Check the voltage selector on the rear panel to make sure it is set for the
appropriate AC mains voltage in your area.
3. After making sure the main power switch is off, connect the AC power cord.
4. Connect output signal cables between P-SOLO Ribbon BALANCED OUT and the
analog line level input of your recorder, mixer, signal processor, etc. Use either the
1/4” TRS or XLR balanced output connectors. See the section “Connections” for
wiring details.
5. Connect a mic cable (and mic) to MIC IN connector on the rear panel.
6. Turn on the AC power.
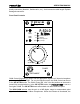
7. Adjust GAIN control for adequate signal level as indicated on the P-SOLO Ribbon
level indicators or on the level indicators of the device to which it is connected.
8. If necessary, select HIGH GAIN mode for an additional 6dB of gain.