
Spec Series Manual


6
Slide packing material under the unit.
Thread leg into cabinet bottom cabinet.
The end of the leg is adjustable to easy
leveling.
Castor with leveling shims.
Anchor castor.
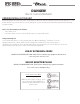
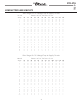
REMOVAL FROM WOODEN SKID / INSTALLATION OF LEGS AND CASTORS
Important Safeguard for installation of leg/castor (Images below that demonstrate procedure)
Removal from wooden skid
1. Make sure unit is as close to the final location as possible.
2. Remove the shipping bolts located at the bottom of the wooden skid.
3. Carefully slide the unit off the wooden skid. Slide packing material
underneath the side of the unit hanging off the skid. Then install castors or
legs for that side of the unit. (See images below for install)
4. Then carefully slide the other side of the unit off one corner at a time while
installing castors or legs for each corner. Use packing material for under each corner of the unit before
installing a castor or leg.
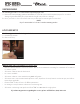
Securing Castors and Legs
To obtain maximum strength and stability of the unit, it is important that you make sure each castor is secure. Legs
are hand-tightened securely against the base of the cabinet.
Unit Leveling
Shims have been provided for leveling castored units positioned on uneven floors. Shims must be positioned between the
bottom of the cabinet and the castor plate.
1. Level cabinet front to back and side to side (diagonally). Use the shims provided and slide them between the
cabinet bottom and the castor plate. Loosen anchor bolts to slide shims above castor plate.
2. Tighten and secure the castor by tightening the four anchoring bolts with a 3/4 inch open-end wrench,
socket.
Castor install 1
Castor install 2
Castor install 3
Leg install 1
Leg install 2
Removing shipping bolts