
Spec Series Manual


18
Image 14
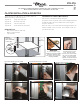
PILASTER CONFIGURATION & INSTALLATION
Pilaster
980850
Pilaster
980846
Pilaster
980848
Pilaster
980852
Pilaster
980850
Pilaster
980846
Pilaster
980851
Pilaster
980852
Pilaster
980848
Pilaster
980853
Pilaster
980851
Pilaster
980853
Pilaster Installation (Side Wall of
Cabinet)
Pilaster Installation (Back Wall of
Cabinet / Two & Three Door Models)
Pilaster Installation Two and Three Door
Models (Middle of Wall in Rear of Cabinet)
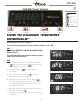
Configuration (Pilasters):
Each TRUE Specification Series (STR, STA, and STG) is
available with two pilaster configurations. Each
configuration depends on the end user preference. Multiple
door units can have two configurations for each section.
See Image 13.
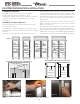
Installation Procedures (Pilasters):
Install slotted thumb screws into threaded holes along the
inside wall of the cabinet.
Slide pilasters into position behind the slotted screws. Leave
all of the thumb screws loose for adjustments when installing
tray slides.
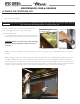
It is critical to measure from the center of the square hole on
the front pilaster to the center hole of the rear pilaster. This
measurement should be 24 5/8” (see image 14). Do the same
on the opposite side of cabinet for single door. Make sure the
measurement (24 5/8”) is the same in the center pilasters in 2
and 3 door units. Tap the tray slides into the Pilasters with a
rubber Mallet.
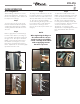
Angle & Rod Type shelving uses a 18 1/8” distance between
Pilasters. Universal Tray slides have a 21 1/4” distance between
Pilasters (see image 15).
After the pilasters are installed the Universal Tray, Angle Type
Tray, and Rod Style Tray Slides will slide into the pilasters (see
images 2-7). When disassembling or changing tray slides a rubber
mallet may be used to take out the different tray slides. Gently tap
on the under side of the tray slide to loosen it from the pilaster.
24 5/8
(Critical Measurement Front to Rear Pilasters)
18 1/8”
Angle Type
&
Rod Type
21 1/4”
Universal
Tray Slide
Top view (Critical Measurement side to side)
Image 15
Image 13
Image 16
Image 17
Image 18