* Assembly Guide & Warranty Card Included 950 TREADMILL OWNER’S MANUAL Model #: 950 Revision 091820
Cardio 950 IMPORTANT: All products shown are prototype. Actual product delivered may vary. Product specifications, features & software are subject to change without notice. For the most up-to-date owner’s manual please visit www.truefitness.com. For documents in additional languages please visit www.truefitness.com/resources/document-library/ IMPORTANTE: Todos los productos mostrados son prototipos. La realidad el producto suministrado puede diferir.
Cardio 950 A MESSAGE TO OUR CUSTOMERS Frank Trulaske began TRUE Fitness® over thirty-five year ago with the simple philosophy of delivering superior fitness products, service, and support. Today, TRUE is the global leader in premium fitness equipment for the commercial and residential markets. Our goal is to be the leader in technology, innovation, performance, safety and style. TRUE has received many awards for its product over the years and remains the benchmark for the industry.
Cardio 950 Table of Contents Chapter 1: Safety Instructions Safety Instructions ������������������������������������������������������������������������������������������������������������������������������������������������������������������5 Space Requirements ���������������������������������������������������������������������������������������������������������������������������������������������������������������8 Grounding Instructions ���������������������������������������������������������������
Cardio 950 CHAPTER 1: SAFETY INSTRUCTIONS IMPORTANT SAFETY INSTRUCTIONS SAVE THESE SAFETY INSTRUCTIONS This equipment is intended for a commercial or institutional setting. This owner’s manual should be accessible to all personal trainers, faculty, and members. WARNING: ALL EXERCISERS MUST READ ALL INSTRUCTIONS BEFORE USING THE EQUIPMENT. WARNING: Heart rate monitoring systems may be inaccurate for some individuals. Over-exercising may result in serious injury or death.
Cardio 950 CHAPTER 1: SAFETY INSTRUCTIONS WARNING: WARNING: is performed. Replace warning labels that may be worn, damaged, or missing. Replace any non-working or damaged components, remove the unit from service until repair WARNING: To reduce the risk of burns, fire, and electric shock or injury to persons, follow these • • • • instructions: This appliance should never be left unattended when plugged in. Do not use any type of extension cord with this product.
Cardio 950 CHAPTER 1: SAFETY INSTRUCTIONS • • • • • • • • • • • • • • • • • • • • CAUTION: Use the side handrails whenever additional stability is required. In case of emergency, such as tripping, the side handrails should be grabbed and the user should place his/her feet on the side platforms. The front handlebars should be used to grasp the heart rate sensors or to rest the hand on while operating the activity zone keys, but not for stability, emergency, or continuous use.
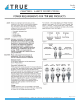
Cardio 950 CHAPTER 1: SAFETY INSTRUCTIONS SPACE REQUIREMENTS: TRUE’s recommendation is to leave a minimum of 24” (0.6m) on each side of the treadmill and a 79” (2 m) safety zone at the rear of the treadmill. 950: True Fitness Technology • O’Fallon, MO • Phone: 800-426-6570/636-272-7100 • Truefitness.
Cardio 950 CHAPTER 1: SAFETY INSTRUCTIONS GROUNDING INSTRUCTIONS: This product must be grounded, if it should malfunction or breakdown, grounding provides a path of least resistance for electric current to reduce the risk of electric shock. This product is equipped with a cord having an equipment-grounding conductor and a grounding plug. The plug must be plugged into an appropriate outlet that is properly installed and grounded in accordance with all local codes and ordinances.
Cardio 950 CHAPTER 1: SAFETY INSTRUCTIONS True Fitness Technology • O’Fallon, MO • Phone: 800-426-6570/636-272-7100 • Truefitness.
Cardio 950 CHAPTER 1: SAFETY INSTRUCTIONS WARNING DECALS: WARNING: Replace warning labels that may be worn, damaged, or missing. To replace any worn or missing decals contact TRUE FITNESS by visiting www.truefitness.com or contact customer service at 800-883-8783. E L P M A S COMPLIANCES: This equipment complies with all applicable codes and regulations. For a complete list of compliances, please visit www.truefitness.com.
Cardio 950 CHAPTER 2: ASSEMBLY GUIDE IMPORTANT SAFETY INSTRUCTIONS • • • • • • • • • • • • • • • Read and understand all instructions and warnings prior to use. Obtain a medical exam before beginning any exercise program. If at any time during exercise youfeel faint, dizzy, or experience pain, stop and consult your physician. Obtain proper instruction prior to use. This unit is intended for commercial use only.
Cardio 950 CHAPTER 2: ASSEMBLY GUIDE PRE-ASSEMBLY CHECKLIST: ITEM 1 2 3 4 5 6 DESCRIPTION Rear Console Cover Assembly Left Shoulder Bottom Assembly Right Shoulder Bottom Assembly Left Handrail Assembly Right Handrail Assembly Left Pedestal Upright Assembly Qty. 1 ITEM 7 1 8 1 9 1 10 1 11 DESCRIPTION Right Pedestal Upright Assembly Left Shoulder Top Assembly Right Shoulder Top Assembly Console Rack Assembly Lower Frame Weldment Qty.
Cardio 950 CHAPTER 2: ASSEMBLY GUIDE PRE-ASSEMBLY CHECK LIST: Item Description Qty Item Description Qty A B C D E F Wire Tie M8 x P1.25 x 75 M4 x P0.7 x 10 Internal Tooth Star Washer M8 M8 x P1.25 x 80 M8 x P1.
Cardio 950 CHAPTER 2: ASSEMBLY GUIDE ASSEMBLY STEPS: Step 1 (Motor Cover): Remove the Motor Cover from the Lower Frame Weldment. Item 1 2 3 Part Number 7PS0035 7RT0140 7RT0020 Description M5 x 15 Bolt Motor Cover Trim Motor Cover True Fitness Technology • O’Fallon, MO • Phone: 800-426-6570/636-272-7100 • Truefitness.
Cardio 950 CHAPTER 2: ASSEMBLY GUIDE ASSEMBLY STEPS: Step 2 (Pedestals): Assemble, but do not fully tighten, all Item hardware for the left and right pedestals as 1 shown below. 2 3 4 Note: Confirm the cables identified in 5 Step 3 (Lower Frame Weldment Cable 6 Connections) are routed correctly to avoid cable pinching. Part Number 7PS0103 7RT0011 7TCS4035 NT-2310 7TC4016LBK 7TC4016RBK Description M8 x 1.25 x 75 Bolt M8 Washer M10 x P1.
Cardio 950 CHAPTER 2: ASSEMBLY GUIDE ASSEMBLY STEPS: Step 3 (Lower Frame Weldment Cable Connections): Connect the AUXPS-I/O (Auxillary Power Supply-Input/Output) combined cable, COMM (Communication) cable, and COAX (Coaxial) cable as shown below. True Fitness Technology • O’Fallon, MO • Phone: 800-426-6570/636-272-7100 • Truefitness.
Cardio 950 CHAPTER 2: ASSEMBLY GUIDE ASSEMBLY STEPS: Step 4-1 (Console Rack): Secure the Console Rack to the Left and Right Pedestals using the required hardware as shown below. Item 1 2 3 4 Part Number 7TC4017BK NO-4827 7RT0011 7PS0034 Description Quantity Console Rack 1 Console Rack Mounting Plate 8 M8 Washer 8 M8xP1.25x40 Bolt 8 True Fitness Technology • O’Fallon, MO • Phone: 800-426-6570/636-272-7100 • Truefitness.
Cardio 950 CHAPTER 2: ASSEMBLY GUIDE ASSEMBLY STEPS: Step 4-2 (Pedestals): Tighten all hardware from Step 2 (Pedestals). True Fitness Technology • O’Fallon, MO • Phone: 800-426-6570/636-272-7100 • Truefitness.
Cardio 950 CHAPTER 2: ASSEMBLY GUIDE ASSEMBLY STEPS: Step 5 (Motor Cover): Secure the Motor Cover to the Lower Frame Weldment using the required hardware as shown below. Item 1 2 3 Part Number 7RT0140 7PS0035 7RT0020 Description Motor Cover Trim M5 x 15 Bolt Motor Cover True Fitness Technology • O’Fallon, MO • Phone: 800-426-6570/636-272-7100 • Truefitness.
Cardio 950 CHAPTER 2: ASSEMBLY GUIDE ASSEMBLY STEPS: Step 6 (Console Rack Cable Connections): Connect the AUXPS (Auxillary Power Supply), I/O (Input/Output), COMM, and COAX cables as shown below. True Fitness Technology • O’Fallon, MO • Phone: 800-426-6570/636-272-7100 • Truefitness.
Cardio 950 CHAPTER 2: ASSEMBLY GUIDE ASSEMBLY STEPS: Step 7 (Handrail Assemblies): Secure the Left and Right Handrail Assemblies to the Console Rack using the identified hardware as shown below. Item 1 2 3 4 Part Number 7TC4018R 7RT0011 7TCS4028 7TC4018L Description Right Handrail Assembly M8 Washer M8 x P1.25 x 80 Bolt Left Handrail Assembly True Fitness Technology • O’Fallon, MO • Phone: 800-426-6570/636-272-7100 • Truefitness.
Cardio 950 CHAPTER 2: ASSEMBLY GUIDE ASSEMBLY STEPS: Step 8 (Shoulder Top Assemblies): Secure the Left and Right Shoulder Top Assemblies to the Console Rack using the identified hardware as shown below. Item 1 2 3 Part Number 7TC4023LBK 7TCS4029 7TC4023RBK Description Quantity Left Shoulder Top Assembly 1 M4 x P0.7 x 10 Bolt 6 Right Shoulder Top Assembly 1 True Fitness Technology • O’Fallon, MO • Phone: 800-426-6570/636-272-7100 • Truefitness.
Cardio 950 CHAPTER 2: ASSEMBLY GUIDE ASSEMBLY STEPS: Step 9 (Shoulder Bottom Assemblies): Secure the Left and Right Shoulder Bottom Assemblies to the Console Rack using the required hardware as shown below. Item 1 Part Number 7TC4022LBK 2 7TC4022RBK 3 7TCS4029 Description Left Shoulder Bottom Assembly Right Shoulder Bottom Assembly M4 x P0.7 x 10 Bolt True Fitness Technology • O’Fallon, MO • Phone: 800-426-6570/636-272-7100 • Truefitness.
Cardio 950 CHAPTER 2: ASSEMBLY GUIDE ASSEMBLY STEPS: Step 10 (Console Mast): Secure the selected console to the Console Mast using the required hardware as shown below. Item 1 Part Number 7TCS4029 Description M4 x P0.7 x 10 Bolt Quantity 4 Note: Refer to the respective console manual included with your console for wiring connections. True Fitness Technology • O’Fallon, MO • Phone: 800-426-6570/636-272-7100 • Truefitness.
Cardio 950 CHAPTER 2: ASSEMBLY GUIDE ASSEMBLY STEPS: Step 11 (Rear Console Cover Assembly): Secure the Rear Console Cover Assembly to the Console Mast using the required hardware as shown below. Item 1 2 Part Number 7TCS4029 7TC4033BK Description M4 x P0.7 x 10 Bolt Rear Console Cover Assembly True Fitness Technology • O’Fallon, MO • Phone: 800-426-6570/636-272-7100 • Truefitness.
Cardio 950 CHAPTER 2: ASSEMBLY GUIDE ASSEMBLY STEPS: Step 12 (Power Cord Installation): Insert Power Cord into Power Inlet shown to the right. POWER SWITCH: — = ON, O = OFF CIRCUIT BREAKER: In the event the current drawn by the treadmill exceeds a specified value, the Circuit Breaker portion of the power on/off switch will operate. The rocker lever will automatically release and position itself to a position half way between on and off, thus opening the power circuit.
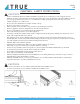
Cardio 950 CHAPTER 2: ASSEMBLY GUIDE ASSEMBLY STEPS: Step 13 (Unit Leveling): Ensure treadmill incline rack wheels and rear feet are resting on the floor and not on cardboard, packaging, etc. Using a 15/16 inch open end wrench, loosen nut A on Right Rear Foot (only side adjustable). Using a level or estimating by sight, turn section B of foot clockwise, or counter-clockwise, using a 7/8 inch open end wrench to level the rear of treadmill. Tighten nut A until it is secured against bottom of treadmill.
Cardio 950 CHAPTER 2: ASSEMBLY GUIDE ASSEMBLY STEPS: Step 14 (Attach Safety Key): Unwind safety key and cord from plate. Note: The safety key and attachment cord are wrapped around plate during shipping as shown. Attach Safety Key magnet to front of Center Pod as shown. Attach Safety Key clip to plate located on Console Rack (when not working out). Attach clip to clothing at the beginning of any workout. CAUTION: Read treadmill Owner’s Manual before attempting any workout.
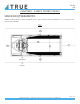
Cardio 950 CHAPTER 3: PRODUCT OVERVIEW Quick Access Keys Contact Heart Rate Pad Contact Heart Rate Pad Safety (E-Stop) Key Console Assembly Straddle Covers Belt Belt Adjustment Bolts Leveling Feet Communication and Coaxial Ports On/Off Switch, Circuit Breaker, and Power Cord True Fitness Technology • O’Fallon, MO • Phone: 800-426-6570/636-272-7100 • Truefitness.
Cardio 950 CHAPTER 3: PRODUCT OVERVIEW Console Assembly: The console allows the user to set up a workout program and control the treadmill during a workout (For console overview and operation instructions refer to the respective console manual). Quick Access Keys: Allows the user to quickly start, stop and wake the treadmill or make fast, convenient adjustments to the incline level or speed of the treadmill.
Cardio 950 CHAPTER 4: CARE & MAINTENANCE CARE & MAINTENANCE: It is important to perform the minor maintenance tasks described in this section. Failure to maintain the treadmill as described here could void the TRUE Fitness Warranty. To reduce the risk of electrical shock, always unplug the unit from its power source before cleaning or performing any maintenance tasks. Inspection: TRUE Fitness is not responsible for performing or scheduling regular maintenance or inspections.
Cardio 950 CHAPTER 4: CARE & MAINTENANCE RUNNING BELT ALIGNMENT: Proper belt alignment allows the belt to remain centered and ensures smooth operation. Realigning the belt takes a few simple adjustments. If you are unsure about this procedure, call the TRUE Service Department. CAUTION: Special care must be taken when aligning the running belt. Turn off the treadmill while adjusting or working near the rear roller. Remove any loose clothing and tie back your hair.
Cardio 950 CHAPTER 4: CARE & MAINTENANCE If the running belt is too far to the left side: • • • • • Locate the belt adjustment bolts in the rear end caps of the treadmill. (To determine left and right, stand at the rear of the Using the appropriate size Allen wrench or socket turn the LEFT turn. Turn the treadmill on and start the belt at 3mph keeping off the Allow 2 minutes for the belt to adjust itself. Repeat the above steps if additional adjustment is necessary.
Cardio 950 CHAPTER 4: CARE & MAINTENANCE LEVELING THE EQUIPMENT: This equipment has adjustable front leveling feet to make sure that the running surface is level. If the unit is placed on an uneven surface, adjusting the front feet can help, but may not completely compensate for extremely uneven surfaces. OTHER SCHEDULED PREVENTIVE MAINTENANCE: TRUE recommends that quarterly scheduled maintenance be performed by a qualified service technician. Please contact your dealer or visit www.truefitness.
Cardio 950 CHAPTER 5: CUSTOMER SERVICE CONTACTING SERVICE: TRUE Fitness recommends that you gather the serial number, model number, and a brief description of the reason for the request. After information has been gathered you may choose to contact your selling dealer or local service company to set an appointment. (If you are not familiar with who is in your area, you may visit our website at www.truefitness.com and use our dealer locator to obtain the contact information for the closest dealer).
Cardio 950 CHAPTER 5: CUSTOMER SERVICE REPORTING FREIGHT OR PARTS DAMAGE: Unfortunately, sometimes materials can be damaged during shipment. If materials are damaged during shipment, please follow the guidelines below to determine the appropriate process for you to follow in case of damages. Severe Damage: Obvious damage to external packaging / internal product. Please refuse the shipment and it will be returned to TRUE Fitness by the carrier.
XL-2037B FAN XL-1915 12V DC power GREEN XL-1505A centerpod keys J18 USB J3 XL-1913 XL-2006 J15 True Fitness Technology • O’Fallon, MO • Phone: 800-426-6570/636-272-7100 • Truefitness.
Cardio 950 CHAPTER 6: ADDITIONAL INFORMATION TROUBLESHOOTING GUIDE: This troubleshooting guide is intended to assist in diagnostics only and is not all inclusive. Technical specifications, error codes and programming are subject to change without notice. TRUE accepts no liability for any damage or loss suffered by persons whom rely wholly or in part on any description or statement contained within this manual. Please visit www.TRUEfitness.
Cardio 950 CHAPTER 6: ADDITIONAL INFORMATION Malfunction Possible Cause Corrective Action Transmitter belt contacts are not making good contact Re-adjust the transmitter belt so that it is in full with the skin contact with the skin Moisten the contacts on the transmitter belt Contacts on the transmitter belt are not moist Adjust your position on the belt so that you are within 3 feet (1 meter) of the console Replace the transmitter belt with a The battery inside the transmitter belt is depleted comp
Cardio 950 CHAPTER 6: ADDITIONAL INFORMATION Fault CN03: Console Stuck Key Fault CN04: Lower Board Console Comm Fault (Treadmill Only) Fault CN05: No Lower Control Console Fault CN06: Config Mismatch Console Fault CN07: Calibration Timeout Console Fault CN08: Calibration Failed Lower Limit Not Reached Console Fault CN09: Insert Safety Console Key Fault CN10: Console E-Stop Fault Fault CN24: BB Comm Fault Fault CN25: Firmware Mismatch Console Membrane Key stuck down/closed Brainboard fails to r
Cardio 950 CHAPTER 6: ADDITIONAL INFORMATION Fault SP01: Belt Under Speed Fault SP02: Belt Over Speed Fault SP03: Belt Over Accel Fault SP04: No Speed Signal Speed Tread motor rpm is below target rpm High Belt Deck Friction Lubricate treadbelt High Belt Tension Contact dealer or TRUE service Low Line Voltage Check drive belt and walking belt tension Dirty or misaligned speed sensor Contact dealer or TRUE service High Belt Deck Friction Speed Speed Speed Tread motor rpm is higher than targe
Cardio 950 CHAPTER 6: ADDITIONAL INFORMATION Fault IN04: Incline Max/Min Fault D100: Motor Controller Fault Incline Incline value is out of expected operating range - may indicate that it is disconnected.
Cardio 950 CHAPTER 6: ADDITIONAL INFORMATION Fault D109: Motor Controller Zero Current Fault D110: Motor Controller Overcurrent DC MCB DC MCB Low Incoming AC Voltage High Incoming AC Voltage Power cycle Low AC Line Voltage Contact dealer or TRUE service High AC line voltage Check AC line voltage Power cycle Motor Control Board High belt/deck friction Fault D111: Motor Controller Voltage Overload Fault D112: Motor Controller Undervoltage Fault D113: Motor Controller Control Fault Contact deale
Cardio RESIDENTIAL LIMITED WARRANTY 950 950 TREADMILL CHAPTER 7: WARRANTY INFORMATION Save Time and Register Online! Activate Multiple Warranties at truefitness.
Cardio RESIDENTIAL LIMITED WARRANTY 950 950 TREADMILL CHAPTER 7: WARRANTY INFORMATION Save Time and Register Online! Activate Multiple Warranties at truefitness.com 1. THIS LIMITED WARRANTY GIVES YOU SPECIFIC LEGAL RIGHTS AND YOU MANY ALSO HAVE OTHER RIGHTS, WHICH VARY FROM STATE TO STATE. 2.
Cardio RESIDENTIAL LIMITED WARRANTY 950 950 TREADMILL CHAPTER 7: WARRANTY INFORMATION Thank you for purchasing a TRUE product. To validate the TRUE product warranty the fast and easy way, please go on-line now to truefitness.com and register your product. The information you provide will never be distributed to any other individuals or agencies for any purpose.