Caravan Mover II Version M1 Operating instructions Installation instructions To be kept in the vehicle! Truma Gerätetechnik GmbH & Co. KG Wernher-von-Braun-Straße 12 85640 Putzbrunn (Germany) Service (UK and Eire) Service (international) Telephone: (01283) 52 82 01 Facsimile: (01283) 52 82 02 Telefon Telefax +49 (0)89 4617-2142 +49 (0)89 4617-2159 sales@trumauk.com www.trumauk.
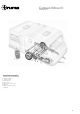
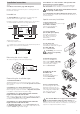
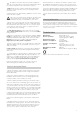
Caravan Mover II Version M1 Installation example 1 2 3 4 5 6 7 Remote handset Toggle crank Drive motor Drive roller Electronic control unit Battery Cross actuation device (Option) B
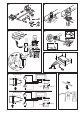
B A B c A c M ov er D C F a b View from Top B G + E Ø 25 mm B 4 3 2 1 + - 40 cm + A A + + red - – black - A A 4 3 2 1 + + - 40 cm View from Top B B + red + C + - – black
Operating instructions Always observe the operating instructions and „Safetyrelated instructions“ prior to starting! The vehicle owner is responsible for correct operation of the appliance. l Do not leave sensitive items such as cameras, personal stereo’s ect close to the Mover control box or motor cables in the bedding locker’s. The strong electromagnetic fields may cause them damage. l The empty weight of the vehicle increases by the weight of the Movers, which reduces the payload of the vehicle.
. After starting up, the Mover moves at one speed only. The speed will increase a little when going downhill and decrease a little when going uphill. 6. Move slide switch on remote control to the „Off” £ position to switch the remote control and the Mover off. The slide switch also acts as an „Emergency stop” switch. 7. After manoeuvring, apply the handbrake first and then disengage the drive rollers from the tyres. Hitching to a tow car 1.
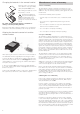
Changing the batteries in the remote handset Please be sure to use leak proof micro-batteries only, type LR 03, AAA, AM 4, MN 2400 (1.5 V). When fitting new batteries ensure the polarity is correct! Dead and used batteries may leak and damage the remote handset! Remove the. batteries if the handset is not going to be used for an extended period. No claims under guarantee will be considered for damage caused by leaking batteries.
Installation instructions 5. Installation on a chassis with L- and U-profiles with frame height of less than 140 mm On a chassis with a frame height (Y) of less than 140 mm a low chassis kit must be fitted to compensate the height. & Please fold out the page with diagrams! Read the installation instructions prior to starting work and follow them carefully! In Germany, the low chassis kit installation must be accepted by a vehicle expert. 6.
Approval When installing the Mover always observe the technical and administrative rules and regulations of the country in which the vehicle is to be registered for the first time. Any modification to the unit, or the use of spare parts and functionally-important accessories which are not original Truma components, or failure to respect the installation and operating instructions, will lead to the cancellation of the guarantee and to exclusion of claims for liability.
The battery connection cables may not be lengthened. The connecting cables to the motor and the battery must be separate and must not be routed via the relay box. 8. Ensure that there no obstacles around the caravan, release the handbrake and switch the remote control on. Now check all functions several times according the operating instructions. 1. Fig. F: Attach relay controller (installed horizontally with antenna in a vertical position) to floor of stowage box with provided screws. 9.
R&TTE Declaration of Conformity (DoC) We, Truma Gerätetechnik GmbH & Co. KG Wernher-von-Braun-Str.
International-Service Holzer-Caravan Klagenfurt, Ehrentaler Straße 33, 9020 Klagenfurt, Tel./Fax 0043 (0)463 433 57, Mobil (0)664 140 61 40 Bachner Wohnwagen & Reisemobile GmbH, Werner-Gröbl-Straße 3, 8501 Lieboch, Tel. 0043 (0)3136 625 25, Fax 0043 (0)3136 625 25 10 Egger Camping-Service, Bachzeile 12, 8940 Liezen, Tel./Fax 0043 (0)664 401 51 83, Mobil (0)664 401 51 83 Virág Trans Bt., újhegyi út 7, 1108 Budapest, Tel.
Quality with tradition Truma was founded in 1949. This middle-sized family concern is today Europe's leading manufacturer of gas heating systems for motor vehicles.
✂ Warranty Card Garantie-Karte Bon de Garantie Certificato di Garanzia Garantiebon Garantikort Tarjeta de garantía ✂
To be filled in by the dealer Vom Händler auszufüllen A remplir par le commerçant Da far compilare dal rivenditore Door de dealer in te vullen. Udfyldes af forhandleren. A ser rellendada por el commerciente. Warranty Card Garantie-Karte Bon de Garantie Certificato di Garanzia Garantiebon Garantikort Tarjeta de garantía Version M1 Serial number Fabrik-Nummer No. de fabrication No.