
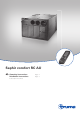
Product Manual
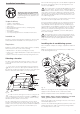

6
The time always appears on the display.
The time must be reset after changing the batteries or after a
daylight saving time change.
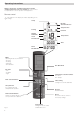
Timer ON / OFF
The On / Off time of the air conditioning system can be set
in advance for a minimum of 15minutes to a maximum of
24 hours, starting from the current time, using the integrated
timer
The device must be switched on using the remote control in
order to program it.
Set required operating mode and room temperature.
Then select TIMER ON or TIMER OFF using the “TIMER se-
lection buttons”. Set the required On / Off time using the
“Time setting” buttons (15 minutes to 24 hours) and con-
firm with TIMER ON or TIMER OFF.
Pressing the relevant timer button again deactivates the timer
function.
Reset
Resets the settings of the remote control to the factory set-
tings when pressed using a ballpoint pen, for example. Setup
symbol flashes.
Resend
The previous settings are resent.
Setup
Tune the remote control to the air conditioning system that is
going to be operated. Settings set to “Circulated air”, fan level
low, no timer set.
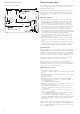
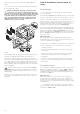
Maintenance
There is a fluff filter (n) and a particle filter (p) on the front of
the device for cleaning the room air.
p
n
s
k
Fig. 5
The fluff filter (n) must be cleaned at regular intervals (at least
2x per annum) and changed if required (part no. 40090-64600).
We recommend replacing the particle filter (p) every year at
the beginning of the season (part no. 40090-58100).
The cold air ducts must be removed before replacing the fil-
ters. Before replacing the fluff filter (n), release the clip (k) and
the sensor (s) using a flat-bladed screwdriver. Pull the fluff
filter (n) a little way forward at the recesses at the top edge
and remove from above. Then remove particle filter (p) from
the front. Re-fit the clip and the sensor in the same position
during assembly.
Fig. 6
When installing the particle filter (p) the printed arrows
must point towards the device – they indicate the circu-
lated air flow direction. Never operate the device without
filters. Operating the device without filters can cause evapo-
rator coil soiling, which can have a detrimental effect on the
performance of the device!
The condensation drain is beneath the floor of the vehicle. In
order to allow the condensation to drain away freely, check
whether the drain is free of dirt, leaves and the like at regular
intervals. Failure to do this may allow condensation to
penetrate the vehicle!
Troubleshooting
Is the motor home / caravan 230 V power supply lead prop-
erly connected, and are the fuses and circuit breakers OK?
Fault Cause / Remedy
Device not cooling – Thawing process in progress
/ wait until thawing process is
complete.
– The temperature set on the re-
mote control has been reached
/ set temperature on remote
control to less than room
temperature.
Device not heating – Thawing process in progress
(outside temperature between
4 °C – 7 °C) / adjust fan to lower
setting
– Outside temperature below 4 °C
Device providing insuf-
ficient cooling or no
cooling at all
– Filters soiled / change filters
– External air routes soiled,
blocked / clear air routes
Moisture at cold air
ducts
– High air humidity / close win-
dows and doors and select high
fan level
Remote control
not working
– Check batteries in remote
control / replace batteries if
necessary
Device not reacting
to remote control
commands
– Check whether there are ob-
structions between the remote
control and the IR receiver / re-
move obstructions if necessary
– Is the remote control tuned to
the IR receiver? / tune remote
control to IR receiver
If these actions fail to remedy the fault, please contact
Service Australia.