
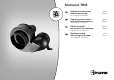
Operation Manual


6
Installation and repair of the Truma Multivent fan may
only carried out by an expert.
When using control panels which are specific to the
vehicle or manufacturer, the electrical connection
must be effected in accordance with Truma interface
specifications.
For connection of the fan with air duct ÜR 65 mm dia.
to the installation box EKM or the rear panel with heat
deflector, a intake nozzle DM (fig. D: part no. 40670-00) is
required.
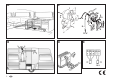
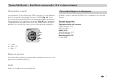
1. fig. C
Fix the fan (1) with two screws (2) to the floor, to the wall, to
the ceiling etc. (the fan works in all posi tions).
2. Push the ducts ÜR 65 mm dia. for the warm air distribu-
tion into the connection fittings and fasten with self tapping
screws (3).
3. Choose a place for the control panel (5) in a position which
is easy to view.
If flush mounting is not possible, Truma will supply an
on-surface frame (7 – part no. 40000-52600) as an
accessory on request.
4. Lay the cable (4) from the fan (1) to the place intended for
the operating unit (5). If required, use a cable 3 x 0.75 mm² as
an extension.
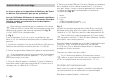
5. Drill a 55 mm diameter hole. Feed the connection cable
from the fan (4) and 12 V lead (9) from behind through the
hole in the wall, and connect it to the operating unit in accord-
ance with the connection diagram (fig. E).
1 = white
2 = brown
3 = green
– = negative lead
+ = positive lead 12 V
Fig. C
Fit the rear cover cap (8) as a stress-relieving device, then se-
cure the control panel (5) with 4 screws (10) and fit the cover
frame (6).
Truma offers side parts (11) in eight different colors for
finishing the cover frames (6) in a visually pleasing way.
Please ask your dealer.
Connect fan to fused vehicle power supply (central electrical
system 5 – 10 A) using a cable 2 x 0.75 mm². When connect-
ing directly to the battery, always fuse the positive and nega-
tive lead.
Secure all cables with cable clips.
When power supplies are being used, it must be noted
that the output voltage is between 11 V and 15 V and the
alternating current ripple is < 1.2 Vss.
Function test
After installation, check all the functions in accordance with
the Operating Instructions.
The operating instructions must be handed over to the user!
Installation instructions